
HarmonyOS SDK Integration Guide
Usage tips
This article is JPush HarmonyOS SDK Standard integration guide document. for guidance SDK By default, readers are already familiar with the usage of DevEco Studio basic usage methods, as well as having certain HarmonyOS Basic programming knowledge.
This guide matches JPush HarmonyOS SDK The version is:1.1.0 and later versions.
Currently supported HarmonyOS API 12 and above.
JPush Documentation website Up, there isJPushAll related guides,API, tutorials and all other documents. Updated versions, including those of this document, will be posted to this website in a timely manner.
Product function description
JPush(JPush) is an end-to-end push service that enables server-side messages to be pushed to end-user mobile phones in a timely manner, allowing developers to actively maintain connections with users, thereby increasing user activity and application retention.JPushClient support Android,iOS,HarmonyOS,QuickApp Multiple platforms.
Book HarmonyOS SDK Convenient for developers based on JPush to quickly HarmonyOS App Add push function.
Main functions
- Maintain a long connection with the server so that messages can be pushed to the client instantly
- Receive notifications and send notifications to developers App convey relevant information
Main features
- The client maintains a connection that takes up less resources and consumes less power.
- SDK Rich interface, customizable notification bar prompt style
- The server has large capacity and is stable
Integration method
Automatic integration
har rely
Description: In entry under module oh-package.json5 File addition
          "dependencies": {
    "@jg/push": "x.x.x"//填写对应版本号,如:"@jg/push": "1.3.0"
}
Note 2: NowharIt is bytecode and needs to be upgraded.idearrive5.0.3.500above, and at the engineering level (outermost layer)build-profile.json5, configuration"useNormalizedOHMUrl": true
              "products": [
      {
        "buildOption": {
          "strictMode": {
            "useNormalizedOHMUrl": true//打开
          }
        },
        "name": "default",
        "signingConfig": "default",
        "compileSdkVersion": "5.0.0(12)",
        "compatibleSdkVersion": "5.0.0(12)",
        "runtimeOS": "HarmonyOS"
      }
    ]
Manual integration
Integrated compressed package download link:Go to download, integrate the contents of the compressed package
jpush-hmos-x.x.x-release.zip Integrated compressed package contents
jpush-hmos-x.x.x-release.har
- JiguangCore package for developer services.
doc
- document
entry
- is a hmos demo Project code, demonstrated through this JPush SDK The basic usage can be used as a reference.
har File integration
- Unzip jpush-hmos-x.x.x-release.zip Integrated compressed package.
- copy jpush-hmos-x.x.x-release.har to your project entry/hars/ directory. (harsThis directory can be customized)
Description: Associationjpush-hmos-x.x.x-release.har, for example, you copy har arrive entry/hars/ directory, then in entry under module oh-package.json5 File addition
          "dependencies": {
    "jg_harmony_har": "./hars/jpush-hmos-x.x.x-release.har" //这里的路径是你存放jpush-hmos-x.x.x-release.har的位置
}
Note 2: NowharIt is bytecode and needs to be upgraded.idearrive5.0.3.500above, and at the engineering level (outermost layer)build-profile.json5, configuration"useNormalizedOHMUrl": true
              "products": [
      {
        "buildOption": {
          "strictMode": {
            "useNormalizedOHMUrl": true//打开
          }
        },
        "name": "default",
        "signingConfig": "default",
        "compileSdkVersion": "5.0.0(12)",
        "compatibleSdkVersion": "5.0.0(12)",
        "runtimeOS": "HarmonyOS"
      }
    ]
Configuration hmosPlatform information
If you want to push the function, you need to configure it HarmonyOS Platform information
The main steps are:
exist hmos The platform obtains the information corresponding to the application under the project. client_id(Note that it is not a projectclient_id)
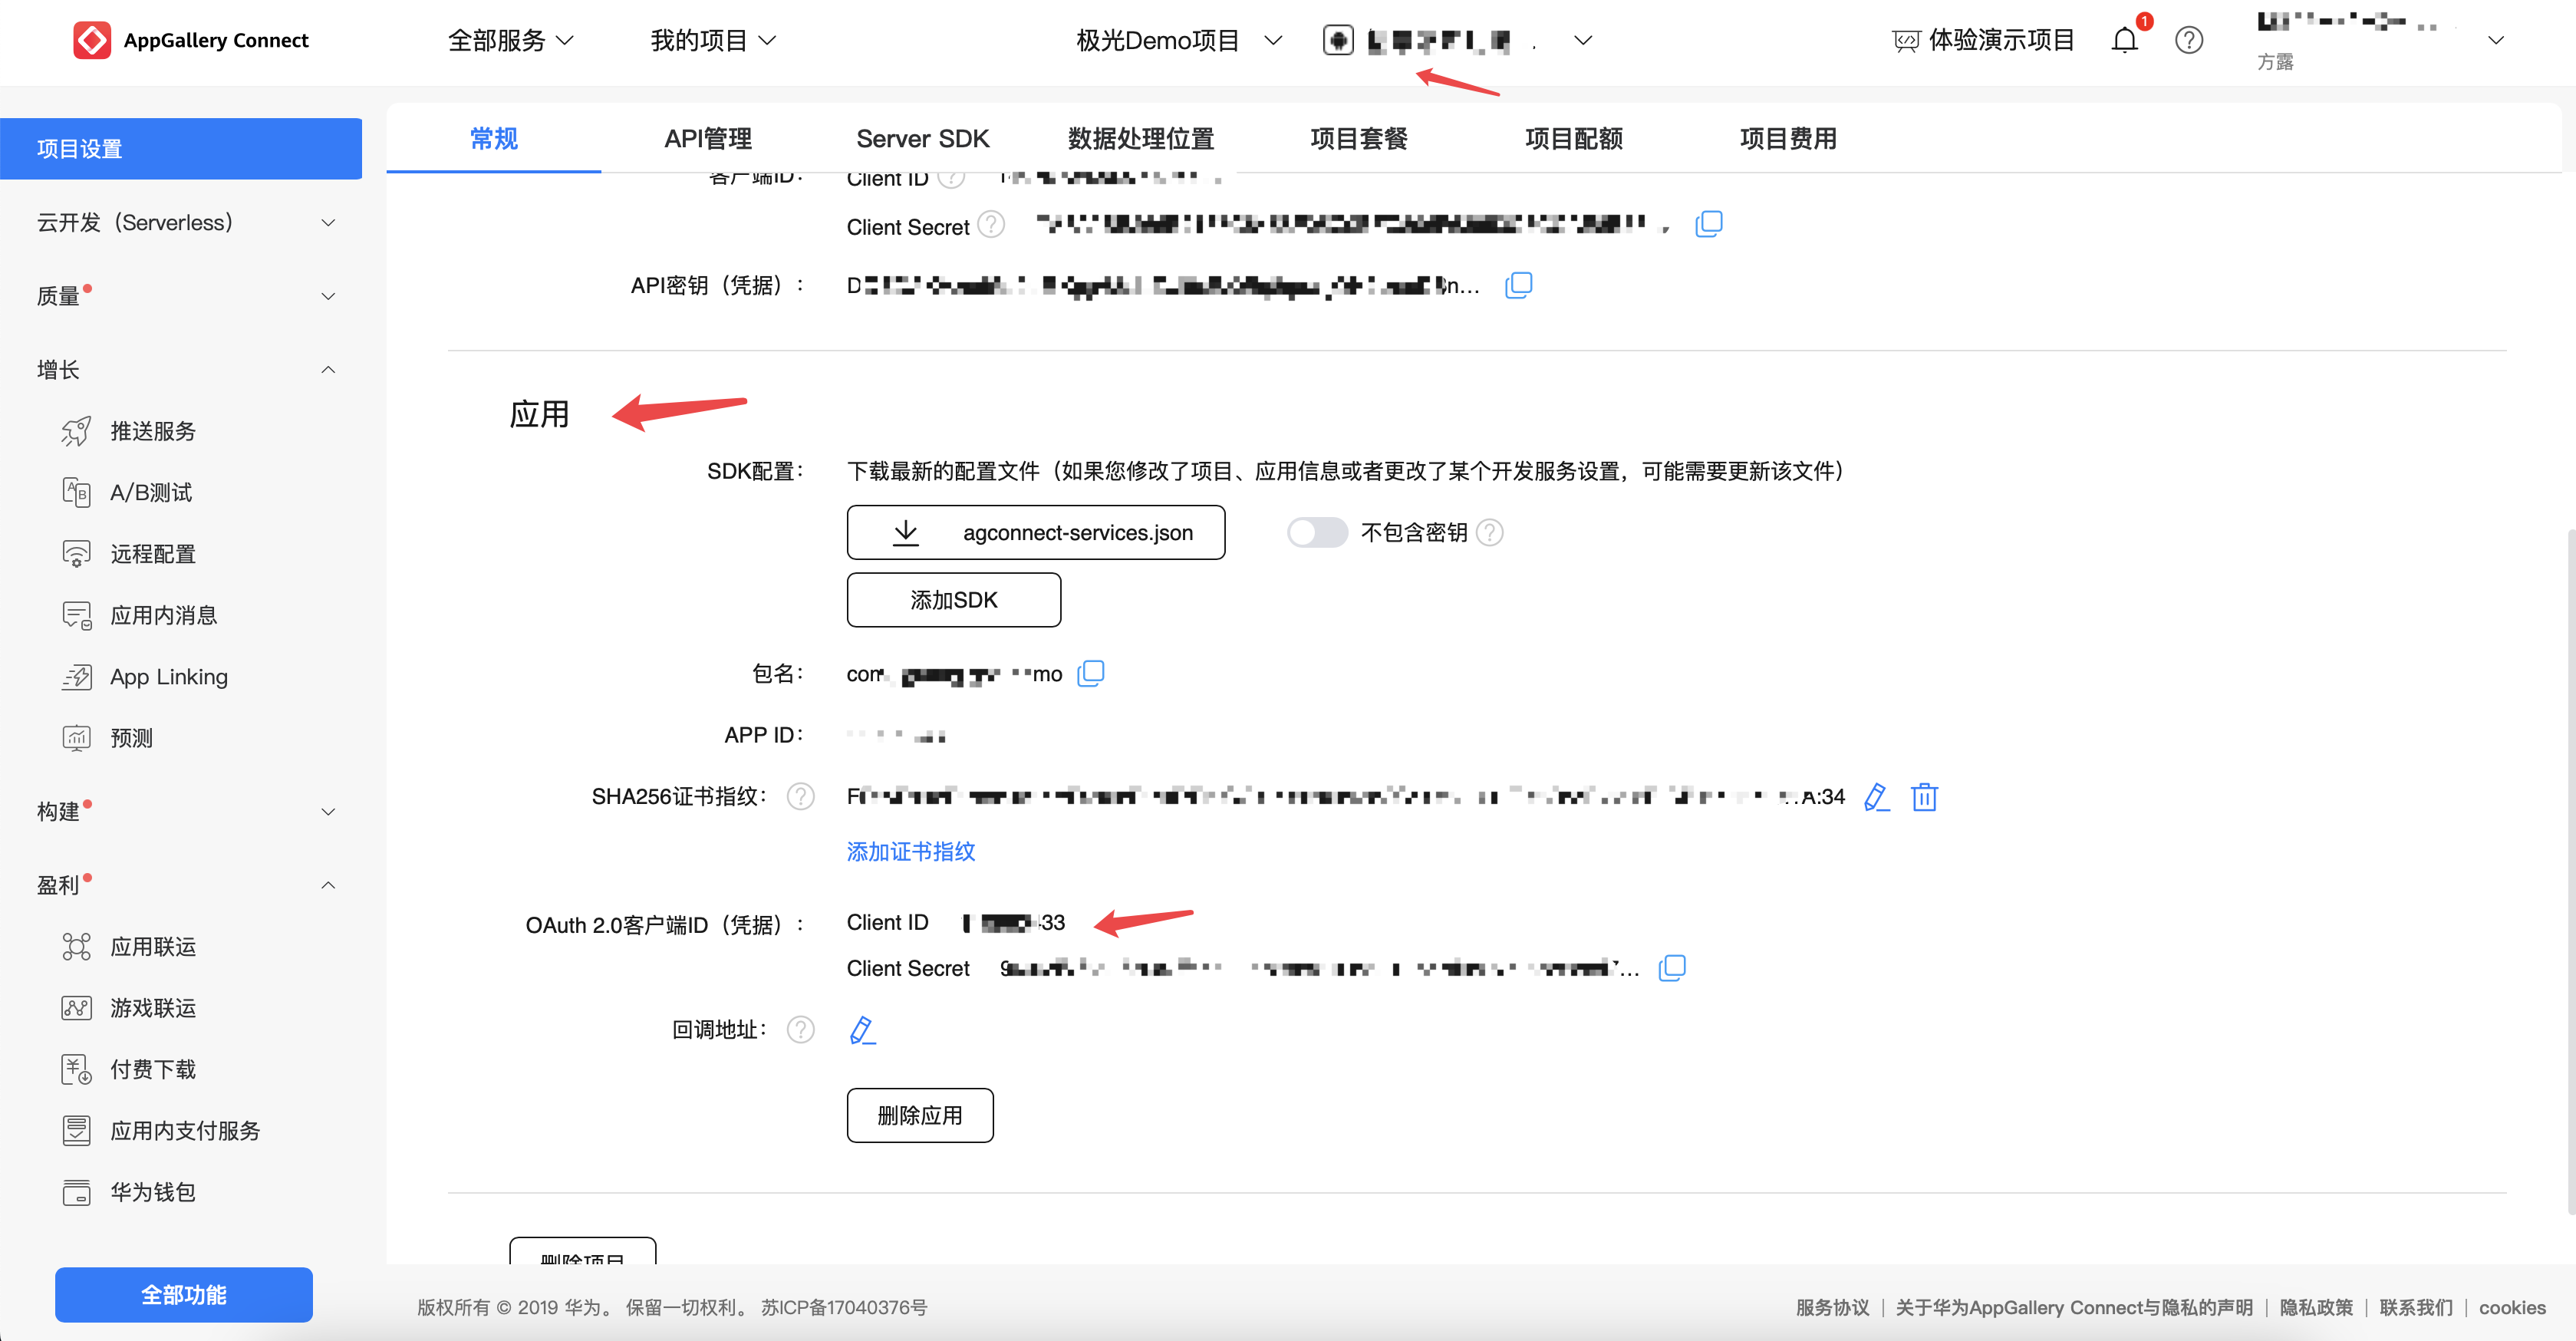
Special note: after the Hongmeng application is created, you must remember to configure the application "SHA256Certificate/Public Key Fingerprint": Click "SHA256Certificate/Public Key Fingerprint" after "Add Public Key Fingerprint (HarmonyOS API 9 and above)" as described below"Configuration Signing"。
existhmosPlatform launches push service
Configure application in local project client_id
illustrate:
Local project configuration application client_id, need to be in entry under module module.json5 File addition
"module": { "metadata": [ { "name": "client_id", "value": "你的id" } ] }"module": { "metadata": [ { "name": "client_id", "value": "你的id" } ] }This code block is shown in the floating windowConfiguration signing
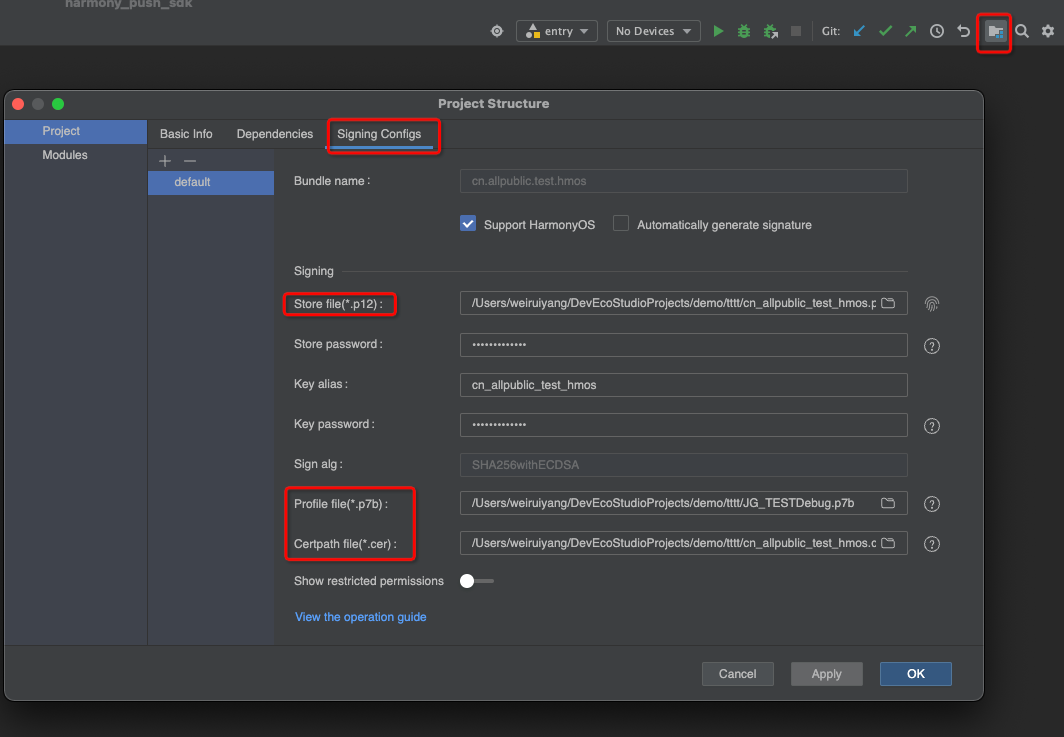
Step 1: Prepare to Sign Documents
Step 2: Apply for a publishing certificate
https://developer.huawei.com/consumer/cn/doc/app/agc-help-add-releasecert-0000001946273961
Step 3: Apply for publicationProfile,ProfileThe format is.p7b
https://developer.huawei.com/consumer/cn/doc/app/agc-help-add-releaseprofile-0000001914714796
Step 4: Sign in the local project configuration, as shown in the figure
ConfigurationJiguangPlatform information
After completing the above steps, you still need to configureJiguangPlatform information
The main steps are:
- existJiguangCreate an application on the platform and ensure the following two information: package name and appKey,andJiguangThe platform is consistent.
Note 1:
Configure the package name in the local project by: AppScope under engineering app.json5 File addition
{ "app": { "bundleName": "你的包名", } }{ "app": { "bundleName": "你的包名", } }This code block is shown in the floating windowNote 2:
Configure in local projectJiguangappKey(JiguangThe application ID automatically generated after the console creates the application), code configuration such as:
export default class MyAbilityStage extends AbilityStage { onCreate() { JPushInterface.setAppKey("你的appKey") //在init之前调用 } }export default class MyAbilityStage extends AbilityStage { onCreate() { JPushInterface.setAppKey("你的appKey") //在init之前调用 } }This code block is shown in the floating windowNote 3:
Configure the local project to receive callback information, code configuration such as:
export default class MyAbilityStage extends AbilityStage { onCreate() { JPushInterface.setCallBackMsg(继承CallBackMsg的实体类) //接收回调信息,在init之前调用 } }export default class MyAbilityStage extends AbilityStage { onCreate() { JPushInterface.setCallBackMsg(继承CallBackMsg的实体类) //接收回调信息,在init之前调用 } }This code block is shown in the floating window
Configure notification jump page
Notification supports jumping to specified page
passurisTo match the page:
- uris,passuriTo match the page, when pushing url=yoursscheme://yourhost:yourport/yourpath
- Notice:urisWay,actions Must be configured as an empty string
                {
        "exported": true,
        "skills": [
          {
            "actions": [""], //actions一定要配置为空字符串
            "uris": [
              {
                "scheme": "你的scheme",
                "host": "你的host",
                "port": "你的port",
                "path": "你的path"
              }
            ]
          }
        ]
      }
passactionsTo match the page:
- actions passactionsto match the page,actionsFill in your corresponding value when pushingactions=yoursactions
                {
        "exported": true,
        "skills": [
          {
            "actions": ["你的actions"],
          }
        ]
      }
Apply to turn on the notification switch
If the notification switch is not turned on, you will not receive notifications
The main steps are:
- Apply on the home page
          export default class EntryAbility extends UIAbility {
  onCreate(want: Want, launchParam: AbilityConstant.LaunchParam): void {
    notificationManager.requestEnableNotification().then(() => {
      hilog.info(0x0000, TAG, '%{public}s', `requestEnableNotification success`);
    }).catch((err: Base.BusinessError) => {
      hilog.error(0x0000, TAG, '%{public}s', `requestEnableNotification failed, code is ${err.code}, message is ${err.message}`);
    });
  }
}
Configure custom information
If you need to process custom messages sent through Hongmeng Channel, you need to configure it according to the following steps:
step one
- In the project module level directory src/main/resources/base/profile/ Created under PushMessage.json file, the contents of the file are as follows:
          {
  "path": "pushmessage/t_push_message",
  "type": "rdb",
  "scope": "application"
}
path: The fixed value is pushmessage/t_push_message, indicating database and table names.
type: The fixed value is rdb, represents a relational database.
scope: Indicates the scope of the database, which can be filled in application(application level) ormodule(hapmodule level).
And, in the project module level directory src/main/module.json5 File addition proxyData Configuration as follows:
          {
  "module": {
    "proxyData":[{
      "uri": "datashareproxy://{bundleName}/PushMessage",
      "requiredWritePermission": "ohos.permission.WRITE_PRIVACY_PUSH_DATA",
      "metadata":{
        "name": "dataProperties",
        "resource": "$profile:PushMessage"
      }
    }]
  }
}
- uri: The fixed format is datashareproxy://{bundleName}/PushMessage, please replace {bundleName}replace with your app'sbundleName,PushMessageThis is a fixed name, please do not change it at will.
- requiredWritePermission: The fixed value is ohos.permission.WRITE_PRIVACY_PUSH_DATA, the push service needs to use this permission to write to the databaseBACKGROUNDmessage data.
- metadata: extended configuration,nameThe fixed value isdataProperties,resourceThe fixed format is$profile:File name, the file name is fixed toPushMessage。
Step 2
- in your projectability(belowPushMessageAbilityFor example) import withinpushmodule,
- Note that you can only useUIAbilitytake overBACKGROUNDinformation.
          import { UIAbility } from '@kit.AbilityKit';
import { JPushInterface } from '@jg/push';
import { pushCommon, pushService } from '@kit.PushKit';
import { hilog } from '@kit.PerformanceAnalysisKit';

const TAG: string = 'JPUSH-JLog-PushMessageAbility'
export default class PushMessageAbility extends UIAbility {
  onCreate(): void {
    try { // receiveMessage中的参数固定为BACKGROUND-------后台自定义信息接收
      pushService.receiveMessage('BACKGROUND', this, async (data: pushCommon.PushPayload) => {
        let jg = await JPushInterface.customMessageBackgroundData(data)
        if (jg) { //如果是true为已经处理
          return
        }
      });
    } catch (e) {
      hilog.info(0x0000, TAG, '%{public}s', 'BACKGROUND fail:'+JSON.stringify(e));
    }
}
- Moreover, in the project engineering src/main/module.json5DocumentaryabilitiesConfiguration in moduleskillsmiddleactionsThe content isaction.ohos.push.listener(There is and can only be oneabilitydefine theaction, if added at the same timeurisparameters, thenurisThe content needs to be empty).
          "abilities": [
      {
        "name": "PushMessageAbility",
        "srcEntry": "./ets/entryability/PushMessageAbility.ets",
        "launchType": "singleton",
        "startWindowIcon": "$media:icon",
        "startWindowBackground": "$color:start_window_background",
        "skills": [
          {
            "actions": [
              "action.ohos.push.listener"
            ]
          }
        ]
      }
]
Configure notification extension messages
If there is a need for notification extension messages, the following configuration is required
The main steps are:
step one
- If the process does not exist, this process (notification extension process) will be followed. In this process, you complete the voice broadcast business processing by yourself and return specific message content (such astitle、bodyetc.) after overwriting the current message content,Push KitA notification will pop up.
- Create aExtensionAbilityComponents of type and inherit fromRemoteNotificationExtensionAbility,FinishonReceiveMessage() Method override, callJPushInterface.receiveExtraDataMessageMethod to obtain data, the code example is as follows:
          import { pushCommon, RemoteNotificationExtensionAbility } from '@kit.PushKit';
import { hilog } from '@kit.PerformanceAnalysisKit';
import { JPushInterface } from '@jg/push';

const TAG: string = 'JPUSH-JLog-RemoteNotificationExtAbility'

export default class RemoteNotificationExtAbility extends RemoteNotificationExtensionAbility {
  async onReceiveMessage(remoteNotificationInfo: pushCommon.RemoteNotificationInfo): Promise<pushCommon.RemoteNotificationContent> {
    hilog.info(0x0000, TAG, 'onReceiveMessage, remoteNotificationInfo: %{public}s',
      JSON.stringify(remoteNotificationInfo));
    let jMessageExtra = await JPushInterface.receiveExtraDataMessage(this, remoteNotificationInfo);
    hilog.info(0x0000, TAG, 'onReceiveMessage jMessageExtra:' + JSON.stringify(jMessageExtra));
    return {}//如果要修改通知可以反回有数据通知
  }

  onDestroy(): void {
    hilog.info(0x0000, TAG, 'RemoteNotificationExtAbility onDestroy.');
  }
}
Moreover, in the project engineeringsrc/main/module.json5DocumentaryextensionAbilitiesConfiguration in moduleRemoteNotificationExtAbilityoftypeandactionsInformation (there is and only oneExtensionAbility, the configuration is as follows, if added at the same timeurisparameters, thenurisContent needs to be empty):
          "extensionAbilities": [
  {
    "name": "RemoteNotificationExtAbility",
    "type": "remoteNotification",
    "srcEntry": "./ets/entryability/RemoteNotificationExtAbility.ets",
    "description": "RemoteNotificationExtAbility test",
    "exported": false,
    "skills": [
      {
        "actions": ["action.hms.push.extension.remotenotification"]
      }
    ]
  }
]
- type: The fixed value isremoteNotification, indicating notification expansionExtensionAbilitytype.
- actions: The fixed value isaction.hms.push.extension.remotenotification, used to receive notification extension messages.
Step 2
- This process will be followed when the process exists. If your application process exists, no notification reminder will pop up regardless of whether the application is in the foreground or in the background.
- You can passreceiveMessage() method to obtain notification extended message data in real time. The sample code is as follows:
          import { UIAbility } from '@kit.AbilityKit';
import { JPushInterface } from '@jg/push';
import { pushCommon, pushService } from '@kit.PushKit';
import { hilog } from '@kit.PerformanceAnalysisKit';

const TAG: string = 'JPUSH-JLog-PushMessageAbility'
export default class PushMessageAbility extends UIAbility {
  onCreate(): void {
    try { // receiveMessage中的参数固定为IM-------拓展通知接收
      pushService.receiveMessage('IM', this, async (data) => {
        let jg = await JPushInterface.extraMessageBackgroundData(data)
        if (jg) { //如果是true为已经处理
          return
        }
      });
    } catch (e) {
      hilog.info(0x0000, TAG, '%{public}s', 'IM fail:'+JSON.stringify(e));
    }
}
- And in the project modulesrc/main/module.json5inskillsConfigurationactionsThe content is action.ohos.push.listener(There is and can only be oneabilitydefine theaction, if added at the same timeurisparameters, thenurisContent needs to be empty):
          "abilities": [
      {
        "name": "PushMessageAbility",
        "srcEntry": "./ets/entryability/PushMessageAbility.ets",
        "launchType": "singleton",
        "startWindowIcon": "$media:icon",
        "startWindowBackground": "$color:start_window_background",
        "skills": [
          {
            "actions": [
              "action.ohos.push.listener"
            ]
          }
        ]
      }
]
Configuration pushVoIPcall message
If there is pushVoIPCall message requirements require the following configuration
The main steps are:
step one
- Create aUIAbilitytype components, such asPushMessageAbility.ets(In project engineeringsrc/main/ets/entryabilitydirectory), responsible for processingVoIPCall message reception, the code example is as follows:
          import { UIAbility } from '@kit.AbilityKit';
import { JPushInterface } from '@jg/push';
import { pushCommon, pushService } from '@kit.PushKit';
import { hilog } from '@kit.PerformanceAnalysisKit';

const TAG: string = 'JPUSH-JLog-PushMessageAbility'
export default class PushMessageAbility extends UIAbility {
  onCreate(): void {
    try {
      pushService.receiveMessage('VoIP', this, async (data) => {
        let jg = await JPushInterface.voIPMessageBackgroundData(data)
        if (jg) { //如果是true为已经处理
          return
        }
      });
    } catch (e) {
      hilog.info(0x0000, TAG, '%{public}s', 'VoIP fail:'+JSON.stringify(e));
    }
  }
}
Moreover, in the project engineering src/main/module.json5 Documentary abilities Configuration in modulePushMessageAbilityofactionsinformation.
          "abilities": [
  {
    "name": "PushMessageAbility",
    "srcEntry": "./ets/entryability/PushMessageAbility.ets",
    "launchType": "singleton",
    "description": "PushMessageAbility test",
    "startWindowIcon": "$media:startIcon",
    "startWindowBackground": "$color:start_window_background",
    "exported": false,
    "skills": [
      {
        "actions": ["action.ohos.push.listener"]
      }
    ]
  }
]
- actions:The content isaction.ohos.push.listener, there is and can only be oneabilitydefine theaction, if added at the same timeurisparameters, thenurisThe content needs to be empty.
Configure "no display function in the front desk"
If there is a functional requirement for "no display at the front desk", the following configuration is required
The main steps are:
step one
- Create aUIAbilitytype components, such asPushMessageAbility.ets(In project engineeringsrc/main/ets/entryabilitydirectory), responsible for processingVoIPCall message reception, the code example is as follows:
          import { UIAbility } from '@kit.AbilityKit';
import { JPushInterface } from '@jg/push';
import { pushCommon, pushService } from '@kit.PushKit';
import { hilog } from '@kit.PerformanceAnalysisKit';

const TAG: string = 'JPUSH-JLog-PushMessageAbility'
export default class PushMessageAbility extends UIAbility {
  onCreate(): void {
    try {
      pushService.receiveMessage('DEFAULT', this, async (data: pushCommon.PushPayload) => {
        let jg = await JPushInterface.defaultMessageBackgroundData(data)
        if (jg) { //如果是true为已经处理
          return
        }
      });
    } catch (e) {
      hilog.info(0x0000, TAG, '%{public}s', 'DEFAULT fail:'+JSON.stringify(e));
    }
  }
}
Moreover, in the project engineering src/main/module.json5 Documentary abilities Configuration in modulePushMessageAbilityofactionsinformation.
          "abilities": [
  {
    "name": "PushMessageAbility",
    "srcEntry": "./ets/entryability/PushMessageAbility.ets",
    "launchType": "singleton",
    "description": "PushMessageAbility test",
    "startWindowIcon": "$media:startIcon",
    "startWindowBackground": "$color:start_window_background",
    "exported": false,
    "skills": [
      {
        "actions": ["action.ohos.push.listener"]
      }
    ]
  }
]
- actions:The content isaction.ohos.push.listener, there is and can only be oneabilitydefine theaction, if added at the same timeurisparameters, thenurisThe content needs to be empty.
Enable push business function
The main steps are:
- exist init Need to set up before appKey
- exist init Before setting up the receive callback information class
          export default class MyAbilityStage extends AbilityStage {
  onCreate() {
    JPushInterface.setCallBackMsg(继承CallBackMsg的实体类)//接收回调信息//在init之前调用
    JPushInterface.setAppKey("你的appKey")//在init之前调用
    JPushInterface.init(this.context.getApplicationContext())
  }
}
Configure permissions
- Required permission. In order to push more accurately, call it after the application is completed. init Enable push business function interface.
- from v1.1.1 Starting from version 1, developers do not need to configure manually.SDKAlready built in.
The main steps are:
- Configuration file permission statement
- Apply for authorization from the user and call it after the application is completed. init Enable push business function interface
Note 1:
Profile permission statement, in entry under module src/main/module.json5 File addition
{ "module": { "requestPermissions": [ { "name": "ohos.permission.APP_TRACKING_CONSENT", "reason": "$string:reason", "usedScene": { "abilities": [ "EntryAbility" //一般要用首页 ], "when": "always" } } ] } }{ "module": { "requestPermissions": [ { "name": "ohos.permission.APP_TRACKING_CONSENT", "reason": "$string:reason", "usedScene": { "abilities": [ "EntryAbility" //一般要用首页 ], "when": "always" } } ] } }This code block is shown in the floating windowNote 2:
Apply for authorization from the user on the homepage EntryAbility Apply in the application, and then enable push business functions, such as:
const permissions: Array<Permissions> = ['ohos.permission.APP_TRACKING_CONSENT']; export default class EntryAbility extends UIAbility { onCreate(want: Want, launchParam: AbilityConstant.LaunchParam): void { let context:Context = this.context; let atManager:abilityAccessCtrl.AtManager = abilityAccessCtrl.createAtManager(); atManager.requestPermissionsFromUser(context, permissions).then((data: PermissionRequestResult) => { // 授权成功 //然后启用推送业务功能 JPushInterface.init(this.context.getApplicationContext()) }).catch((err: BusinessError) => { //然后启用推送业务功能 JPushInterface.init(this.context.getApplicationContext()) }) }const permissions: Array<Permissions> = ['ohos.permission.APP_TRACKING_CONSENT']; export default class EntryAbility extends UIAbility { onCreate(want: Want, launchParam: AbilityConstant.LaunchParam): void { let context:Context = this.context; let atManager:abilityAccessCtrl.AtManager = abilityAccessCtrl.createAtManager(); atManager.requestPermissionsFromUser(context, permissions).then((data: PermissionRequestResult) => { // 授权成功 //然后启用推送业务功能 JPushInterface.init(this.context.getApplicationContext()) }).catch((err: BusinessError) => { //然后启用推送业务功能 JPushInterface.init(this.context.getApplicationContext()) }) }This code block is shown in the floating window
Advanced functions
get Registration ID suggestions
becauseJPushAll forms of push will eventually be converted into Registration ID push, so you need to provide it when troubleshooting customer problems Registration ID. In order to facilitate online customers to accurately provide information and reduce communication costs, we recommend that you complete SDK After integration, in App Display customer information in less commonly used UIs such as [About], [Feedback], [My] and so on. Registration ID 。
Sample code:
JPushInterface.getRegistrationID();
Other functions
Please refer to:
Technical support
When something goes wrong:
- you can arriveJiguangCommunity search for similar questions
- for us support Send email support@jiguang.cn
In order to solve the problem more quickly, please provide the following information when asking for help:
- The product you need to consult is JPush, whether used simultaneouslyJiguangOther products
- what are you calling API, the parameters passed, the complete error message, and the time point when the exception occurred.
- If you cannot receive the message, provide the application's Appkey, news Message ID, of the device registration ID information
- in the case of SDK Please provide corresponding questions SDK Version and complete log records, log information please use TXT File upload
- The abnormal device is HarmonyOS, list specific models and systems

