
iOS SDK Integration Guide
SDK illustrate
Applicable version
This article matches SDK Version:r2.1.5 after. View recent updates Learn about the latest SDK Updates. use Xcode Version 6 and above can use the new version Push SDK,Xcode 5. You need to run the old version in the environment SDK(1.7.4)
Notice:iOS SDK 4.9.0 and above versions need to use Xcode Version 14 and above, please pay attention to upgrade!
Resource file
JPUSH v5.0.1 and above
- Libs Folder: Contains jpush-ios-x.x.x.xcframework,jcore-ios-x.x.x.xcframework(Please note: the emulator does not support APNs)
- Libs-noidfa Folder: Contains static library files jcore-noidfa-ios-x.x.x.xcframework
- Libs-NotificationServiceExtension Folder: Contains jpush-extension-ios-x.x.x.xcframework file, the directory is NotificationServiceExtension SDK, need to use APNs Integrated when displaying statistics.
- JiguangDemo Folder: example
JPUSH v5.0.1 The following versions
- Libs Folder: Contains header files JPUSHService.h, static library file jpush-ios-x.x.x.a,jcore-ios-x.x.x.a(Please note: the emulator does not support APNs)(v4.6.0andv4.6.4version exceptJPUSHService.h,jpush-ios-x.x.x.a,jcore-ios-x.x.x.a, also addedJAdService.h,JPUSHService+inapp.h,JPUSHService+inapp.mthree files)
- Libs-noidfa Folder: Contains static library files jcore-noidfa-ios-x.x.x.a
- Libs-NotificationServiceExtension Folder: Contains JPushNotificationExtensionService.h and jpush-extension-ios-x.x.x.a file, the directory is NotificationServiceExtension SDK, need to use APNs Integrated when displaying statistics.
- JiguangDemo Folder: example
DEMO use
enter into JiguangDemo directory, execute pod install Command installation sdk,Open JiguangDemo.xcworkspace Just run it.
JiguangDemo 为多个SDK拼接组装而成的Demo,使用 cocoapods 进行管理,如需手动集成请参考[手动导入]部分。
Create app
exist JPush management Portal Create an application on the app and automatically generate it after the creation is successful. AppKey Used to identify the application.
In push settings iOS Module upload APNs Certificate or configuration Token Authentication. if right APNs I don’t know much about the certificate. Please refer to: iOS Certificate setup guide
For detailed illustrations, see Quick Start》Create app
Configuration project
import SDK
Choice 1:Cocoapods import
1. Use the standard version
          pod 'JPush'         // 必选
pod 'JOperate'   // 可选,集成极光分析SDK后,即可支持行为触发推送消息、推送转化率统计,用户行为分析和用户标签等功能
pod 'JCore'         // 可选,也可由pod 'JPush'自动获取

注:如果无法导入最新版本,请执行 pod repo update master 这个命令来升级本机的 pod 库,然后重新 pod 'JPush'
2. If you need to install the specified version, use the following method (with JPush 4.8.0 version as an example):
          pod 'JCore', '3.2.3'        //可选,也可由pod 'JPush'自动获取
pod 'JPush', '4.8.0'        //必选
pod 'JOperate', '2.0.0'      //可选,集成极光分析SDK后,即可支持行为触发推送消息、推送转化率统计,用户行为分析和用户标签等功能
JiguanganalyzeSDKmore features andAPISee detailsJiguanganalyzeSDKIntegration Guide
3. Precautions
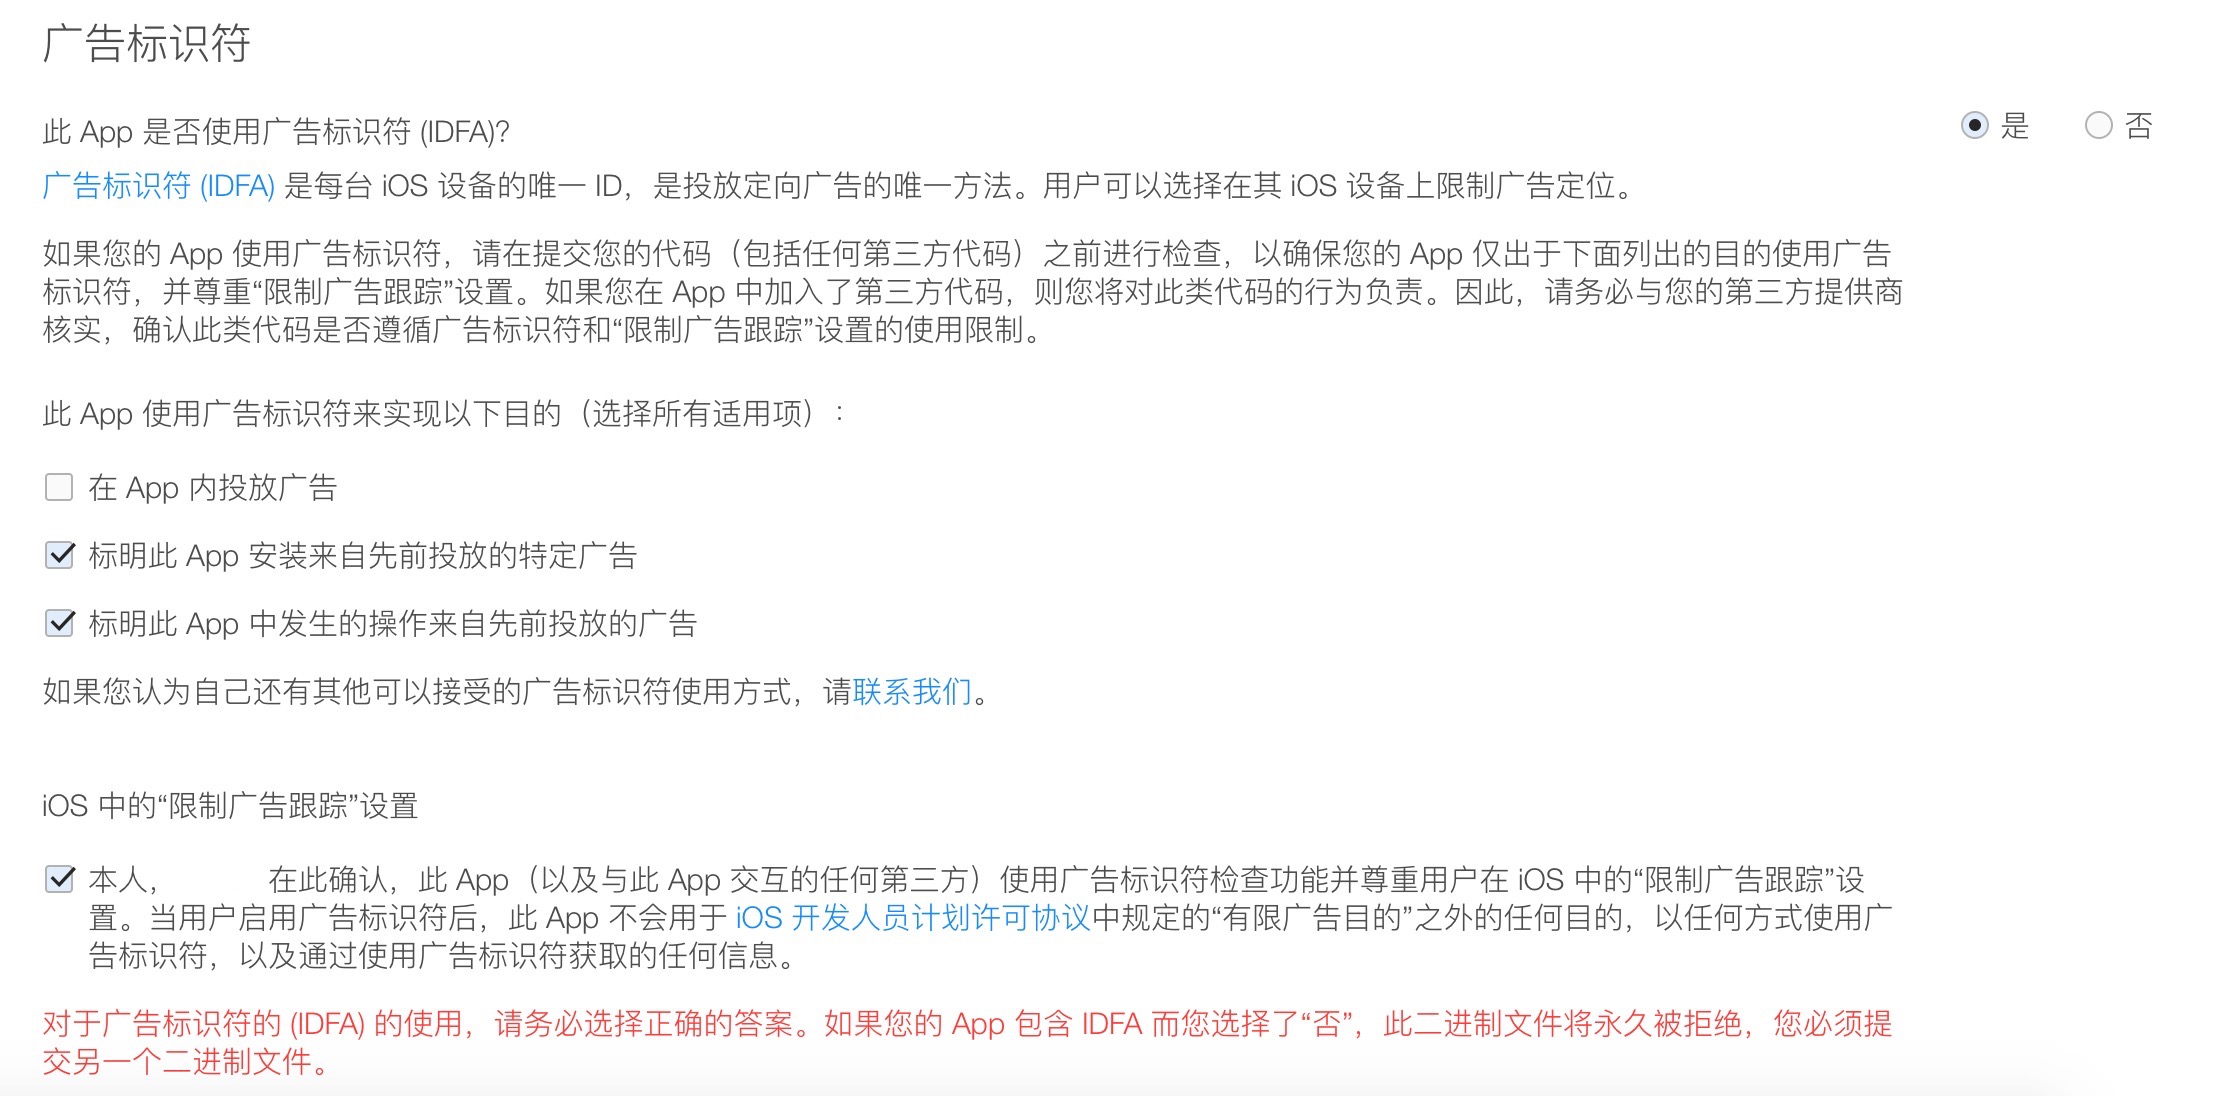
exist App If there are no ads, it is still recommended that developers use Get IDFA version, please refer to the method shown in the figure below to submit it. AppStore Review. Of course, if the developer doesn't want to use IDFA Or worry about collection IDFA without integrating any advertising services. Apple Rejection, we are also prepared for what to do IDFA Version for developers to integrate. Things to note:
- (1) in App Place ads within and get IDFA Can be reviewed by Apple.
- (2) App There are no ads, but due to specific ads that have been previously placed, you can check the box below to pass Apple's review.
Option 2:Swift Package Manager import
- JPush V6.0.0 / JCore V5.3.0 Version starts to support Swift Package Manager import
1. Add Package rely
Add to JPush:
- exist Xcode in, select File > Add Package Dependencies...
- Enter in the search boxJPushof Swift Package Warehouse address:https://github.com/jpush/jpush-sdk.git
https://github.com/jpush/jpush-sdk.gitThis code block is shown in the floating window - Select version rules (it is recommended to select "Up to Next Major Version" to get the latest version)
- Click "Add Package"Complete adding
- Adding Package After that, select JPush Products are integrated,Add To Target Please select your main application Target
Add to JCore:
- Select again File > Add Package Dependencies...
- Enter in the search box JCore of Swift Package Warehouse address:https://github.com/jpush/jcore-sdk.git
https://github.com/jpush/jcore-sdk.gitThis code block is shown in the floating window - Select version rules (it is recommended to select "Up to Next Major Version" to get the latest version)
- Click "Add Package"Complete adding
- Adding Package After that, select JCore Products are integrated,Add To Target Please select your main application Target
2. Precautions
- Swift Package Manager need Xcode 11 and above
- If you cannot find the latest version, make sure Xcode Updated to the latest version
- JCore It is a required dependent library.JPush rely JCore, please make sure both Package have been added correctly
- about IDFA For instructions on use, please refer to about IDFA part
Option 3: Manual import
- existJiguangOfficial website download up to date SDK。
JPUSH v5.0.1 and above
- Will SDK Unzip the package in Xcode Select "Add files to 'Your project name'...”, decompress the Libs subfolder (containing filesjpush-ios-x.x.x.xcframework、jcore-ios-x.x.x.xcframework) to your project directory. If you need to usenoidfaversion, thenLibs-noidfadownjcore-noidfa-ios-x.x.x.xcframeworkfile replacementjcore-ios-x.x.x.xcframework。
JPUSH v5.0.1 The following versions
- Will SDK Unzip the package in Xcode Select "Add files to 'Your project name'...”, decompress the Libs subfolder (containing filesJPUSHService.h、jpush-ios-x.x.x.a、jcore-ios-x.x.x.a)(v4.6.0andv4.6.4version contains JPUSHService.h、JAdService.h、JPUSHService+inapp.h、JPUSHService+inapp.m、jpush-ios-x.x.x.a、jcore-ios-x.x.x.a) to your project directory. If you need to usenoidfaversion, thenLibs-noidfadownjcore-noidfa-ios-x.x.x.afile replacementjcore-ios-x.x.x.a。
- Add to Framework
- CFNetwork.framework
- CoreFoundation.framework
- CoreTelephony.framework
- SystemConfiguration.framework
- CoreGraphics.framework
- Foundation.framework
- UIKit.framework
- Security.framework
- libz.tbd(Xcode 7 The following versions are libz.dylib)
- AdSupport.framework(Required for the standard version, it is recommended to add it, or you can choose it according to actual needs.)
- UserNotifications.framework(Xcode 8 and above)
- libresolv.tbd(JPush 2.2.0 Required for versions and above,Xcode 7 The following versions are libresolv.dylib)
- WebKit.framework(JPush 3.3.0 and above version required)
- AppTrackingTransparency.framework(Xcode 12 and above, required by the standard version, it is recommended to add it, you can also choose according to actual needs)
- StoreKit.framework(JPush 3.3.6 and above version required)
Notice:
If integrated JPush 3.0.1 and above, and integrated at the same timeJiguangother SDK(like:JMessage 3.0.0 and above)1. Cocoapods Import, it is recommended to update to the latest online version to avoid JCore Conflicts caused by inconsistent versions.
2. Swift Package Manager Import, it is recommended to update to the latest online version to avoid JCore Conflicts caused by inconsistent versions.
3. Manual import, only need to keep the latest version in the project jcore-ios-x.x.x.xcframework (JPUSH v5.0.1 The following versions are reservedjcore-ios-x.x.x.a) static library files.
Build Settings
If your project needs to support smaller than 7.0 of iOS system, please go to Build Settings closure bitCode option, otherwise it will not compile normally.
- set up Search Paths down User Header Search Paths and Library Search Paths,for example SDK folder (default is lib ) are in the same directory as the project file, both are set to "$(SRCROOT)/{name of the folder where the static library is located}".
Capabilities
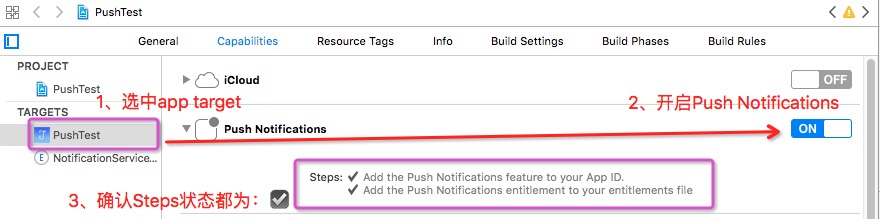
If used Xcode 8 and above environment development, please enable Application Target of Capabilities->Push Notifications Options, as shown in the figure:
If used Xcode 10 and above environment development, please enable Application Target of Capabilities-> Access WIFI Infomation options.

allow Xcode 7 support Http Transmission method
If you are using 2.1.9 Versions of and above do not need to configure this step.
If using Xcode 7 or newer, requires the App project plist Under manual configuration key and values to support http transmission:
Option 1: Configure according to domain name
- in the project info.plist Add one in Key:NSAppTransportSecurity, type is dictionary type.
- Then add a NSExceptionDomains, the type is dictionary type;
- Add the required supported domains to NSExceptionDomains. in jpush.cn as Key, type is dictionary type.
- Two attributes need to be set under each domain:NSIncludesSubdomains、NSExceptionAllowsInsecureHTTPLoads。 Both attributes are Boolean Type, the values are respectively YES、YES。
As shown in the picture:

Option 2: Global Configuration
          <key>NSAppTransportSecurity</key>
<dict>
    <key>NSAllowsArbitraryLoads</key>
    <true/>
</dict>
Add header file
Please add the following code to AppDelegate.m The location of the referenced header file.
          // 引入 JPush 功能所需头文件
# import "JPUSHService.h"
// iOS10 注册 APNs 所需头文件
# ifdef NSFoundationVersionNumber_iOS_9_x_Max
# import <UserNotifications/UserNotifications.h>
# endif
// 如果需要使用 idfa 功能所需要引入的头文件(可选)
# import <AdSupport/AdSupport.h>
Add to Delegate
for AppDelegate Add to Delegate。
Reference code:
          @interface AppDelegate ()<JPUSHRegisterDelegate>

@end
Add initialization and start push service code
2.1.0 version starts,API class name JPUSHService, no longer use the original APService。
Add initialization APNs code
Please add the following code to -(BOOL)application:(UIApplication *)application didFinishLaunchingWithOptions:(NSDictionary *)launchOptions
          //Required
//notice: 3.0.0 及以后版本注册可以这样写,也可以继续用之前的注册方式
JPUSHRegisterEntity * entity = [[JPUSHRegisterEntity alloc] init];
entity.types = JPAuthorizationOptionAlert|JPAuthorizationOptionBadge|JPAuthorizationOptionSound|JPAuthorizationOptionProvidesAppNotificationSettings;
if ([[UIDevice currentDevice].systemVersion floatValue] >= 8.0) {
  // 可以添加自定义 categories
  // NSSet<UNNotificationCategory *> *categories for iOS10 or later
  // NSSet<UIUserNotificationCategory *> *categories for iOS8 and iOS9
}
[JPUSHService registerForRemoteNotificationConfig:entity delegate:self];
Add initialization JPush and enable push service code
Please add the following code to -(BOOL)application:(UIApplication *)application didFinishLaunchingWithOptions:(NSDictionary *)launchOptions
          // Optional
// 获取 IDFA
// 如需使用 IDFA 功能请添加此代码并在初始化方法的 advertisingIdentifier 参数中填写对应值
  NSString *advertisingId;
  if (@available(iOS 14, *)) {
        [ATTrackingManager requestTrackingAuthorizationWithCompletionHandler:^(ATTrackingManagerAuthorizationStatus status) {
            if (status == ATTrackingManagerAuthorizationStatusAuthorized) {
                advertisingId = [[ASIdentifierManager sharedManager] advertisingIdentifier].UUIDString;
            }
        }];
    } else {
        // 使用原方式访问 IDFA
        advertisingId = [[[ASIdentifierManager sharedManager] advertisingIdentifier] UUIDString];
    }

// Required
// init Push
// notice: 2.1.5 版本的 SDK 新增的注册方法,改成可上报 IDFA,如果没有使用 IDFA 直接传 nil
//初始化极光推送服务,调用了本 API 后,开启 JPush 推送服务,将会开始收集上报 SDK 业务功能所必要的用户个人信息
[JPUSHService setupWithOption:launchOptions appKey:appKey
                      channel:channel
             apsForProduction:isProduction
        advertisingIdentifier:advertisingId];
Partial parameter description:
- appKey
- chooseJiguangConsole application, click "Settings" to get its appkey value. Please ensure that the in-app configuration appkey andJiguangGenerated after creating the application on the console appkey consistent.
- channel
- Specify the download channel of the application package. To facilitate statistics by channel, the specific value is defined by you, such as:App Store。
- apsForProduction
- 1.3.1 Version is added to identify the version used by the current application. APNs Certificate environment.
- 0 (default) means a development certificate is used, 1 means the application is released with a production certificate.
- Note: The value of this field must be consistent with Build Settings of Code Signing The configured certificate environment is consistent.
- advertisingIdentifier
- See details about IDFA。
register APNs Successful and reported DeviceToken
Kind tips:
JPush 3.0.9 In previous versions, this interface must be called to register token You can then log inJiguang, use notifications and custom messaging features.
from JPush 3.0.9 Starting from version 1, you can log in without calling this method.Jiguang. but cannot be used APNs Notification function can only be used JPush Custom message.
please AppDelegate.m Implement the callback method and add the code in the callback method
          - (void)application:(UIApplication *)application
didRegisterForRemoteNotificationsWithDeviceToken:(NSData *)deviceToken {

  /// Required - 注册 DeviceToken
  [JPUSHService registerDeviceToken:deviceToken];
}
Realize registration APNs Failure interface (optional)
          - (void)application:(UIApplication *)application didFailToRegisterForRemoteNotificationsWithError:(NSError *)error {
  //Optional
  NSLog(@"did Fail To Register For Remote Notifications With Error: %@", error);
}
Add processing APNs Notification callback method
please AppDelegate.m Implement the callback method and add the code in the callback method
          # pragma mark- JPUSHRegisterDelegate

// iOS 12 Support
- (void)jpushNotificationCenter:(UNUserNotificationCenter *)center openSettingsForNotification:(UNNotification *)notification{
  if (notification && [notification.request.trigger isKindOfClass:[UNPushNotificationTrigger class]]) {
    //从通知界面直接进入应用
  }else{
    //从通知设置界面进入应用
  }
}

// iOS 10 Support
- (void)jpushNotificationCenter:(UNUserNotificationCenter *)center willPresentNotification:(UNNotification *)notification withCompletionHandler:(void (^)(NSInteger))completionHandler {
  // Required
  NSDictionary * userInfo = notification.request.content.userInfo;
  if([notification.request.trigger isKindOfClass:[UNPushNotificationTrigger class]]) {
    [JPUSHService handleRemoteNotification:userInfo];
  }
  completionHandler(UNNotificationPresentationOptionAlert); // 需要执行这个方法,选择是否提醒用户,有 Badge、Sound、Alert 三种类型可以选择设置
}

// iOS 10 Support
- (void)jpushNotificationCenter:(UNUserNotificationCenter *)center didReceiveNotificationResponse:(UNNotificationResponse *)response withCompletionHandler:(void (^)())completionHandler {
  // Required
  NSDictionary * userInfo = response.notification.request.content.userInfo;
  if([response.notification.request.trigger isKindOfClass:[UNPushNotificationTrigger class]]) {
    [JPUSHService handleRemoteNotification:userInfo];
  }
  completionHandler();    // 系统要求执行这个方法
}

- (void)application:(UIApplication *)application didReceiveRemoteNotification:(NSDictionary *)userInfo fetchCompletionHandler:(void (^)(UIBackgroundFetchResult))completionHandler {

  // Required, iOS 7 Support
  [JPUSHService handleRemoteNotification:userInfo];
  completionHandler(UIBackgroundFetchResultNewData);
}

- (void)application:(UIApplication *)application didReceiveRemoteNotification:(NSDictionary *)userInfo {

  // Required, For systems with less than or equal to iOS 6
  [JPUSHService handleRemoteNotification:userInfo];
}
Add processing JPush Custom message callback method
If you need to use JPush For custom message functions, please refer to document To implement custom message processing callback methods.
Run successfully
Debug the project on a real machine. If the console outputs the following log, it means that you have successfully integrated it.
          2016-08-19 17:12:12.745823 219b28[1443:286814]  | JPUSH | I - [JPUSHLogin]
----- login result -----
uid:5460310207
registrationID:171976fa8a8620a14a4
If you encounter problems during debugging, please refer to:iOS SDK Debugging Guide
Advanced features
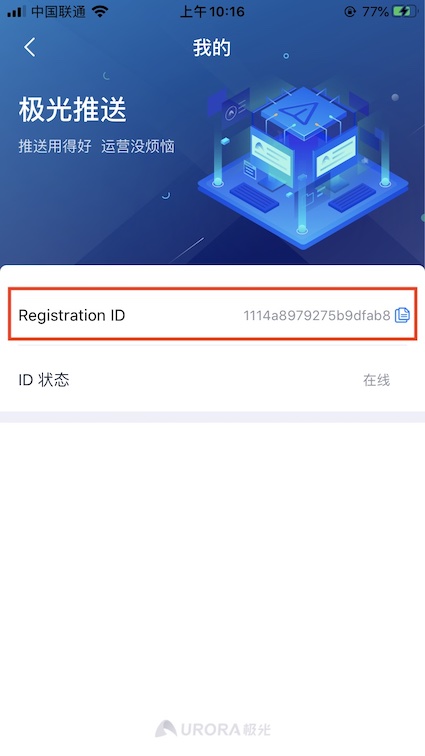
get Registration ID interaction suggestions
becauseJPushAll forms of push will eventually be converted into Registration ID push, so you need to provide it when troubleshooting customer problems Registration ID. In order to facilitate online customers to accurately provide information and reduce communication costs, we recommend that you complete SDK After integration, in App Display customer information in less commonly used UIs such as [About], [Feedback], [My] and so on. Registration ID 。
Sample code:
          [JPUSHService registrationIDCompletionHandler:^(int resCode, NSString *registrationID) {
    NSLog(@"resCode : %d,registrationID: %@",resCode,registrationID);
}];
The effect is as shown in the figure:
about IDFA
from JPUSH v3.2.2 version starts,Jiguangsupply idfa and noidfa Two versions,JPUSH v3.2.6 and above versions by JCORE supply idfa and noidfa There are two versions, please pay attention to the selected version integration. idfa The version is the standard version, which is automatically collected by default. IDFA data, noidfa Versions are not automatically collected.JiguangIt is recommended that developers use idfa Version. Of course, if the developer does not want to use IDFA Or worry about collection IDFA without integrating any advertising services. Apple Rejection, we are also prepared for what to do IDFA Versions are available for developers to integrate. Version integration methods:
JPush 3.2.6 and above, if using JCore 2.1.4 and above versions, the usage method is as follows (with JPush 4.8.0 Version,JCore 3.2.3 version as an example):
pod 'JCore', '3.2.3-noidfa' // 必选项 pod 'JPush', '4.8.0' // 必选项pod 'JCore', '3.2.3-noidfa' // 必选项 pod 'JPush', '4.8.0' // 必选项This code block is shown in the floating windowJPush 3.2.6 and above, if using JCore 2.1.2 and below versions, use as follows (with JPush 3.2.6 version as an example):
pod 'JCore', '2.1.2' // 必选项 pod 'JPush', '3.2.6' // 必选项pod 'JCore', '2.1.2' // 必选项 pod 'JPush', '3.2.6' // 必选项This code block is shown in the floating windowJPush 3.2.2、3.2.4 Both versions if used JCore 2.1.4 and above versions, the usage method is as follows (with JPush 3.2.4 version as an example):
pod 'JCore', '2.1.4-noidfa' // 必选项 pod 'JPush', '3.2.4-noidfa' // 必选项pod 'JCore', '2.1.4-noidfa' // 必选项 pod 'JPush', '3.2.4-noidfa' // 必选项This code block is shown in the floating windowJPush 3.2.2、3.2.4 Both versions if used JCore 2.1.2 and below versions, use as follows (with JPush 3.2.4 version as an example):
pod 'JCore', '2.1.2' // 必选项 pod 'JPush', '3.2.4-noidfa' // 必选项pod 'JCore', '2.1.2' // 必选项 pod 'JPush', '3.2.4-noidfa' // 必选项This code block is shown in the floating window
在iOS14需要去申请用户权限,首先需要在 Info.plist 中配置" NSUserTrackingUsageDescription " 及描述文案,接着使用 AppTrackingTransparency 框架中的 ATTrackingManager 中的 requestTrackingAuthorizationWithCompletionHandler 请求用户权限,在用户授权后再去访问 IDFA 才能够获取到正确信息。
r2.1.5 Add an upload to the version IDFA String interface
           + (void)setupWithOption:(NSDictionary *)launchingOption
                  appKey:(NSString *)appKey
                 channel:(NSString *)channel
        apsForProduction:(BOOL)isProduction
   advertisingIdentifier:(NSString *)advertisingId;
If not used IDFA, you can still use the interface
          + (void)setupWithOption:(NSDictionary *)launchingOption
                  appKey:(NSString *)appKey
                 channel:(NSString *)channel
        apsForProduction:(BOOL)isProduction;
JPush SDK Related event monitoring
It is recommended that developers add API The following types of notifications are provided:
extern NSString *const kJPFNetworkIsConnectingNotification; // Connecting
extern NSString * const kJPFNetworkDidSetupNotification; // Establish connection
extern NSString * const kJPFNetworkDidCloseNotification; // close connection
extern NSString * const kJPFNetworkDidRegisterNotification; // Registration successful
extern NSString *const kJPFNetworkFailedRegisterNotification; //Registration failed
extern NSString * const kJPFNetworkDidLoginNotification; // Login successful
Kind tips:
Registration id needs to be added for registration kJPFNetworkDidLoginNotification Obtained from the notification method, you can also call [registrationIDCompletionHandler:] method, through completionHandler get
extern NSString * const kJPFNetworkDidReceiveMessageNotification; // Custom message received (not APNs)
in,kJPFNetworkDidReceiveMessageNotification The data passed can be passed through NSNotification in userInfo Method acquisition, including title, content,extras information etc.
Please refer to the documentation:iOS SDK API
Notification display statistics
Kind tips:
iOS 10 new Notification Service Extension function, use mutable-content fields to control.
If using Web Console, you need to check "Optional Settings" mutable-content option; if used RESTFul API Need to set mutable-content The fields are true。
from iOS JPush SDK 3.0.7 version, available to developers Notification Service Extension SDK Report each item APNs The status of information display.
How to use:
- Create a Notification Service Extension Services, please refer to the details iOS 10 Notification Service Extension。
Choice 1:Cocoapods import
exist Podfile Zhongwei Notification Service Extension target Add dependencies:
          target 'YourNotificationServiceExtension' do
  pod 'JPushExtension'
end
Note: Please change YourNotificationServiceExtension Replace with your actual Extension target name.
Option 2:Swift Package Manager import
JPushExtension v2.0.6 Supported by and above version
- exist Xcode in, select File > Add Package Dependencies...
- Enter in the search box JPushExtension of Swift Package Warehouse address:https://github.com/jpush/jpush-extension-sdk.git
https://github.com/jpush/jpush-extension-sdk.gitThis code block is shown in the floating window - Select version rules (Branch choose main branch)
- Click "Add Package"Complete adding
- Adding Package After that, select JPushExtension Products are integrated,Add To Target Please select your Notification Service Extension Target
Option 3: Manual import
JPUSH v5.0.1 and above
- existJiguangOfficial website download up to date SDK
- Will SDK Unzip the package in Xcode Select "Add files to 'Your project name'...", will decompress the Libs-NotificationServiceExtension subfolder (containing files jpush-extension-ios-x.x.x.xcframework) add to your Service Extension In the project directory
JPUSH v5.0.1 The following versions
- existJiguangOfficial website download up to date SDK
- Will SDK Unzip the package in Xcode Select "Add files to 'Your project name'...", will decompress the Libs-NotificationServiceExtension subfolder (containing files JPushNotificationExtensionService.h and jpush-extension-ios-x.x.x.a) add to your Service Extension In the project directory
Code Integration:
call [jpushSetAppkey:] method to set your appkey, please note here appkey should be with youJiguangapplied appkey same.
call [jpushReceiveNotificationRequest:] method to report your apns message to complete the display statistics; in this method block Performed in callback apns display.
# import "NotificationService.h" # import "JPushNotificationExtensionService.h" @implementation NotificationService - (void)didReceiveNotificationRequest:(UNNotificationRequest *)request withContentHandler:(void (^)(UNNotificationContent * _Nonnull))contentHandler { - [JPushNotificationExtensionService jpushSetAppkey:@"AppKey copied from JiGuang Portal application"]; [JPushNotificationExtensionService jpushReceiveNotificationRequest:request with:^ { NSLog(@"apns upload success"); contentHandler(request.content); }]; } @end# import "NotificationService.h" # import "JPushNotificationExtensionService.h" @implementation NotificationService - (void)didReceiveNotificationRequest:(UNNotificationRequest *)request withContentHandler:(void (^)(UNNotificationContent * _Nonnull))contentHandler { - [JPushNotificationExtensionService jpushSetAppkey:@"AppKey copied from JiGuang Portal application"]; [JPushNotificationExtensionService jpushReceiveNotificationRequest:request with:^ { NSLog(@"apns upload success"); contentHandler(request.content); }]; } @endThis code block is shown in the floating window
Voip Push
- exist iOS 8 later introduced a PushKit framed Voip Push can make users’ APP wake up in case of kill APP, and execute the code.
- Voip No distinction is made between development and production certificates,Apple Push Notification service SSL (Sandbox & Production) and VoIP Services Certificate All supported Voip Push
Add to PushKit.Framework Library
- by optional way to introduce PushKit.framework Library
- Import header file #import <PushKit/PushKit.h>
- AppDelegate accomplish PKPushRegistryDelegate protocol
Add to Voip Permissions
exist Project-> Capabilities->Background Modes inner handle Voice over IP options open
Code implementation
exist didFinishLaunchingWithOptions implemented in method Voip register
- (void)voipRegistration{ dispatch_queue_t mainQueue = dispatch_get_main_queue(); PKPushRegistry *voipRegistry = [[PKPushRegistry alloc] initWithQueue:mainQueue]; voipRegistry.delegate = self; // Set the push type to VoIP voipRegistry.desiredPushTypes = [NSSet setWithObject:PKPushTypeVoIP]; }- (void)voipRegistration{ dispatch_queue_t mainQueue = dispatch_get_main_queue(); PKPushRegistry *voipRegistry = [[PKPushRegistry alloc] initWithQueue:mainQueue]; voipRegistry.delegate = self; // Set the push type to VoIP voipRegistry.desiredPushTypes = [NSSet setWithObject:PKPushTypeVoIP]; }This code block is shown in the floating windowsubmit Token
/// 系统返回VoipToken,上报给极光服务器 - (void)pushRegistry:(PKPushRegistry *)registry didUpdatePushCredentials:(PKPushCredentials *)pushCredentials forType:(PKPushType)type{ [JPUSHService registerVoipToken:pushCredentials.token]; }/// 系统返回VoipToken,上报给极光服务器 - (void)pushRegistry:(PKPushRegistry *)registry didUpdatePushCredentials:(PKPushCredentials *)pushCredentials forType:(PKPushType)type{ [JPUSHService registerVoipToken:pushCredentials.token]; }This code block is shown in the floating windowreceived Voip Push, call receipt interface, user statistics Voip service.
- (void)pushRegistry:(PKPushRegistry *)registry didReceiveIncomingPushWithPayload:(PKPushPayload *)payload forType:(PKPushType)type{ // 提交回执给极光服务器 [JPUSHService handleVoipNotification:payload.dictionaryPayload]; } - (void)pushRegistry:(PKPushRegistry *)registry didReceiveIncomingPushWithPayload:(PKPushPayload *)payload forType:(PKPushType)type withCompletionHandler:(void(^)(void))completion{ // 提交回执给极光服务器 [JPUSHService handleVoipNotification:payload.dictionaryPayload]; }- (void)pushRegistry:(PKPushRegistry *)registry didReceiveIncomingPushWithPayload:(PKPushPayload *)payload forType:(PKPushType)type{ // 提交回执给极光服务器 [JPUSHService handleVoipNotification:payload.dictionaryPayload]; } - (void)pushRegistry:(PKPushRegistry *)registry didReceiveIncomingPushWithPayload:(PKPushPayload *)payload forType:(PKPushType)type withCompletionHandler:(void(^)(void))completion{ // 提交回执给极光服务器 [JPUSHService handleVoipNotification:payload.dictionaryPayload]; }This code block is shown in the floating window
LiveActivity
iOS 16.1 A new feature has been launched in LiveActivity(live activity). Real-time activities are displayed on the lock screen, helping users learn about the progress of various things in real time directly from the lock screen.
Used in main project ActivityKit Framework to start, update, and end real-time activities. exist widget extension in use SwiftUI and WidgetKit to create Live Activity interface.
Updates, Ends Live Events Not only available ActivityKit accomplish. This can also be achieved using remote push.
LiveActivityRemote push update function is not supportedp12Certificate. Users are required to configure p8 certificate.
Here's how to support real-time activities in your project. If you have already implemented it, please follow "Submit" below Token"Module is enough.
Add to ActivityKit.Framework Library
The main project is based on optional way to introduce ActivityKit.Framework Library

Import header file import ActivityKit
Configuration engineering support LiveActivity
in main project Info.plist Add a key-value pair to the file,key for NSSupportsLiveActivities,value for YES;

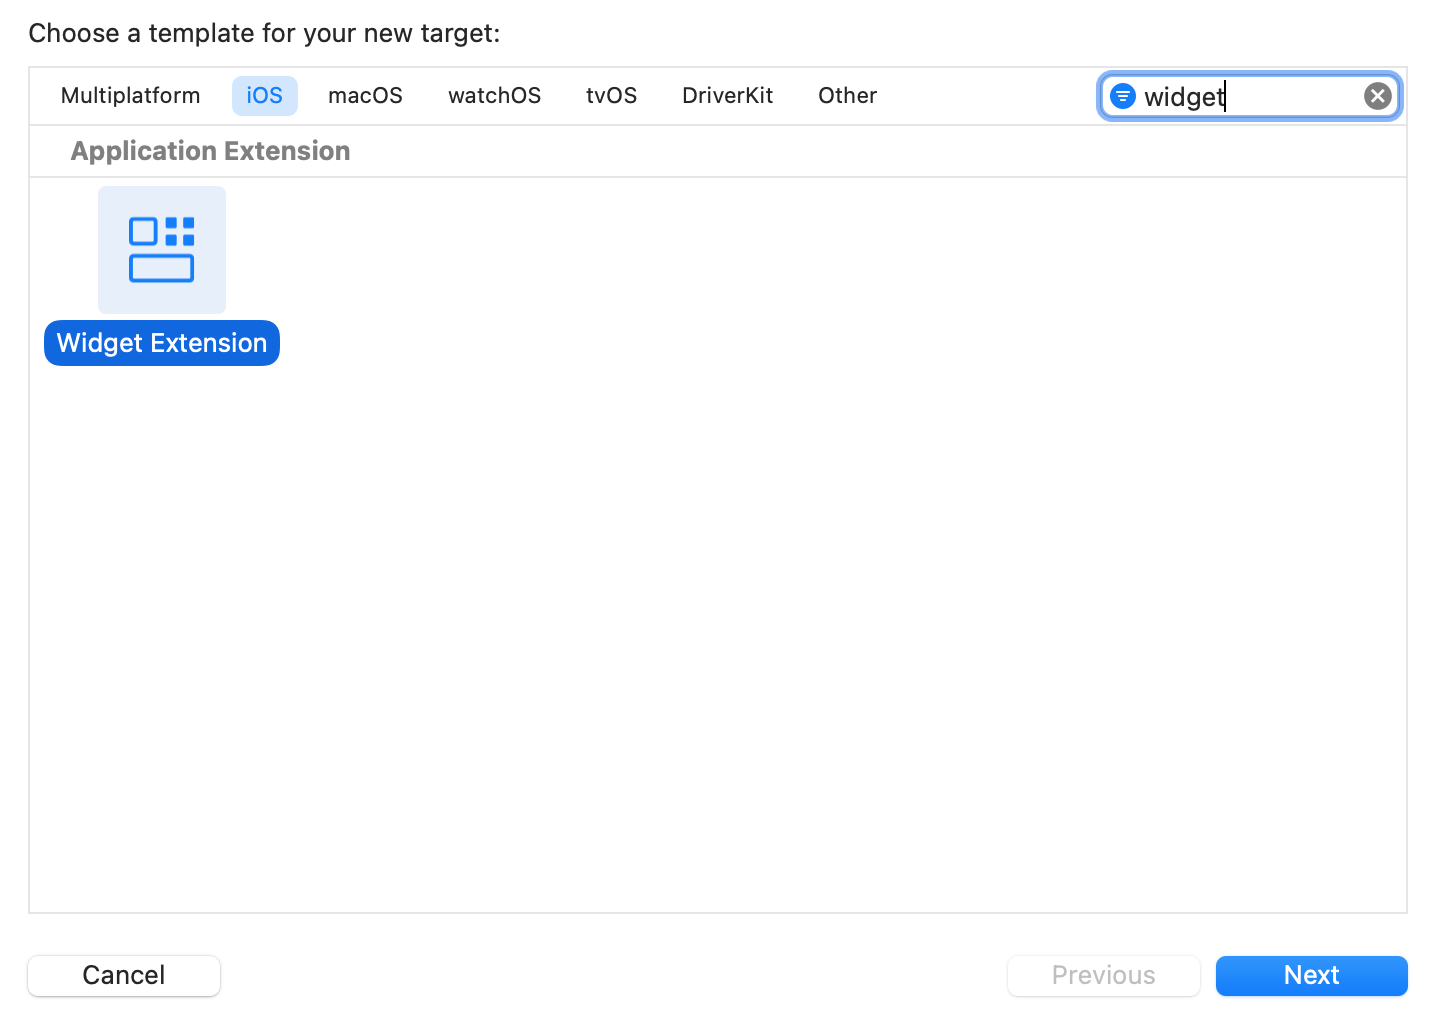
NewWidget Extension, if it already exists in the project, this step is skipped.
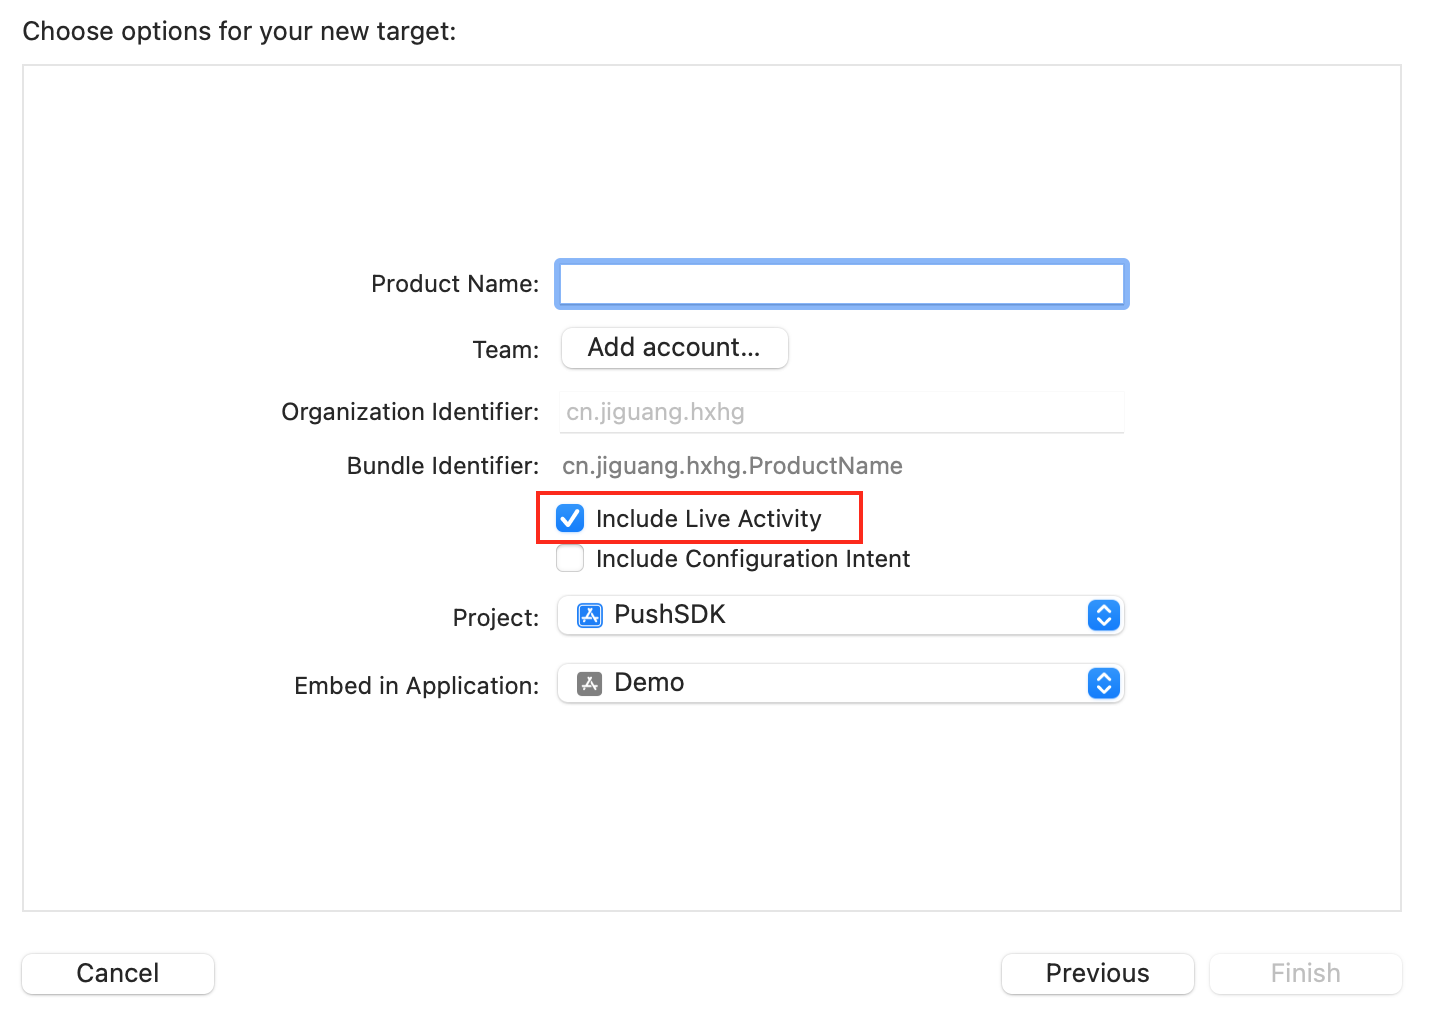
Code implementation
Create a new one in the main project codeswiftfile in which a set of ActivityAttributes as well as Activity.ContentState;
The following code is sample code, please write it according to your own business. ContentStateHere is the data that can be dynamically updated, throughJPushLiveActivityWhen notifying, the dynamically updated parameter name and type must be the same asContentStateCorresponding to the configuration here. Otherwise, the update will fail.
import ActivityKit @available(iOS 16.1, *) struct JGLAAttributes: ActivityAttributes { public typealias JGLAStatus = ContentState // ContentState 里 为可以动态更新的数据。 public struct ContentState: Codable, Hashable { var eventStr: String // 事件名称 var eventTime: Int // 事件时间 } // 以下为静态数据,不可改变。 var name: String // 展示的名字 var number: Int // 第几个 }import ActivityKit @available(iOS 16.1, *) struct JGLAAttributes: ActivityAttributes { public typealias JGLAStatus = ContentState // ContentState 里 为可以动态更新的数据。 public struct ContentState: Codable, Hashable { var eventStr: String // 事件名称 var eventTime: Int // 事件时间 } // 以下为静态数据,不可改变。 var name: String // 展示的名字 var number: Int // 第几个 }This code block is shown in the floating windowexist Widget Extension Interface for creating real-time activities.
create Widget and returns a ActivityConfiguration。 The following is sample code. Please write the specific UI according to your own business.
import ActivityKit import WidgetKit import SwiftUI @available(iOS 16.1, *) struct PizzaDeliveryActivityWidget: Widget { var body: some WidgetConfiguration { ActivityConfiguration(for: JGLAAttributes.self) { context in // Create the view that appears on the Lock Screen and as a // banner on the Home Screen of devices that don't support the // Dynamic Island. // 锁屏界面样式。在不支持灵动岛的设备上如果数据有更新,在主屏幕上也会将以下界面以一个横幅的样式进行提示。 LockScreenLiveActivityView(context: context) } dynamicIsland: { context in // 以下为灵动岛的样式 DynamicIsland { // Create the expanded view. DynamicIslandExpandedRegion(.leading) { Text("L") } DynamicIslandExpandedRegion(.trailing) { Text("T") } DynamicIslandExpandedRegion(.center) { Text("C") } DynamicIslandExpandedRegion(.bottom) { Text("B") } } compactLeading: { // Create the compact leading view. Text("CL") } compactTrailing: { // Create the compact trailing view. Text("CT") } minimal: { // Create the minimal view. Text("M") } .keylineTint(.white) } } } // 锁屏界面样式 @available(iOS 16.1, *) struct LockScreenLiveActivityView: View { let context: ActivityViewContext<JGLAAttributes> var body: some View { VStack { Spacer() Text("JIGUANG: \(context.attributes.name)-\(context.attributes.number)") Spacer() HStack { Spacer() Text("eventStr: \(context.state.eventStr) , eventTime: \(context.state.eventTime)") Spacer() } Spacer() } .activitySystemActionForegroundColor(.indigo) .activityBackgroundTint(.cyan) } }import ActivityKit import WidgetKit import SwiftUI @available(iOS 16.1, *) struct PizzaDeliveryActivityWidget: Widget { var body: some WidgetConfiguration { ActivityConfiguration(for: JGLAAttributes.self) { context in // Create the view that appears on the Lock Screen and as a // banner on the Home Screen of devices that don't support the // Dynamic Island. // 锁屏界面样式。在不支持灵动岛的设备上如果数据有更新,在主屏幕上也会将以下界面以一个横幅的样式进行提示。 LockScreenLiveActivityView(context: context) } dynamicIsland: { context in // 以下为灵动岛的样式 DynamicIsland { // Create the expanded view. DynamicIslandExpandedRegion(.leading) { Text("L") } DynamicIslandExpandedRegion(.trailing) { Text("T") } DynamicIslandExpandedRegion(.center) { Text("C") } DynamicIslandExpandedRegion(.bottom) { Text("B") } } compactLeading: { // Create the compact leading view. Text("CL") } compactTrailing: { // Create the compact trailing view. Text("CT") } minimal: { // Create the minimal view. Text("M") } .keylineTint(.white) } } } // 锁屏界面样式 @available(iOS 16.1, *) struct LockScreenLiveActivityView: View { let context: ActivityViewContext<JGLAAttributes> var body: some View { VStack { Spacer() Text("JIGUANG: \(context.attributes.name)-\(context.attributes.number)") Spacer() HStack { Spacer() Text("eventStr: \(context.state.eventStr) , eventTime: \(context.state.eventTime)") Spacer() } Spacer() } .activitySystemActionForegroundColor(.indigo) .activityBackgroundTint(.cyan) } }This code block is shown in the floating window//If yourappSupports both widgets and real-time activities. Please useWidgetBundle。
import WidgetKit import SwiftUI @main struct DemoWidgetServiceBundle: WidgetBundle { var body: some Widget { DemoWidgetService() if #available(iOS 16.1, *) { PizzaDeliveryActivityWidget() } } }import WidgetKit import SwiftUI @main struct DemoWidgetServiceBundle: WidgetBundle { var body: some Widget { DemoWidgetService() if #available(iOS 16.1, *) { PizzaDeliveryActivityWidget() } } }This code block is shown in the floating windowStart a live event
After successful activation, real-time activities will be displayed on the lock screen.
// 初始状态 let initialContentState = JGLAAttributes.ContentState(eventStr: "begin", eventTime: 1) let activityAttributes = JGLAAttributes(name: "LiveActivity", number: "1") do { // 创建Activity let jgActivity = try Activity.request(attributes: activityAttributes, contentState: initialContentState, pushType:PushType.token) print("Requested a Live Activity \(String(describing: jgActivity.id)).") } catch (let error) { print("Error requesting Live Activity \(error.localizedDescription).") }// 初始状态 let initialContentState = JGLAAttributes.ContentState(eventStr: "begin", eventTime: 1) let activityAttributes = JGLAAttributes(name: "LiveActivity", number: "1") do { // 创建Activity let jgActivity = try Activity.request(attributes: activityAttributes, contentState: initialContentState, pushType:PushType.token) print("Requested a Live Activity \(String(describing: jgActivity.id)).") } catch (let error) { print("Error requesting Live Activity \(error.localizedDescription).") }This code block is shown in the floating windowsubmit Token
After successfully starting the real-time activity, pass pushTokenUpdates Method to get the real-time activities returned by the system PushToken。 callJiguangof registerLiveActivity:pushToken:completion:seq api Report toJiguangserver. ReportingpushTokenAt the same time, the identification of the real-time activity needs to be reported toJiguangserver. passJiguangThis identifier is needed when pushing real-time activities.JiguangThe server identifies the push target based on this identification. Please customize the identification of this real-time activity. It is recommended that it be unique.
Notice:
ActivityKitforswiftLanguage framework, and does not support direct oc calls, use this frameworkapiwhen, pleaseswiftCalled in the file. becauseJPush SDK It is an OC language and involvesswiftTo call OC, you need to create a bridge file. And import it in the bridge file:
#import "JPUSHService.h"
After the report is successful, you can use the real-time activity identifier to push updates.
// 系统返回LiveActivity的PushToken,上报给极光服务器 for await pushtoken in jgActivity.pushTokenUpdates { let liveactivityId = "LiveActivity-01" // 向极光注册liveactivity,在推送平台通过liveactivityId推送通知进行更新 JPUSHService.registerLiveActivity(liveactivityId, pushToken: pushtoken, completion: { code, liveactivityId, token, seq in print("registerLiveActivity liveactivityId:\(String(describing: liveactivityId)) token: \(pushtokenstr) result:\(code) seq:\(seq)") }, seq: seq()) }// 系统返回LiveActivity的PushToken,上报给极光服务器 for await pushtoken in jgActivity.pushTokenUpdates { let liveactivityId = "LiveActivity-01" // 向极光注册liveactivity,在推送平台通过liveactivityId推送通知进行更新 JPUSHService.registerLiveActivity(liveactivityId, pushToken: pushtoken, completion: { code, liveactivityId, token, seq in print("registerLiveActivity liveactivityId:\(String(describing: liveactivityId)) token: \(pushtokenstr) result:\(code) seq:\(seq)") }, seq: seq()) }This code block is shown in the floating windowAt the end of the real-time activity, this interface is also called to notifyJiguangThis live activity on the server has ended.pushTokenParameter transfernilThat’s it.
Task { for await stateUpdate in jgActivity.activityStateUpdates { if stateUpdate == .dismissed || stateUpdate == .ended { // 当liveactivity结束时,向极光注册清除pushToken JPUSHService.registerLiveActivity(liveactivityId, pushToken: nil, completion: { code, liveActivityId, token, seq in print("registerLiveActivity liveactivityId:\(String(describing: liveActivityId)) token: nil result:\(code) seq:\(seq)") }, seq: seq()); } } }Task { for await stateUpdate in jgActivity.activityStateUpdates { if stateUpdate == .dismissed || stateUpdate == .ended { // 当liveactivity结束时,向极光注册清除pushToken JPUSHService.registerLiveActivity(liveactivityId, pushToken: nil, completion: { code, liveActivityId, token, seq in print("registerLiveActivity liveactivityId:\(String(describing: liveActivityId)) token: nil result:\(code) seq:\(seq)") }, seq: seq()); } } }This code block is shown in the floating windowfromiOS17.2To start, Apple allows using push to launch aliveactivity, this operation depends onpushToStartToken。 monitorpushToStartTokenUpdates:function getliveactivityofpushToStartTokenchanges and report them toJiguangserver.
pushToStartTokenon first bootAppThere may be no callback. Need to create one locallyLiveActivitycan be triggered only afterpushToStartTokencallback. Start afterAppwill triggerpushToStartTokencallback.
           Task {
      if #available(iOS 17.2, *) {
        var beforeToken = "";
        for await pushtoken in Activity<JGLAAttributes>.pushToStartTokenUpdates {
          let pushtokenstr = pushtoken.map { String(format: "%02.2hhx", arguments: [$0]) }.joined()
          // 建议在这里做个去重处理,因为这里的回调可能会有多次,且值没有变化。
          if (beforeToken == pushtokenstr) {
            return
          }
          beforeToken = pushtokenstr

          // 向极光服务器上报pushToStartToken
          JPUSHService.registerLiveActivity("JGLAAttributes", pushToStartToken: pushtoken, completion: { code, alias, token, seq in
            print("register JGLAAttributes pushToStartToken result: \(pushtokenstr) result:\(code) seq:\(seq)")
          }, seq: seq())

        }
      } else {
        // Fallback on earlier versions
      }
    }
More functions can be vieweddemo。
Technical support
- When something goes wrong:
- Please read carefully iOS FAQ Document to see if anything is missing.
- you can arriveJiguangCommunity search for similar questions
- for us support Send email [support@jiguang.cn][4]
- In order to solve the problem more quickly, please provide the following information when asking for help:
- The product you need to consult is JPush, whether used simultaneouslyJiguangOther products
- what are you calling API, the parameters passed, the complete error message, and the time point when the exception occurred.
- If you cannot receive the message, provide the application's Appkey, news Message ID, of the device registration ID information
- in the case of SDK Please provide corresponding questions SDK Version and complete log records, log information please use TXT File upload
- The abnormal device is iOS, list specific models and systems

