
iOS SDK 集成指南
SDK 说明
适用版本
本文匹配的 SDK 版本:r2.1.5 以后。 查看最近更新 了解最新的 SDK 更新情况。 使用 Xcode 6 及以上版本可以使用新版 Push SDK,Xcode 5 环境下需要运行旧版本 SDK(1.7.4)
注意:iOS SDK 4.9.0 及以上版本需要使用 Xcode 14 及以上版本,请注意升级!
资源文件
JPUSH v5.0.1 及以上版本
- Libs 文件夹:包含 jpush-ios-x.x.x.xcframework,jcore-ios-x.x.x.xcframework(请注意:模拟器不支持 APNs)
- Libs-noidfa 文件夹:包含静态库文件 jcore-noidfa-ios-x.x.x.xcframework
- Libs-NotificationServiceExtension 文件夹:包含 jpush-extension-ios-x.x.x.xcframework 文件,该目录为 NotificationServiceExtension SDK,需要使用 APNs 展示统计时集成。
- JiguangDemo 文件夹:示例
JPUSH v5.0.1 以下版本
- Libs 文件夹:包含头文件 JPUSHService.h,静态库文件 jpush-ios-x.x.x.a,jcore-ios-x.x.x.a(请注意:模拟器不支持 APNs)(v4.6.0和v4.6.4版本除了JPUSHService.h,jpush-ios-x.x.x.a,jcore-ios-x.x.x.a,还新增了JAdService.h,JPUSHService+inapp.h,JPUSHService+inapp.m三个文件)
- Libs-noidfa 文件夹:包含静态库文件 jcore-noidfa-ios-x.x.x.a
- Libs-NotificationServiceExtension 文件夹:包含 JPushNotificationExtensionService.h 和 jpush-extension-ios-x.x.x.a 文件,该目录为 NotificationServiceExtension SDK,需要使用 APNs 展示统计时集成。
- JiguangDemo 文件夹:示例
DEMO 使用
进入到 JiguangDemo 目录下,执行 pod install 命令安装 sdk,打开 JiguangDemo.xcworkspace 运行即可。
JiguangDemo 为多个SDK拼接组装而成的Demo,使用 cocoapods 进行管理,如需手动集成请参考[手动导入]部分。
创建应用
在 JPush 的管理 Portal 上创建应用,创建成功后自动生成 AppKey 用以标识该应用。
在推送设置 iOS 模块上传 APNs 证书或配置 Token Authentication。如果对 APNs 证书不太了解 请参考: iOS 证书设置指南
详细图示见快速开始 》创建应用
配置工程
导入 SDK
选择 1:Cocoapods 导入
1. 使用标准版本
          pod 'JPush'         // 必选
pod 'JOperate'   // 可选,集成极光分析SDK后,即可支持行为触发推送消息、推送转化率统计,用户行为分析和用户标签等功能
pod 'JCore'         // 可选,也可由pod 'JPush'自动获取

注:如果无法导入最新版本,请执行 pod repo update master 这个命令来升级本机的 pod 库,然后重新 pod 'JPush'
2. 如果需要安装指定版本则使用以下方式(以 JPush 4.8.0 版本为例):
          pod 'JCore', '3.2.3'        //可选,也可由pod 'JPush'自动获取
pod 'JPush', '4.8.0'        //必选
pod 'JOperate', '2.0.0'      //可选,集成极光分析SDK后,即可支持行为触发推送消息、推送转化率统计,用户行为分析和用户标签等功能
极光分析SDK更多功能和API详见极光分析SDK集成指南
3. 注意事项
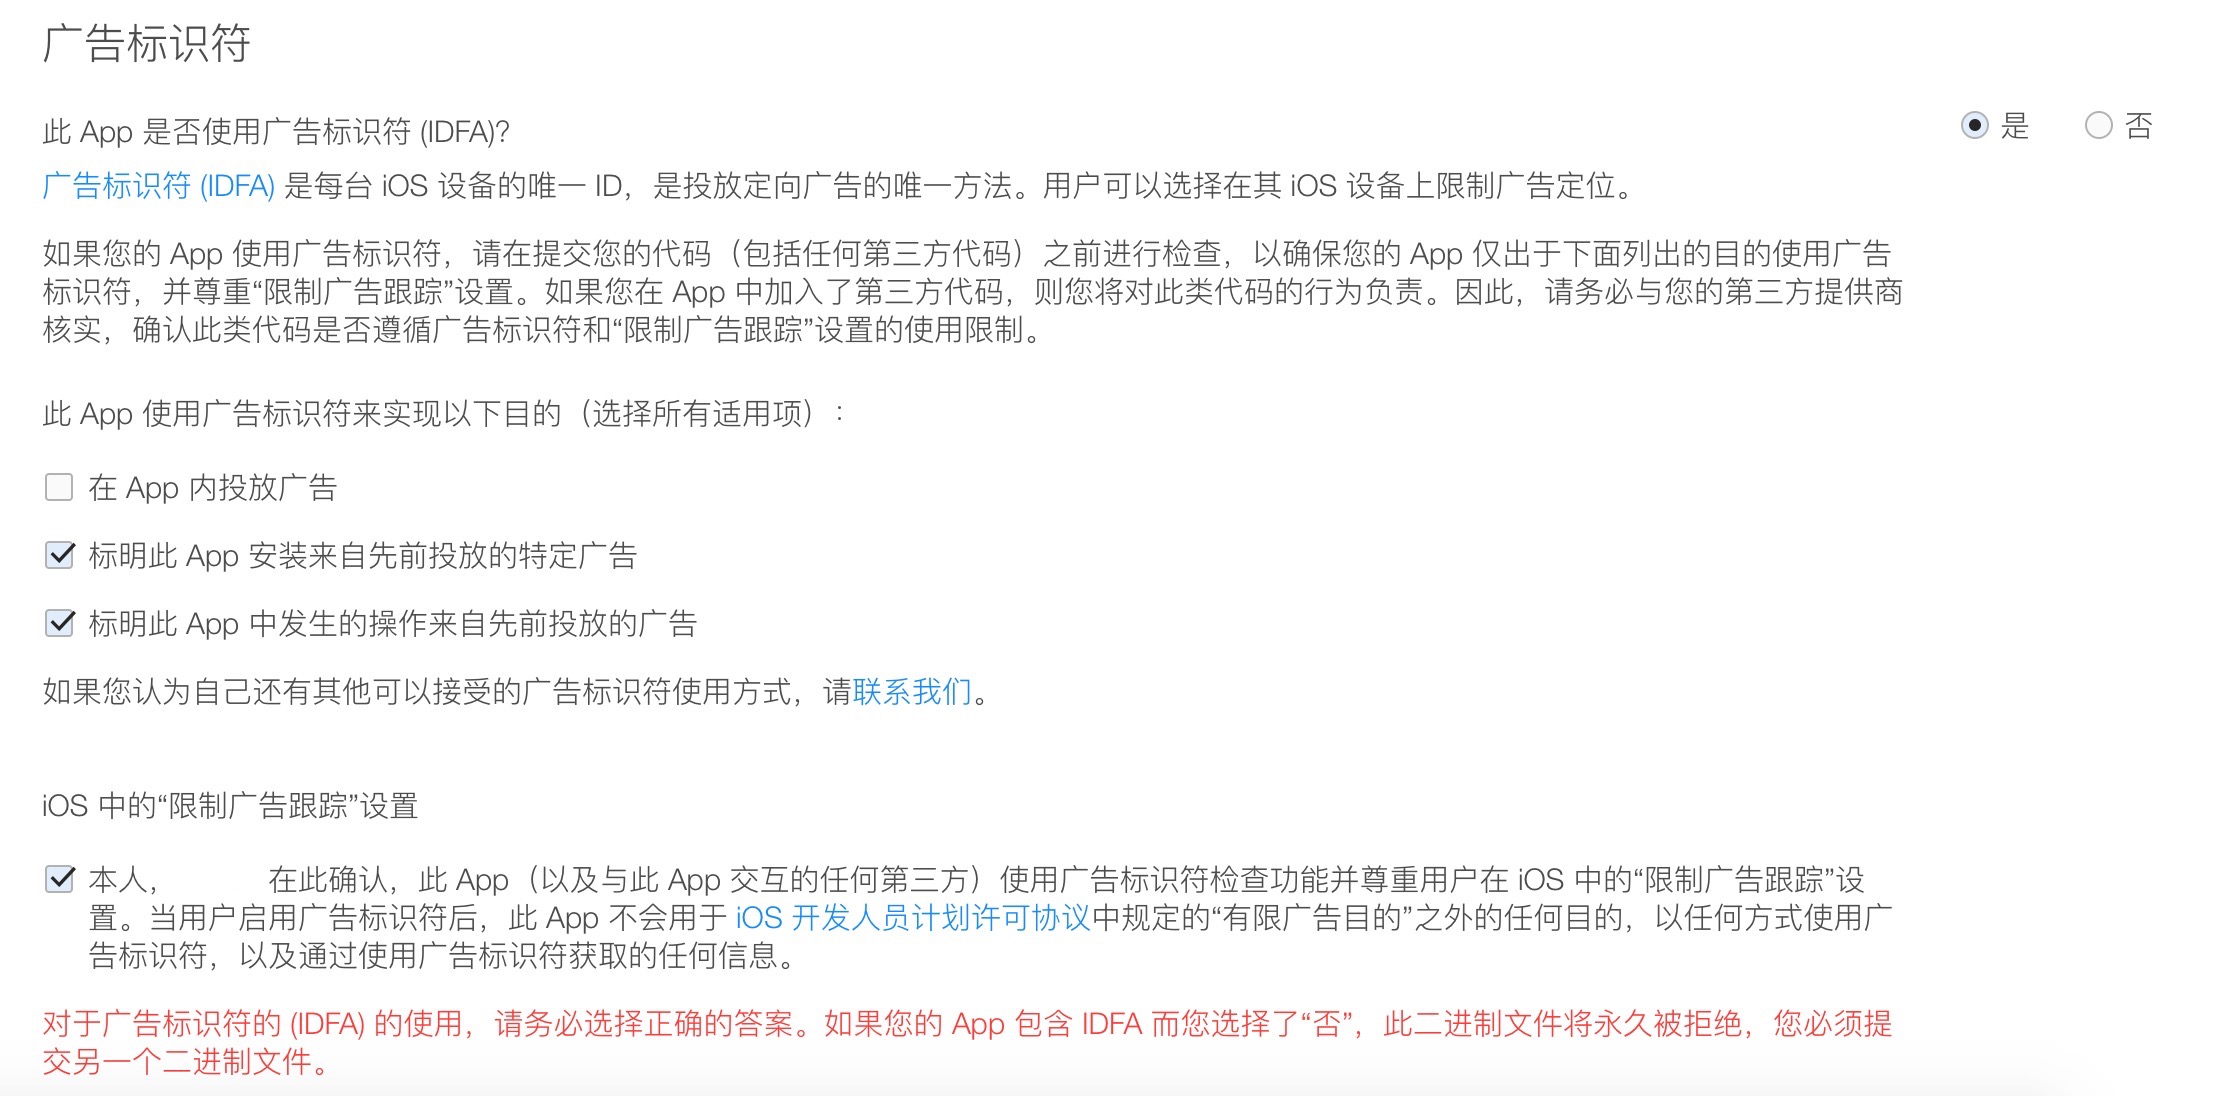
在 App 内无广告情况下还是建议开发者使用获取 IDFA 版本,可参考下图中所说的方式提交 AppStore 审核。当然,如果开发者不想使用 IDFA 或者担忧采集 IDFA 而未集成任何广告服务遭到 Apple 拒绝,我们也准备了该无 IDFA 版本供开发者集成。 注意事项:
- (1) 在 App 内投放广告,获取 IDFA 可通过苹果审核。
- (2) App 内无广告,但由于先前投放的特定广告,可参考如下勾选,通过苹果审核。
选择 2:Swift Package Manager 导入
- JPush V6.0.0 / JCore V5.3.0 版本开始支持 Swift Package Manager 导入
1. 添加 Package 依赖
添加 JPush:
- 在 Xcode 中,选择 File > Add Package Dependencies...
- 在搜索框中输入极光推送的 Swift Package 仓库地址:https://github.com/jpush/jpush-sdk.git
https://github.com/jpush/jpush-sdk.git此代码块在浮窗中显示 - 选择版本规则(建议选择 "Up to Next Major Version" 以获取最新版本)
- 点击 "Add Package" 完成添加
- 在添加 Package 后,选择 JPush 产品进行集成,Add To Target 请选择您的主应用 Target
添加 JCore:
- 再次选择 File > Add Package Dependencies...
- 在搜索框中输入 JCore 的 Swift Package 仓库地址:https://github.com/jpush/jcore-sdk.git
https://github.com/jpush/jcore-sdk.git此代码块在浮窗中显示 - 选择版本规则(建议选择 "Up to Next Major Version" 以获取最新版本)
- 点击 "Add Package" 完成添加
- 在添加 Package 后,选择 JCore 产品进行集成,Add To Target 请选择您的主应用 Target
2. 注意事项
- Swift Package Manager 需要 Xcode 11 及以上版本
- 如果无法找到最新版本,请确保 Xcode 已更新到最新版本
- JCore 是必选的依赖库,JPush 依赖 JCore,请确保两个 Package 都已正确添加
- 关于 IDFA 的使用说明,请参考 关于 IDFA 部分
选择 3:手动导入
- 在极光官网下载 最新 SDK 。
JPUSH v5.0.1 及以上版本
- 将 SDK 包解压,在 Xcode 中选择 “Add files to 'Your project name'...”,将解压后的 Libs 子文件夹(包含文件jpush-ios-x.x.x.xcframework、jcore-ios-x.x.x.xcframework)添加到你的工程目录中。如需使用noidfa版本,则将Libs-noidfa下的jcore-noidfa-ios-x.x.x.xcframework文件替换jcore-ios-x.x.x.xcframework。
JPUSH v5.0.1 以下版本
- 将 SDK 包解压,在 Xcode 中选择 “Add files to 'Your project name'...”,将解压后的 Libs 子文件夹(包含文件JPUSHService.h、jpush-ios-x.x.x.a、jcore-ios-x.x.x.a)(v4.6.0和v4.6.4版本包含 JPUSHService.h、JAdService.h、JPUSHService+inapp.h、JPUSHService+inapp.m、jpush-ios-x.x.x.a、jcore-ios-x.x.x.a)添加到你的工程目录中。如需使用noidfa版本,则将Libs-noidfa下的jcore-noidfa-ios-x.x.x.a文件替换jcore-ios-x.x.x.a。
- 添加 Framework
- CFNetwork.framework
- CoreFoundation.framework
- CoreTelephony.framework
- SystemConfiguration.framework
- CoreGraphics.framework
- Foundation.framework
- UIKit.framework
- Security.framework
- libz.tbd(Xcode 7 以下版本是 libz.dylib)
- AdSupport.framework(标准版需要,建议添加,也可根据实际需要选择。)
- UserNotifications.framework(Xcode 8 及以上)
- libresolv.tbd(JPush 2.2.0 及以上版本需要,Xcode 7 以下版本是 libresolv.dylib)
- WebKit.framework(JPush 3.3.0 及以上版本需要)
- AppTrackingTransparency.framework(Xcode 12 及以上,标准版需要,建议添加,也可根据实际需要选择)
- StoreKit.framework(JPush 3.3.6 及以上版本需要)
注意:
如果集成 JPush 3.0.1 及以上版本, 且同时集成极光其他 SDK(如:JMessage 3.0.0 及以上版本)1. Cocoapods 导入,建议都更新为线上最新版本,来避免 JCore 版本不一致导致的冲突。
2. Swift Package Manager 导入,建议都更新为线上最新版本,来避免 JCore 版本不一致导致的冲突。
3. 手动导入,在工程中只需保留一个最新版本的 jcore-ios-x.x.x.xcframework (JPUSH v5.0.1 以下版本保留jcore-ios-x.x.x.a)静态库文件。
Build Settings
如果你的工程需要支持小于 7.0 的 iOS 系统,请到 Build Settings 关闭 bitCode 选项,否则将无法正常编译通过。
- 设置 Search Paths 下的 User Header Search Paths 和 Library Search Paths,比如 SDK 文件夹(默认为 lib )与工程文件在同一级目录下,则都设置为 "$(SRCROOT)/{静态库所在文件夹名称}" 即可。
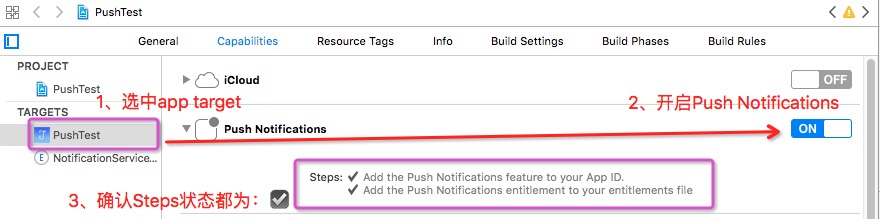
Capabilities
如使用 Xcode 8 及以上环境开发,请开启 Application Target 的 Capabilities->Push Notifications 选项,如图:
如使用 Xcode 10 及以上环境开发,请开启 Application Target 的 Capabilities-> Access WIFI Infomation 选项。

允许 Xcode 7 支持 Http 传输方法
如果您使用的是 2.1.9 及以上的版本则不需要配置此步骤
如果用的是 Xcode 7 或更新版本,需要在 App 项目的 plist 手动配置下 key 和值以支持 http 传输:
选择 1:根据域名配置
- 在项目的 info.plist 中添加一个 Key:NSAppTransportSecurity,类型为字典类型。
- 然后给它添加一个 NSExceptionDomains,类型为字典类型;
- 把需要的支持的域添加给 NSExceptionDomains。其中 jpush.cn 作为 Key,类型为字典类型。
- 每个域下面需要设置 2 个属性:NSIncludesSubdomains、NSExceptionAllowsInsecureHTTPLoads。 两个属性均为 Boolean 类型,值分别为 YES、YES。
如图:

选择 2:全局配置
          <key>NSAppTransportSecurity</key>
<dict>
    <key>NSAllowsArbitraryLoads</key>
    <true/>
</dict>
添加头文件
请将以下代码添加到 AppDelegate.m 引用头文件的位置。
          // 引入 JPush 功能所需头文件
# import "JPUSHService.h"
// iOS10 注册 APNs 所需头文件
# ifdef NSFoundationVersionNumber_iOS_9_x_Max
# import <UserNotifications/UserNotifications.h>
# endif
// 如果需要使用 idfa 功能所需要引入的头文件(可选)
# import <AdSupport/AdSupport.h>
添加 Delegate
为 AppDelegate 添加 Delegate。
参考代码:
          @interface AppDelegate ()<JPUSHRegisterDelegate>

@end
添加初始化与开启推送服务代码
2.1.0 版本开始,API 类名为 JPUSHService,不再使用原先的 APService。
添加初始化 APNs 代码
请将以下代码添加到 -(BOOL)application:(UIApplication *)application didFinishLaunchingWithOptions:(NSDictionary *)launchOptions
          //Required
//notice: 3.0.0 及以后版本注册可以这样写,也可以继续用之前的注册方式
JPUSHRegisterEntity * entity = [[JPUSHRegisterEntity alloc] init];
entity.types = JPAuthorizationOptionAlert|JPAuthorizationOptionBadge|JPAuthorizationOptionSound|JPAuthorizationOptionProvidesAppNotificationSettings;
if ([[UIDevice currentDevice].systemVersion floatValue] >= 8.0) {
  // 可以添加自定义 categories
  // NSSet<UNNotificationCategory *> *categories for iOS10 or later
  // NSSet<UIUserNotificationCategory *> *categories for iOS8 and iOS9
}
[JPUSHService registerForRemoteNotificationConfig:entity delegate:self];
添加初始化 JPush 与开启推送服务代码
请将以下代码添加到 -(BOOL)application:(UIApplication *)application didFinishLaunchingWithOptions:(NSDictionary *)launchOptions
          // Optional
// 获取 IDFA
// 如需使用 IDFA 功能请添加此代码并在初始化方法的 advertisingIdentifier 参数中填写对应值
  NSString *advertisingId;
  if (@available(iOS 14, *)) {
        [ATTrackingManager requestTrackingAuthorizationWithCompletionHandler:^(ATTrackingManagerAuthorizationStatus status) {
            if (status == ATTrackingManagerAuthorizationStatusAuthorized) {
                advertisingId = [[ASIdentifierManager sharedManager] advertisingIdentifier].UUIDString;
            }
        }];
    } else {
        // 使用原方式访问 IDFA
        advertisingId = [[[ASIdentifierManager sharedManager] advertisingIdentifier] UUIDString];
    }

// Required
// init Push
// notice: 2.1.5 版本的 SDK 新增的注册方法,改成可上报 IDFA,如果没有使用 IDFA 直接传 nil
//初始化极光推送服务,调用了本 API 后,开启 JPush 推送服务,将会开始收集上报 SDK 业务功能所必要的用户个人信息
[JPUSHService setupWithOption:launchOptions appKey:appKey
                      channel:channel
             apsForProduction:isProduction
        advertisingIdentifier:advertisingId];
部分参数说明:
- appKey
- 选择极光控制台的应用 ,点击“设置”获取其 appkey 值。请确保应用内配置的 appkey 与极光控制台上创建应用后生成的 appkey 一致。
- channel
- 指明应用程序包的下载渠道,为方便分渠道统计,具体值由你自行定义,如:App Store。
- apsForProduction
- 1.3.1 版本新增,用于标识当前应用所使用的 APNs 证书环境。
- 0(默认值)表示采用的是开发证书,1 表示采用生产证书发布应用。
- 注:此字段的值要与 Build Settings 的 Code Signing 配置的证书环境一致。
- advertisingIdentifier
- 详见 关于 IDFA。
注册 APNs 成功并上报 DeviceToken
温馨提示:
JPush 3.0.9 之前的版本,必须调用此接口,注册 token 之后才可以登录极光,使用通知和自定义消息功能。
从 JPush 3.0.9 版本开始,不调用此方法也可以登录极光。但是不能使用 APNs 通知功能,只可以使用 JPush 自定义消息。
请在 AppDelegate.m 实现该回调方法并添加回调方法中的代码
          - (void)application:(UIApplication *)application
didRegisterForRemoteNotificationsWithDeviceToken:(NSData *)deviceToken {

  /// Required - 注册 DeviceToken
  [JPUSHService registerDeviceToken:deviceToken];
}
实现注册 APNs 失败接口(可选)
          - (void)application:(UIApplication *)application didFailToRegisterForRemoteNotificationsWithError:(NSError *)error {
  //Optional
  NSLog(@"did Fail To Register For Remote Notifications With Error: %@", error);
}
添加处理 APNs 通知回调方法
请在 AppDelegate.m 实现该回调方法并添加回调方法中的代码
          # pragma mark- JPUSHRegisterDelegate

// iOS 12 Support
- (void)jpushNotificationCenter:(UNUserNotificationCenter *)center openSettingsForNotification:(UNNotification *)notification{
  if (notification && [notification.request.trigger isKindOfClass:[UNPushNotificationTrigger class]]) {
    //从通知界面直接进入应用
  }else{
    //从通知设置界面进入应用
  }
}

// iOS 10 Support
- (void)jpushNotificationCenter:(UNUserNotificationCenter *)center willPresentNotification:(UNNotification *)notification withCompletionHandler:(void (^)(NSInteger))completionHandler {
  // Required
  NSDictionary * userInfo = notification.request.content.userInfo;
  if([notification.request.trigger isKindOfClass:[UNPushNotificationTrigger class]]) {
    [JPUSHService handleRemoteNotification:userInfo];
  }
  completionHandler(UNNotificationPresentationOptionAlert); // 需要执行这个方法,选择是否提醒用户,有 Badge、Sound、Alert 三种类型可以选择设置
}

// iOS 10 Support
- (void)jpushNotificationCenter:(UNUserNotificationCenter *)center didReceiveNotificationResponse:(UNNotificationResponse *)response withCompletionHandler:(void (^)())completionHandler {
  // Required
  NSDictionary * userInfo = response.notification.request.content.userInfo;
  if([response.notification.request.trigger isKindOfClass:[UNPushNotificationTrigger class]]) {
    [JPUSHService handleRemoteNotification:userInfo];
  }
  completionHandler();    // 系统要求执行这个方法
}

- (void)application:(UIApplication *)application didReceiveRemoteNotification:(NSDictionary *)userInfo fetchCompletionHandler:(void (^)(UIBackgroundFetchResult))completionHandler {

  // Required, iOS 7 Support
  [JPUSHService handleRemoteNotification:userInfo];
  completionHandler(UIBackgroundFetchResultNewData);
}

- (void)application:(UIApplication *)application didReceiveRemoteNotification:(NSDictionary *)userInfo {

  // Required, For systems with less than or equal to iOS 6
  [JPUSHService handleRemoteNotification:userInfo];
}
添加处理 JPush 自定义消息回调方法
如需使用 JPush 的自定义消息功能,请参考 文档 来实现自定义消息的处理回调方法。
成功运行
真机调试该项目,如果控制台输出以下日志则代表您已经集成成功。
          2016-08-19 17:12:12.745823 219b28[1443:286814]  | JPUSH | I - [JPUSHLogin]
----- login result -----
uid:5460310207
registrationID:171976fa8a8620a14a4
如果调试运行中遇到问题请参考:iOS SDK 调试指南
高级功能
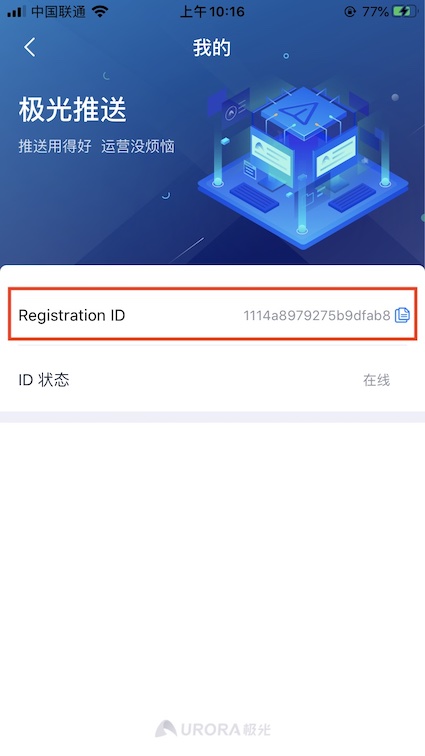
获取 Registration ID 交互建议
由于极光推送所有形式的推送最后都会转化为对 Registration ID 推送,因此排查客户问题的时候需要提供 Registration ID。为了方便线上客户准确提供信息,减少沟通成本,我们建议您完成 SDK 集成后,在 App 的【关于】、【意见反馈】、【我的】等比较不常用的 UI 中展示客户的 Registration ID 。
示例代码:
          [JPUSHService registrationIDCompletionHandler:^(int resCode, NSString *registrationID) {
    NSLog(@"resCode : %d,registrationID: %@",resCode,registrationID);
}];
效果如图:
关于 IDFA
从 JPUSH v3.2.2 版本开始,极光提供 idfa 和 noidfa 两个版本,JPUSH v3.2.6 及以上版本由 JCORE 提供 idfa 和 noidfa 两个版本,请注意选择版本集成。 idfa 版本是标准版,默认自动采集 IDFA 数据, noidfa 版本不自动采集。极光建议开发者使 idfa 版本。当然,如果开发者不想使⽤ IDFA 或者担忧采集 IDFA 而未集成任何广告服务遭到 Apple 拒绝,我们也准备了该无 IDFA 版本供开发者集成,版本集成方式:
JPush 3.2.6 及以上版本,如果使用 JCore 2.1.4 及以上版本,使用方式如下(以 JPush 4.8.0 版本、JCore 3.2.3 版本为例):
pod 'JCore', '3.2.3-noidfa' // 必选项 pod 'JPush', '4.8.0' // 必选项pod 'JCore', '3.2.3-noidfa' // 必选项 pod 'JPush', '4.8.0' // 必选项此代码块在浮窗中显示JPush 3.2.6 及以上版本,如果使用 JCore 2.1.2 及以下版本,使用方式如下(以 JPush 3.2.6 版本为例):
pod 'JCore', '2.1.2' // 必选项 pod 'JPush', '3.2.6' // 必选项pod 'JCore', '2.1.2' // 必选项 pod 'JPush', '3.2.6' // 必选项此代码块在浮窗中显示JPush 3.2.2、3.2.4 两个版本,如果使用 JCore 2.1.4 及以上版本,使用方式如下(以 JPush 3.2.4 版本为例):
pod 'JCore', '2.1.4-noidfa' // 必选项 pod 'JPush', '3.2.4-noidfa' // 必选项pod 'JCore', '2.1.4-noidfa' // 必选项 pod 'JPush', '3.2.4-noidfa' // 必选项此代码块在浮窗中显示JPush 3.2.2、3.2.4 两个版本,如果使用 JCore 2.1.2 及以下版本,使用方式如下(以 JPush 3.2.4 版本为例):
pod 'JCore', '2.1.2' // 必选项 pod 'JPush', '3.2.4-noidfa' // 必选项pod 'JCore', '2.1.2' // 必选项 pod 'JPush', '3.2.4-noidfa' // 必选项此代码块在浮窗中显示
在iOS14需要去申请用户权限,首先需要在 Info.plist 中配置" NSUserTrackingUsageDescription " 及描述文案,接着使用 AppTrackingTransparency 框架中的 ATTrackingManager 中的 requestTrackingAuthorizationWithCompletionHandler 请求用户权限,在用户授权后再去访问 IDFA 才能够获取到正确信息。
r2.1.5 版本增加一个上传 IDFA 字符串的接口
           + (void)setupWithOption:(NSDictionary *)launchingOption
                  appKey:(NSString *)appKey
                 channel:(NSString *)channel
        apsForProduction:(BOOL)isProduction
   advertisingIdentifier:(NSString *)advertisingId;
如果不使用 IDFA,仍可使用接口
          + (void)setupWithOption:(NSDictionary *)launchingOption
                  appKey:(NSString *)appKey
                 channel:(NSString *)channel
        apsForProduction:(BOOL)isProduction;
JPush SDK 相关事件监听
建议开发者加上 API 里面提供的以下类型的通知:
extern NSString *const kJPFNetworkIsConnectingNotification; // 正在连接中
extern NSString * const kJPFNetworkDidSetupNotification; // 建立连接
extern NSString * const kJPFNetworkDidCloseNotification; // 关闭连接
extern NSString * const kJPFNetworkDidRegisterNotification; // 注册成功
extern NSString *const kJPFNetworkFailedRegisterNotification; //注册失败
extern NSString * const kJPFNetworkDidLoginNotification; // 登录成功
温馨提示:
Registration id 需要添加注册 kJPFNetworkDidLoginNotification 通知的方法里获取,也可以调用 [registrationIDCompletionHandler:] 方法,通过 completionHandler 获取
extern NSString * const kJPFNetworkDidReceiveMessageNotification; // 收到自定义消息(非 APNs)
其中,kJPFNetworkDidReceiveMessageNotification 传递的数据可以通过 NSNotification 中的 userInfo 方法获取,包括标题、内容、extras 信息等
请参考文档:iOS SDK API
通知展示统计
温馨提示:
iOS 10 新增的 Notification Service Extension 功能,用 mutable-content 字段来控制。
若使用 Web 控制台,需勾选 “可选设置”中 mutable-content 选项;若使用 RESTFul API 需设置 mutable-content 字段为 true。
从 iOS JPush SDK 3.0.7 版本,开发者可使用 Notification Service Extension SDK 上报每条 APNs 信息展示的状态。
使用方法:
- 创建一个 Notification Service Extension 服务,详情参考 iOS 10 Notification Service Extension。
选择 1:Cocoapods 导入
在 Podfile 中为 Notification Service Extension target 添加依赖:
          target 'YourNotificationServiceExtension' do
  pod 'JPushExtension'
end
注意:请将 YourNotificationServiceExtension 替换为您的实际 Extension target 名称。
选择 2:Swift Package Manager 导入
JPushExtension v2.0.6 及以上版本支持
- 在 Xcode 中,选择 File > Add Package Dependencies...
- 在搜索框中输入 JPushExtension 的 Swift Package 仓库地址:https://github.com/jpush/jpush-extension-sdk.git
https://github.com/jpush/jpush-extension-sdk.git此代码块在浮窗中显示 - 选择版本规则(Branch 选择 main 分支)
- 点击 "Add Package" 完成添加
- 在添加 Package 后,选择 JPushExtension 产品进行集成,Add To Target 请选择您的 Notification Service Extension Target
选择 3:手动导入
JPUSH v5.0.1 及以上版本
- 在极光官网下载 最新 SDK
- 将 SDK 包解压,在 Xcode 中选择 "Add files to 'Your project name'...",将解压后的 Libs-NotificationServiceExtension 子文件夹(包含文件 jpush-extension-ios-x.x.x.xcframework)添加到你的 Service Extension 工程目录中
JPUSH v5.0.1 以下版本
- 在极光官网下载 最新 SDK
- 将 SDK 包解压,在 Xcode 中选择 "Add files to 'Your project name'...",将解压后的 Libs-NotificationServiceExtension 子文件夹(包含文件 JPushNotificationExtensionService.h 和 jpush-extension-ios-x.x.x.a)添加到你的 Service Extension 工程目录中
代码集成:
调用 [jpushSetAppkey:] 方法设置您的 appkey,请注意这里的 appkey 应该和您极光应用的 appkey 相同。
调用 [jpushReceiveNotificationRequest:] 方法上报您的 apns 消息,完成展示统计;在该方法的 block 回调中进行 apns 的显示。
# import "NotificationService.h" # import "JPushNotificationExtensionService.h" @implementation NotificationService - (void)didReceiveNotificationRequest:(UNNotificationRequest *)request withContentHandler:(void (^)(UNNotificationContent * _Nonnull))contentHandler { - [JPushNotificationExtensionService jpushSetAppkey:@"AppKey copied from JiGuang Portal application"]; [JPushNotificationExtensionService jpushReceiveNotificationRequest:request with:^ { NSLog(@"apns upload success"); contentHandler(request.content); }]; } @end# import "NotificationService.h" # import "JPushNotificationExtensionService.h" @implementation NotificationService - (void)didReceiveNotificationRequest:(UNNotificationRequest *)request withContentHandler:(void (^)(UNNotificationContent * _Nonnull))contentHandler { - [JPushNotificationExtensionService jpushSetAppkey:@"AppKey copied from JiGuang Portal application"]; [JPushNotificationExtensionService jpushReceiveNotificationRequest:request with:^ { NSLog(@"apns upload success"); contentHandler(request.content); }]; } @end此代码块在浮窗中显示
Voip 推送
- 在 iOS 8 之后引入了一个基于 PushKit 框架的 Voip 推送,可以使得用户的 APP 在杀死的情况下唤醒 APP,并执行代码。
- Voip 不区分开发和生产证书,Apple Push Notification service SSL (Sandbox & Production) 和 VoIP Services Certificate 都支持 Voip 推送
添加 PushKit.Framework 库
- 以 optional 方式引入 PushKit.framework 库
- 导入头文件 #import <PushKit/PushKit.h>
- AppDelegate 实现 PKPushRegistryDelegate 协议
添加 Voip 权限
在 Project-> Capabilities->Background Modes 里把 Voice over IP 选项打开
代码实现
在 didFinishLaunchingWithOptions 方法中实现 Voip 注册
- (void)voipRegistration{ dispatch_queue_t mainQueue = dispatch_get_main_queue(); PKPushRegistry *voipRegistry = [[PKPushRegistry alloc] initWithQueue:mainQueue]; voipRegistry.delegate = self; // Set the push type to VoIP voipRegistry.desiredPushTypes = [NSSet setWithObject:PKPushTypeVoIP]; }- (void)voipRegistration{ dispatch_queue_t mainQueue = dispatch_get_main_queue(); PKPushRegistry *voipRegistry = [[PKPushRegistry alloc] initWithQueue:mainQueue]; voipRegistry.delegate = self; // Set the push type to VoIP voipRegistry.desiredPushTypes = [NSSet setWithObject:PKPushTypeVoIP]; }此代码块在浮窗中显示提交 Token
/// 系统返回VoipToken,上报给极光服务器 - (void)pushRegistry:(PKPushRegistry *)registry didUpdatePushCredentials:(PKPushCredentials *)pushCredentials forType:(PKPushType)type{ [JPUSHService registerVoipToken:pushCredentials.token]; }/// 系统返回VoipToken,上报给极光服务器 - (void)pushRegistry:(PKPushRegistry *)registry didUpdatePushCredentials:(PKPushCredentials *)pushCredentials forType:(PKPushType)type{ [JPUSHService registerVoipToken:pushCredentials.token]; }此代码块在浮窗中显示接收到 Voip 推送,调用回执接口,用户统计 Voip 送达。
- (void)pushRegistry:(PKPushRegistry *)registry didReceiveIncomingPushWithPayload:(PKPushPayload *)payload forType:(PKPushType)type{ // 提交回执给极光服务器 [JPUSHService handleVoipNotification:payload.dictionaryPayload]; } - (void)pushRegistry:(PKPushRegistry *)registry didReceiveIncomingPushWithPayload:(PKPushPayload *)payload forType:(PKPushType)type withCompletionHandler:(void(^)(void))completion{ // 提交回执给极光服务器 [JPUSHService handleVoipNotification:payload.dictionaryPayload]; }- (void)pushRegistry:(PKPushRegistry *)registry didReceiveIncomingPushWithPayload:(PKPushPayload *)payload forType:(PKPushType)type{ // 提交回执给极光服务器 [JPUSHService handleVoipNotification:payload.dictionaryPayload]; } - (void)pushRegistry:(PKPushRegistry *)registry didReceiveIncomingPushWithPayload:(PKPushPayload *)payload forType:(PKPushType)type withCompletionHandler:(void(^)(void))completion{ // 提交回执给极光服务器 [JPUSHService handleVoipNotification:payload.dictionaryPayload]; }此代码块在浮窗中显示
LiveActivity
iOS 16.1 中推出了一个新功能 LiveActivity(实时活动)。实时活动展示在锁屏界面上,可帮助用户直接从锁定屏幕实时获知各种事情的进展。
在主工程中使用 ActivityKit 框架 来 开启、更新、结束 实时活动。在 widget extension 中 使用 SwiftUI 和 WidgetKit 来 创建 Live Activity 的界面。
更新、结束 实时活动 不仅可以使用 ActivityKit 实现。也可以使用远程推送来实现。
LiveActivity远程推送更新功能,不支持p12证书。需要用户配置p8证书。
下面介绍了如何在项目中支持实时活动。如果您已经实现,请关注下方 "提交 Token"模块即可。
添加 ActivityKit.Framework 库
主工程以 optional 方式引入 ActivityKit.Framework 库

导入头文件 import ActivityKit
配置工程支持 LiveActivity
在主工程的 Info.plist 文件中添加一个键值对,key 为 NSSupportsLiveActivities,value 为 YES;

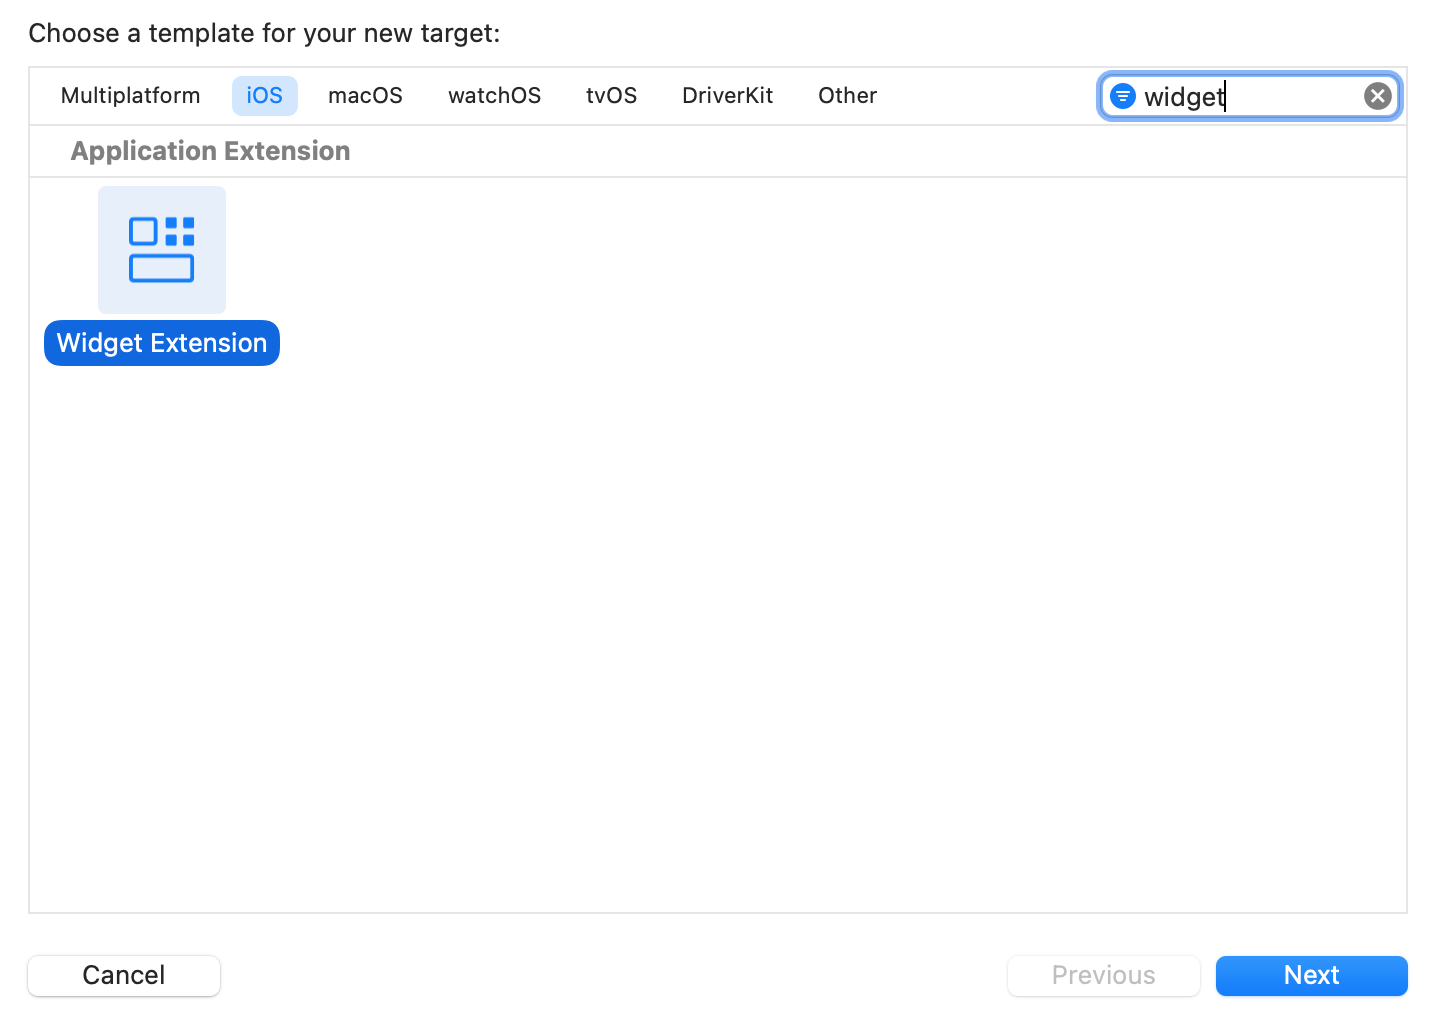
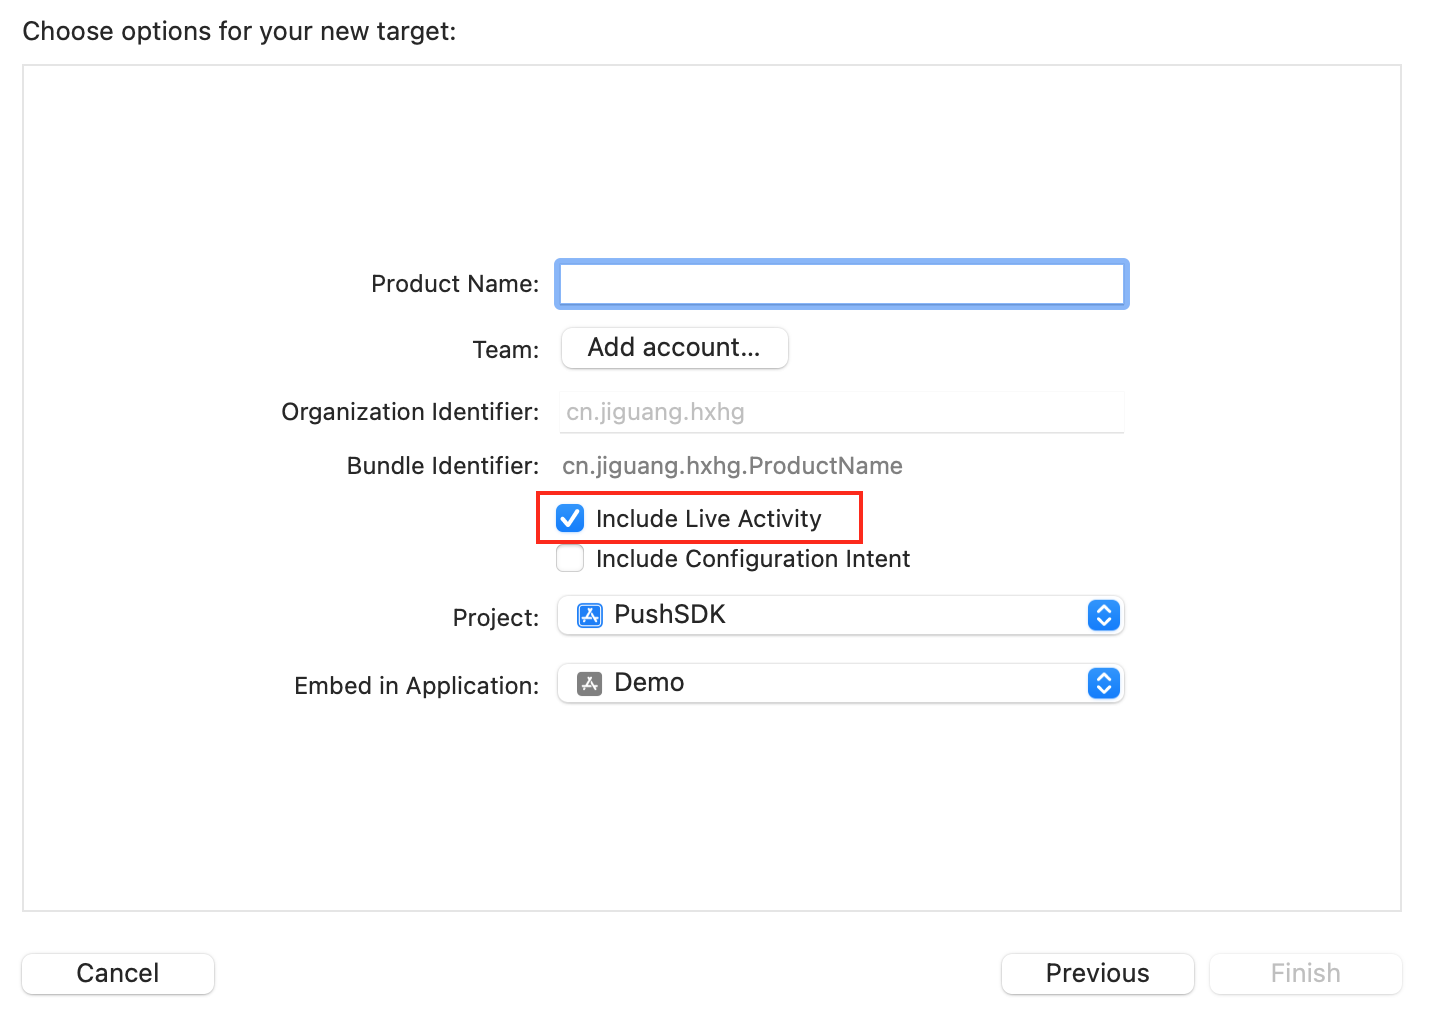
新建Widget Extension, 如果项目中已经有,则该步跳过。
代码实现
在主工程代码里新建一个swift文件,在其中定义一组 ActivityAttributes 以及 Activity.ContentState;
以下代码为示例代码,请按照自己的业务编写。 ContentState里为可以动态更新的数据,通过极光推送LiveActivity通知时,动态更新的参数名和类型要和ContentState里配置的对应上。否则会更新不成功。
import ActivityKit @available(iOS 16.1, *) struct JGLAAttributes: ActivityAttributes { public typealias JGLAStatus = ContentState // ContentState 里 为可以动态更新的数据。 public struct ContentState: Codable, Hashable { var eventStr: String // 事件名称 var eventTime: Int // 事件时间 } // 以下为静态数据,不可改变。 var name: String // 展示的名字 var number: Int // 第几个 }import ActivityKit @available(iOS 16.1, *) struct JGLAAttributes: ActivityAttributes { public typealias JGLAStatus = ContentState // ContentState 里 为可以动态更新的数据。 public struct ContentState: Codable, Hashable { var eventStr: String // 事件名称 var eventTime: Int // 事件时间 } // 以下为静态数据,不可改变。 var name: String // 展示的名字 var number: Int // 第几个 }此代码块在浮窗中显示在 Widget Extension 中 创建实时活动的界面。
创建 Widget 并返回一个 ActivityConfiguration。 以下为示例代码,具体UI请按照自己的业务编写。
import ActivityKit import WidgetKit import SwiftUI @available(iOS 16.1, *) struct PizzaDeliveryActivityWidget: Widget { var body: some WidgetConfiguration { ActivityConfiguration(for: JGLAAttributes.self) { context in // Create the view that appears on the Lock Screen and as a // banner on the Home Screen of devices that don't support the // Dynamic Island. // 锁屏界面样式。在不支持灵动岛的设备上如果数据有更新,在主屏幕上也会将以下界面以一个横幅的样式进行提示。 LockScreenLiveActivityView(context: context) } dynamicIsland: { context in // 以下为灵动岛的样式 DynamicIsland { // Create the expanded view. DynamicIslandExpandedRegion(.leading) { Text("L") } DynamicIslandExpandedRegion(.trailing) { Text("T") } DynamicIslandExpandedRegion(.center) { Text("C") } DynamicIslandExpandedRegion(.bottom) { Text("B") } } compactLeading: { // Create the compact leading view. Text("CL") } compactTrailing: { // Create the compact trailing view. Text("CT") } minimal: { // Create the minimal view. Text("M") } .keylineTint(.white) } } } // 锁屏界面样式 @available(iOS 16.1, *) struct LockScreenLiveActivityView: View { let context: ActivityViewContext<JGLAAttributes> var body: some View { VStack { Spacer() Text("JIGUANG: \(context.attributes.name)-\(context.attributes.number)") Spacer() HStack { Spacer() Text("eventStr: \(context.state.eventStr) , eventTime: \(context.state.eventTime)") Spacer() } Spacer() } .activitySystemActionForegroundColor(.indigo) .activityBackgroundTint(.cyan) } }import ActivityKit import WidgetKit import SwiftUI @available(iOS 16.1, *) struct PizzaDeliveryActivityWidget: Widget { var body: some WidgetConfiguration { ActivityConfiguration(for: JGLAAttributes.self) { context in // Create the view that appears on the Lock Screen and as a // banner on the Home Screen of devices that don't support the // Dynamic Island. // 锁屏界面样式。在不支持灵动岛的设备上如果数据有更新,在主屏幕上也会将以下界面以一个横幅的样式进行提示。 LockScreenLiveActivityView(context: context) } dynamicIsland: { context in // 以下为灵动岛的样式 DynamicIsland { // Create the expanded view. DynamicIslandExpandedRegion(.leading) { Text("L") } DynamicIslandExpandedRegion(.trailing) { Text("T") } DynamicIslandExpandedRegion(.center) { Text("C") } DynamicIslandExpandedRegion(.bottom) { Text("B") } } compactLeading: { // Create the compact leading view. Text("CL") } compactTrailing: { // Create the compact trailing view. Text("CT") } minimal: { // Create the minimal view. Text("M") } .keylineTint(.white) } } } // 锁屏界面样式 @available(iOS 16.1, *) struct LockScreenLiveActivityView: View { let context: ActivityViewContext<JGLAAttributes> var body: some View { VStack { Spacer() Text("JIGUANG: \(context.attributes.name)-\(context.attributes.number)") Spacer() HStack { Spacer() Text("eventStr: \(context.state.eventStr) , eventTime: \(context.state.eventTime)") Spacer() } Spacer() } .activitySystemActionForegroundColor(.indigo) .activityBackgroundTint(.cyan) } }此代码块在浮窗中显示//如果您的app既支持小组件也支持实时活动。请使用WidgetBundle。
import WidgetKit import SwiftUI @main struct DemoWidgetServiceBundle: WidgetBundle { var body: some Widget { DemoWidgetService() if #available(iOS 16.1, *) { PizzaDeliveryActivityWidget() } } }import WidgetKit import SwiftUI @main struct DemoWidgetServiceBundle: WidgetBundle { var body: some Widget { DemoWidgetService() if #available(iOS 16.1, *) { PizzaDeliveryActivityWidget() } } }此代码块在浮窗中显示开始实时活动
开启成功后,会在锁屏界面显示实时活动。
// 初始状态 let initialContentState = JGLAAttributes.ContentState(eventStr: "begin", eventTime: 1) let activityAttributes = JGLAAttributes(name: "LiveActivity", number: "1") do { // 创建Activity let jgActivity = try Activity.request(attributes: activityAttributes, contentState: initialContentState, pushType:PushType.token) print("Requested a Live Activity \(String(describing: jgActivity.id)).") } catch (let error) { print("Error requesting Live Activity \(error.localizedDescription).") }// 初始状态 let initialContentState = JGLAAttributes.ContentState(eventStr: "begin", eventTime: 1) let activityAttributes = JGLAAttributes(name: "LiveActivity", number: "1") do { // 创建Activity let jgActivity = try Activity.request(attributes: activityAttributes, contentState: initialContentState, pushType:PushType.token) print("Requested a Live Activity \(String(describing: jgActivity.id)).") } catch (let error) { print("Error requesting Live Activity \(error.localizedDescription).") }此代码块在浮窗中显示提交 Token
开启实时活动成功后,通过 pushTokenUpdates 方法拿到系统返回的 实时活动 的 PushToken。 调用极光的 registerLiveActivity:pushToken:completion:seq api 上报给极光服务器。 在上报pushToken的同时,需要将该 实时活动 的标识 一起上报给极光服务器。通过极光进行实时活动推送时需要用到该标识。极光服务器根据该标识确认推送目标。该实时活动的标识请自定义,建议可以唯一。
注意:
ActivityKit为swift语言框架,且不支持直接oc调用,使用该框架api的时候,请在swift文件里面调用。由于JPush SDK 是OC语言,涉及到swift调用OC,需要创建桥接文件。 并在桥接文件里导入:
#import "JPUSHService.h"
上报成功后,则可以使用 实时活动的标识 进行推送更新。
// 系统返回LiveActivity的PushToken,上报给极光服务器 for await pushtoken in jgActivity.pushTokenUpdates { let liveactivityId = "LiveActivity-01" // 向极光注册liveactivity,在推送平台通过liveactivityId推送通知进行更新 JPUSHService.registerLiveActivity(liveactivityId, pushToken: pushtoken, completion: { code, liveactivityId, token, seq in print("registerLiveActivity liveactivityId:\(String(describing: liveactivityId)) token: \(pushtokenstr) result:\(code) seq:\(seq)") }, seq: seq()) }// 系统返回LiveActivity的PushToken,上报给极光服务器 for await pushtoken in jgActivity.pushTokenUpdates { let liveactivityId = "LiveActivity-01" // 向极光注册liveactivity,在推送平台通过liveactivityId推送通知进行更新 JPUSHService.registerLiveActivity(liveactivityId, pushToken: pushtoken, completion: { code, liveactivityId, token, seq in print("registerLiveActivity liveactivityId:\(String(describing: liveactivityId)) token: \(pushtokenstr) result:\(code) seq:\(seq)") }, seq: seq()) }此代码块在浮窗中显示在实时活动结束时,同样调用该接口,告知极光服务器该实时活动已结束。pushToken参数传nil即可。
Task { for await stateUpdate in jgActivity.activityStateUpdates { if stateUpdate == .dismissed || stateUpdate == .ended { // 当liveactivity结束时,向极光注册清除pushToken JPUSHService.registerLiveActivity(liveactivityId, pushToken: nil, completion: { code, liveActivityId, token, seq in print("registerLiveActivity liveactivityId:\(String(describing: liveActivityId)) token: nil result:\(code) seq:\(seq)") }, seq: seq()); } } }Task { for await stateUpdate in jgActivity.activityStateUpdates { if stateUpdate == .dismissed || stateUpdate == .ended { // 当liveactivity结束时,向极光注册清除pushToken JPUSHService.registerLiveActivity(liveactivityId, pushToken: nil, completion: { code, liveActivityId, token, seq in print("registerLiveActivity liveactivityId:\(String(describing: liveActivityId)) token: nil result:\(code) seq:\(seq)") }, seq: seq()); } } }此代码块在浮窗中显示从iOS17.2开始,苹果允许使用推送启动一个liveactivity,这个操作依赖于pushToStartToken。 监听pushToStartTokenUpdates:函数获取liveactivity的pushToStartToken的变化,并将其上报到极光服务器。
pushToStartToken在首次启动App时可能没有回调。需要在本地创建一个LiveActivity后,才能触发pushToStartToken回调。之后启动App都会触发pushToStartToken回调。
           Task {
      if #available(iOS 17.2, *) {
        var beforeToken = "";
        for await pushtoken in Activity<JGLAAttributes>.pushToStartTokenUpdates {
          let pushtokenstr = pushtoken.map { String(format: "%02.2hhx", arguments: [$0]) }.joined()
          // 建议在这里做个去重处理,因为这里的回调可能会有多次,且值没有变化。
          if (beforeToken == pushtokenstr) {
            return
          }
          beforeToken = pushtokenstr

          // 向极光服务器上报pushToStartToken
          JPUSHService.registerLiveActivity("JGLAAttributes", pushToStartToken: pushtoken, completion: { code, alias, token, seq in
            print("register JGLAAttributes pushToStartToken result: \(pushtokenstr) result:\(code) seq:\(seq)")
          }, seq: seq())

        }
      } else {
        // Fallback on earlier versions
      }
    }
更多功能可以查看demo。
技术支持
- 当出现问题时:
- 请仔细阅读 iOS FAQ 文档,查看是否有遗漏。
- 你可以到极光社区搜索类似问题
- 给我们的 support 发邮件 [support@jiguang.cn][4]
- 为了更快速的解决问题,在寻求帮助时,请提供下列信息:
- 你需要咨询的产品是 JPush,是否同时使用了极光其他的产品
- 你所调用的是什么 API,所传参数,完整的报错信息,出现异常的时间点
- 如果收不到消息,提供应用的 Appkey,消息的 Message ID,设备的 registration ID 信息
- 如果是 SDK 问题请提供对应的 SDK 版本和完整的日志记录,日志信息请使用 TXT 文件上传
- 出现异常的设备是 iOS ,列出具体的机型和系统

