
Android SDK 集成指南
使用提示
本文是 JPush Android SDK 标准的集成指南文档。用以指导 SDK 的使用方法,默认读者已经熟悉 IDE(Eclipse 或者 Android Studio)的基本使用方法,以及具有一定的 Android 编程知识基础。
本篇指南匹配的 JPush Android SDK 版本为:3.0.0 及以后版本。
- 三分钟完成 Demo 体验(Android):如果您想要快速地测试、感受下极光推送的效果,请参考本文在几分钟内跑通 Demo。
- 极光推送 文档网站 上,有极光推送相关的所有指南、API、教程等全部的文档。包括本文档的更新版本,都会及时地发布到该网站上。
- 如果您看到本文档,但还未下载 Android SDK,请访问 组装 SDK 服务 并下载。
产品功能说明
极光推送(JPush)是一个端到端的推送服务,使得服务器端消息能够及时地推送到终端用户手机上,让开发者积极地保持与用户的连接,从而提高用户活跃度、提高应用的留存率。极光推送客户端支持 Android,iOS 两个平台。
本 Android SDK 方便开发者基于 JPush 来快捷地为 Android App 增加推送功能。
主要功能
- 保持与服务器的长连接,以便消息能够即时推送到达客户端
- 接收通知与自定义消息,并向开发者 App 传递相关信息
主要特点
- 客户端维持连接占用资源少、耗电低
- SDK 丰富的接口,可定制通知栏提示样式
- 服务器大容量、稳定
SDK 所支持的 Android 系统版本
- 目前 SDK 只支持 Android 2.3 或以上版本的手机系统;
- 富媒体信息流、应用内消息功能则需 Android 3.0 或以上版本的系统。
mavenCentral 自动集成方式(推荐)
使用 mavenCentral 自动集成的开发者,不需要在项目中添加 jar 和 so,mavenCentral 会自动完成依赖;在 AndroidManifest.xml 中不需要添加任何 JPush SDK 相关的配置,mavenCentral 会自动导入。
如果需要处理收到的消息、使用 3.0.7 版本支持的别名与标签的新接口,AndroidManifest 中的自定义广播接收器仍需开发者手动配置,参考 SDK 压缩包里的 AndroidManifest.xml 样例文件。
修改组件属性
如果开发者需要修改组件属性,可以在本地的 AndroidManifest 中定义同名的组件并配置想要的属性,然后用 xmlns:tools 来控制本地组件覆盖 mavenCentral 上的组件。示例:
          <manifest xmlns:android="http://schemas.android.com/apk/res/android"
    package="com.android.tests.flavorlib.app"
    xmlns:tools="http://schemas.android.com/tools">

    <application
        android:icon="@drawable/icon"
        android:name="com.example.jpushdemo.ExampleApplication"
        android:label="@string/app_name" >

  </application>

</manifest>
配置 mavenCentral 支持
确认 android studio 的 Project 根目录的主 gradle 中配置了 mavenCentral 支持。(新建 project 默认配置就支持)
          buildscript {
    repositories {
        mavenCentral()
    }
    ......
}

allprojects {
    repositories {
        mavenCentral()
    }
}
配置依赖和替换变量
在 module 的 gradle 中添加依赖和 AndroidManifest 的替换变量。
          android {
    ......
    defaultConfig {
    applicationId "com.xxx.xxx" //JPush 上注册的包名.
    ......

    ndk {
        //选择要添加的对应 cpu 类型的 .so 库。
        abiFilters 'armeabi', 'armeabi-v7a', 'arm64-v8a'
        // 还可以添加 'x86', 'x86_64', 'mips', 'mips64'
    }

    manifestPlaceholders = [
        JPUSH_PKGNAME : applicationId,
        JPUSH_APPKEY : "你的 Appkey ", //JPush 上注册的包名对应的 Appkey.
        JPUSH_CHANNEL : "developer-default", //暂时填写默认值即可.
    ]
    ......
}
......
}

dependencies {
......

implementation 'cn.jiguang.sdk:jpush:5.8.0'        // 必选,此处以JPush 5.8.0 版本为例,注意:5.0.0 版本开始可以自动拉取 JCore 包,无需另外配置
implementation 'cn.jiguang.sdk:joperate:2.0.2'     // 可选,集成极光分析SDK后,即可支持行为触发推送消息、推送转化率统计,用户行为分析和用户标签等功能

}
极光分析SDK更多功能和API详见极光分析SDK集成指南
如果需要使用指定版本的 JCore,可以使用如下命令,不再自动拉取最新版jcore
implementation ('cn.jiguang.sdk:jpush:5.8.0'){ exclude group: 'cn.jiguang.sdk', module: 'jcore' //不再使用自动拉取的最新版 JCore } implementation 'cn.jiguang.sdk:jcore:5.x.x' //使用指定的 JCore 版本implementation ('cn.jiguang.sdk:jpush:5.8.0'){ exclude group: 'cn.jiguang.sdk', module: 'jcore' //不再使用自动拉取的最新版 JCore } implementation 'cn.jiguang.sdk:jcore:5.x.x' //使用指定的 JCore 版本此代码块在浮窗中显示当使用的 JPush ≥ 5.0.0 且 JCore < 4.2.0时,需要在清单文件中添加以下配置:
          <provider tools:node="remove"
            android:exported="false"
            android:authorities="${applicationId}.jiguang.InitProvider"
            android:name="cn.jpush.android.service.InitProvider"></provider>
- 如果使用的 JPush < 5.0.0 版本时,需要配置 JCore 依赖:
          implementation 'cn.jiguang.sdk:jpush:4.x.x'
implementation 'cn.jiguang.sdk:jcore:4.x.x'
Google Play 版本
如果你希望使用 Google Play 版本,则自动集成时需要选择 Google Play 版本对应 SDK
- 5.0.0 版本开始可以自动拉取 JCore 包,无需另外配置,配置如下:
          dependencies {
......

implementation 'cn.jiguang.sdk:jpush-google:5.8.0'  // 此处以JPush 5.8.0 Google Play 版本为例,

}
- 如果想剔除 JPush 自动依赖的 JCore,可以使用以下方式:
implementation ('cn.jiguang.sdk:jpush-google:5.8.0'){
       exclude group: 'cn.jiguang.sdk', module: 'jcore-google'//会自动把 JCore 剔除
}
- 注意 :当使用JPush 5.0.0 及以上版本时,用户移除了JPush自动依赖的JCore版本,而使用自己依赖的JCore其他版本当JCore版本< 4.2.0时,需要在清单文件中添加以下配置:
          <provider tools:node="remove"
            android:exported="false"
            android:authorities="${applicationId}.jiguang.InitProvider"
            android:name="cn.jpush.android.service.InitProvider"></provider>
- 如果使用 JPush 5.0.0 及以下版本时,需要配置 JCore 依赖:
          implementation 'cn.jiguang.sdk:jpush-google:4.x.x'
implementation 'cn.jiguang.sdk:jcore-google:4.x.x'
配置 Service
如果你使用的 JCore 是 2.0.0 及以上的版本,需要额外在 Androidmanifest 中配置一个 Service,以在更多手机平台上获得更稳定的支持,示例如下。(JCore1.x 版本不需要)
           <!-- Since JCore2.0.0 Required SDK核心功能-->
 <!-- 可配置android:process参数将Service放在其他进程中;android:enabled属性不能是false -->
 <!-- 这个是自定义Service,要继承极光JCommonService,可以在更多手机平台上使得推送通道保持的更稳定 -->
 <service android:name="xx.xx.XService"
         android:enabled="true"
         android:exported="false"
         android:process=":pushcore">
         <intent-filter>
             <action android:name="cn.jiguang.user.service.action" />
         </intent-filter>
 </service>
配置 Receiver
从 JPush3.0.7 开始,需要配置继承 JPushMessageReceiver 的广播,原来如果配了 MyReceiver 现在可以弃用。示例如下。
           <!-- Required since 3.0.7 -->
 <!-- 新的 tag/alias 接口结果返回需要开发者配置一个自定的广播 -->
 <!-- 3.3.0开始所有事件将通过该类回调 -->
 <!-- 该广播需要继承 JPush 提供的 JPushMessageReceiver 类, 并如下新增一个 Intent-Filter -->
 <receiver
       android:name="自定义 Receiver"
       android:enabled="true"
       android:exported="false" >
       <intent-filter>
            <!-- 从 JPush v5.4.0 版本开始,请特别注意 RECEIVER_MESSAGE 写法, 如配置错误则无法找到回调类 -->
            <action android:name="cn.jpush.android.intent.RECEIVER_MESSAGE" />
            <category android:name="您应用的包名" />
       </intent-filter>
 </receiver>
注 :SDK回调方式说明
- SDK版本:3.0.7<= x < 5.2.0 和 5.4.0及以上 使用receiver 方式
- SDK版本:5.2.0<= x <=5.3.1 使用service 方式
注 : 如果在添加以上 abiFilter 配置之后 android Studio 出现以下提示:
NDK integration is deprecated in the current plugin. Consider trying the new experimental plugin
则在 Project 根目录的 gradle.properties 文件中添加:
android.useDeprecatedNdk=true
注 : 使用 NDK r17 时,可能 Android Studio 会出现以下提示:
          A problem occurred starting process ‘command
‘/Users/xxx/Library/Android/sdk/ndk-bundle/toolchains/mips64el-linux-android-4.9/prebuilt
/darwin-x86_64/bin/mips64el-linux-android-strip”

系统找不到指定的文件
这是因为 NDK r17 之后不再支持 mips 平台,在 build.gradle 里增加如下配置可解决
          android {

    defaultConfig {
        .....
    }

    packagingOptions {
        doNotStrip '*/mips/*.so'
        doNotStrip '*/mips64/*.so'
    }
}
若没有 res/drawable-xxxx/jpush_notification_icon 这个资源默认使用应用图标作为通知 icon,在 5.0 以上系统将应用图标作为 statusbar icon 可能显示不正常,用户可定义没有阴影和渐变色的 icon 替换这个文件,文件名不要变。
配置和代码说明
必须权限说明
| 权限 | 用途 |
|---|---|
| You Package.permission.JPUSH_MESSAGE | 官方定义的权限,允许应用接收 JPush 内部代码发送的广播消息。 |
| INTERNET | 允许应用可以访问网络。 |
| ACCESS_NETWORK_STATE | 允许应用获取网络信息状态,如当前的网络连接是否有效。 |
集成 JPush Android SDK 的混淆
请下载 4.x 及以上版本的 proguard.jar, 并替换你 Android SDK "tools\proguard\lib\proguard.jar"
请在工程的混淆文件中添加以下配置:
              -dontoptimize
    -dontpreverify

    -dontwarn cn.jpush.**
    -keep class cn.jpush.** { *; }
    -keep class * extends cn.jpush.android.service.JPushMessageReceiver { *; }

    -dontwarn cn.jiguang.**
    -keep class cn.jiguang.** { *; }
- 2.0.5 ~ 2.1.7 版本有引入 gson 和 protobuf,增加排除混淆的配置。(2.1.8 版本不需配置)
                  #==================gson && protobuf==========================
        -dontwarn com.google.**
        -keep class com.google.gson.** {*;}
        -keep class com.google.protobuf.** {*;}
关于资源混淆
极光 SDK 资源不能混淆,如果有资源混淆需要添加以下白名单:
          andResGuard {
   ...
    whiteList = [
        "R.xml.jpush*",
        "R.drawable.jpush*",
        "R.layout.jpush*",
        "R.layout.push*",
        "R.string.jg*",
        "R.style.MyDialogStyle",
        "R.style.JPushTheme"
    ]
    ...
}
添加代码
JPush SDK 提供的 API 接口,都主要集中在 cn.jpush.android.api.JPushInterface 类里。
基础 API
- init 初始化 SDK 与开启推送服务 API
特别提醒:
1. 考虑 APP 上线合规,开发者必须在APP用户同意了隐私政策,并且开发者确定为App用户开始提供推送服务后,再调用此接口启用推送业务功能来使用极光服务。
2. 关于 APP 隐私政策建议和说明,具体可以参考 极光推送SDK合规指引。
public static void init(Context context, JPushConfig config);
- setDebugMode 设置调试模式
注:该接口需在 init 接口之前调用,避免出现部分日志没打印的情况。多进程情况下建议在自定义的 Application 中 onCreate 中调用。
          // You can enable debug mode in developing state. You should close debug mode when release.
public static void setDebugMode(boolean debugEnalbed)
添加统计代码
- 参考文档: 统计分析 API
调用示例代码(参考 example 项目)
init 只需要在应用程序启动时调用一次该 API 即可。
以下代码定制一个本应用程序 Application 类。需要在 AndoridManifest.xml 里配置。请参考上面 AndroidManifest.xml 片断,或者 example 项目。
          public class ExampleApplication extends Application {
    @Override
    public void onCreate() {
        super.onCreate();
        JPushInterface.setDebugMode(true);

      // 调整点一:调用启用推送业务功能代码前增加setAuth调用
      boolean isPrivacyReady; // app根据是否已弹窗获取隐私授权来赋值
      if(!isPrivacyReady){
        // JCore 5.0.4之前版本需要显式设置false
        if (JCoreInterface.getJCoreSDKVersionInt() < 504) { // 5.0.4版本号对应504
          JCollectionAuth.setAuth(context, false);
        }
        // 所有版本在未授权时都不应初始化SDK
        return;
      }
      JPushInterface.init();


      // 调整点二:App用户同意了隐私政策授权,并且开发者确定要开启推送服务后调用
      // JCore 5.0.4+会自动处理授权状态,可不需要显式设置true
      JCollectionAuth.setAuth(context, true);

    }
}
测试确认
- 确认所需的权限都已经添加。如果必须的权限未添加,日志会提示错误。
- 确认 AppKey(在 Portal 上生成的)已经正确的写入 Androidmanifest.xml 。
- 确认在程序启动时候调用了 init(context)接口
- 确认测试手机(或者模拟器)已成功连入网络 + 客户端调用 init 后不久,如果一切正常,应有登录成功的日志信息
- 启动应用程序,在 Portal 上向应用程序发送自定义消息或者通知栏提示。详情请参考 创建推送。
- 在几秒内,客户端应可收到下发的通知或者正定义消息,如果 SDK 工作正常,则日志信息会如下:
          [JPushInterface] action:init
.......
[ConnectingHelper] Login succeed
如图所示,客户端启动分为 4 步:
- 检查 metadata 的 appKey 和 channel,如果不存在,则启动失败
- 初始化 JPush SDK,检查 JNI 等库文件的有效性,如果库文件无效,则启动失败
- 检查 Androidmanifest.xml,如果有 Required 的权限不存在,则启动失败
- 连接服务器登录,如果存在网络问题,则登陆失败,或者前面三步有问题,不会启动 JPush SDK
进阶功能
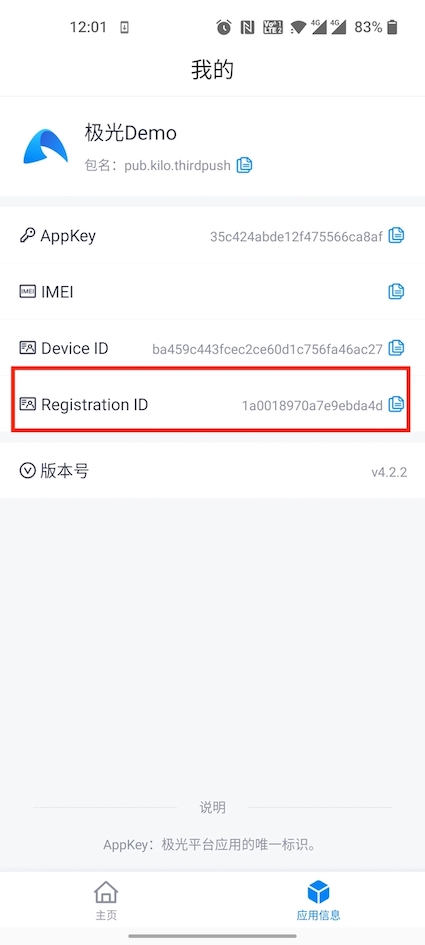
获取 Registration ID 交互建议
由于极光推送所有形式的推送最后都会转化为对 Registration ID 推送,因此排查客户问题的时候需要提供 Registration ID。为了方便线上客户准确提供信息,减少沟通成本,我们建议您完成 SDK 集成后,在 App 的【关于】、【意见反馈】、【我的】等比较不常用的 UI 中展示客户的 Registration ID 。
示例代码:
JPushInterface.getRegistrationID(getContext());
效果如图:
其他功能
请参考:
其他集成方式
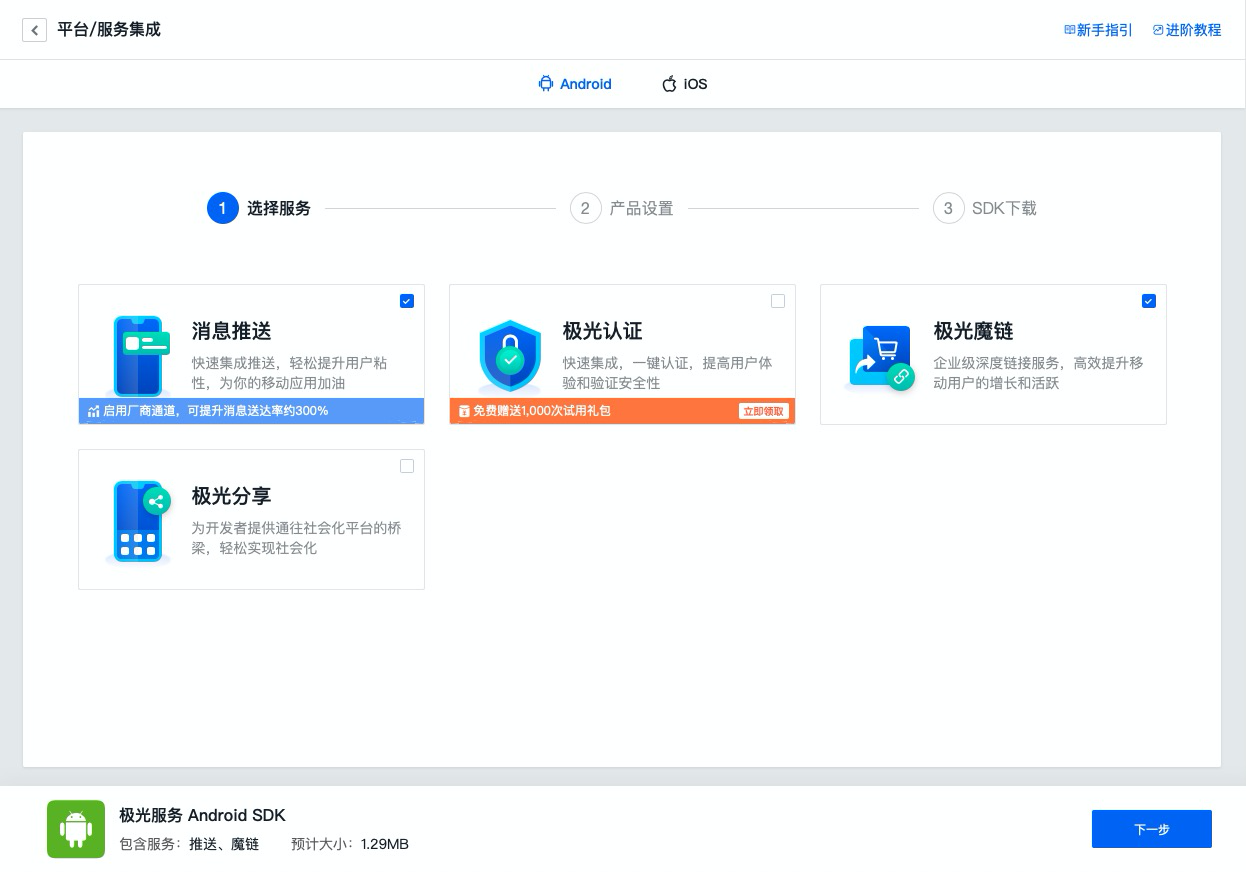
组装服务集成方式
组包服务是对手动集成 SDK 的封装服务,通过将 SDK 组合到单独的 jiguang module ,将手动集成的共同配置业务隐藏,开发者只需关注自己本身的个性化配置,减少集成步骤,提高开发者接入效率。
如您需要使用 Jpush 组包服务,请在组包服务界面勾选 JPush 服务,并 组装 SDK。
jiguang_sdk.zip 集成压缩包内容说明
jiguang
- JIGUANG SDK 组合包
- JPush jar 包,资源文件等已在该包中进行依赖,无需在手动拷贝依赖
jiguang-demo
- JIGUANG SDK 组合包集成 demo。
- 是一个完整的 Android 项目,通过这个演示了组包服务的基本用法,可以用来做参考。
- 根据您勾选的服务自动组合构建,组包前预设的相关配置会同时预埋到 demo 中
导入 JIGUANG SDK
通过 AS 将 SDK 作为 module 导入项目
导入步骤:AndroidStudio -> File -> New -> Import Module -> 选择 jiguang 导入
配置 JIGUANG SDK
settings.gradle 配置添加:
include ':jiguang'
在应用 gradle 中 添加 SDK 依赖
          android {
    ......
    defaultConfig {
        applicationId "com.xxx.xxx" //JPush 上注册的包名.
        ......

        manifestPlaceholders = [
            JPUSH_PKGNAME : applicationId,
            JPUSH_APPKEY : "你的 Appkey ", //JPush 上注册的包名对应的 Appkey.
            JPUSH_CHANNEL : "developer-default", //暂时填写默认值即可.
        ]
        ......
    }
    ......
}

dependencies {
    ......

    implementation project(':jiguang')
    ......
}
在应用 Androidmanifest 中配置
          <!-- Since JCore2.0.0 Required SDK核心功能-->
<!-- 可配置android:process参数将Service放在其他进程中;android:enabled属性不能是false -->
<!-- 这个是自定义Service,要继承极光JCommonService,可以在更多手机平台上使得推送通道保持的更稳定 -->
<service android:name="xx.xx.XService"
        android:enabled="true"
        android:exported="false"
        android:process=":pushcore">
        <intent-filter>
            <action android:name="cn.jiguang.user.service.action" />
        </intent-filter>
</service>

 <!-- Required since 3.0.7 -->
 <!-- 新的 tag/alias 接口结果返回需要开发者配置一个自定的广播 -->
 <!-- 3.3.0开始所有事件将通过该类回调 -->
 <!-- 该广播需要继承 JPush 提供的 JPushMessageReceiver 类, 并如下新增一个 Intent-Filter -->
 <receiver
       android:name="自定义 Receiver"
       android:enabled="true"
       android:exported="false" >
       <intent-filter>
            <action android:name="cn.jpush.android.intent.RECEIVER_MESSAGE" />
            <category android:name="您应用的包名" />
       </intent-filter>
 </receiver>
手动集成方式
手动集成压缩包下载链接:前往下载
jpush-android-3.x.x-release.zip 集成压缩包内容
- AndroidManifest.xml
- 客户端嵌入 SDK 参考的配置文件
- libs/jcore-android.x.x.x.jar
- 极光开发者服务的核心包。
- libs/jpush-android-3.x.y.jar
- JPush SDK 开发包。
- libs/(cpu-type)/libjcore1xx.so
- 各种 CPU 类型的 native 开发包。
- res
- 集成 SDK 必须添加的资源文件
- example
- 是一个完整的 Android 项目,通过这个演示了 JPush SDK 的基本用法,可以用来做参考。
SDK 文件移植
- 解压缩 jpush-android--3.x.x-release.zip 集成压缩包。
- 复制 libs/jcore-android-x.x.x.jar 到工程 libs/ 目录下。
- 复制 libs/jpush-android-3.x.x.jar 到工程 libs/ 目录下。
- 复制 libs/(cpu-type)/libjcore1xy.so 到你的工程中存放对应 cpu 类型的目录下。
- 复制 res/ 中 drawable-hdpi, layout, values 文件夹中的资源文件到你的工程中 res/ 对应同名的目录下。
说明 1:若没有 res/drawable-xxxx/jpush_notification_icon 这个资源默认使用应用图标作为通知 icon,在 5.0 以上系统将应用图标作为 statusbar icon 可能显示不正常,用户可定义没有阴影和渐变色的 icon 替换这个文件,文件名不要变。
说明 2:使用 android studio 的开发者,如果使用 jniLibs 文件夹导入 so 文件,则仅需将所有 cpu 类型的文件夹拷进去;如果将 so 文件添加在 module 的 libs 文件夹下,注意在 module 的 gradle 配置中添加一下配置:
          android {
    ......
    sourceSets {
        main {
            jniLibs.srcDirs = ['libs']
            ......
        }
        ......
    }
    ......
}
配置 AndroidManifest.xml
根据 SDK 压缩包里的 AndroidManifest.xml 样例文件,来配置应用程序项目的 AndroidManifest.xml 。
主要步骤为:
- 复制备注为 "Required" 的部分
- 将标注为“您应用的包名”的部分,替换为当前应用程序的包名
- 将标注为“您应用的 Appkey” 的部分,替换为在 Portal 上创建该应用后应用信息中的 Appkey,例如:9fed5bcb7b9b87413678c407
说明:
如果使用 android studio,可在 AndroidManifest 中引用 applicationId 的值,在 build.gradle 配置中 defaultConfig 节点下配置,如:
          defaultConfig {
    applicationId "cn.jpush.example" //您应用的包名
......
}
在 AndroidManifest 中使用 ${applicationId} 引用 gradle 中定义的包名
AndroidManifest 示例
          <?xml version="1.0" encoding="utf-8"?>
<manifest xmlns:android="http://schemas.android.com/apk/res/android"
    package="您应用的包名"
    android:versionCode="316"
    android:versionName="3.1.6"
    >
    <uses-sdk android:minSdkVersion="9" android:targetSdkVersion="23" />

    <!-- Required -->
    <permission
        android:name="您应用的包名.permission.JPUSH_MESSAGE"
        android:protectionLevel="signature" />
    <uses-permission android:name="您应用的包名.permission.JPUSH_MESSAGE" />
    <uses-permission android:name="android.permission.INTERNET" />
    <uses-permission android:name="android.permission.ACCESS_NETWORK_STATE" />
    <!-- 适配Android13,弹出通知必须权限-->
     <uses-permission android:name="android.permission.POST_NOTIFICATIONS"/>

    <!-- Optional. Required for location feature -->
    <!-- 为了提高sdk识别唯一用户的能力,保证消息推送的精准送达,建议集成以下权限(可选)-->
    <uses-permission android:name="android.permission.READ_PHONE_STATE" />
    <uses-permission android:name="android.permission.QUERY_ALL_PACKAGES" />
    <uses-permission android:name="android.permission.GET_TASKS" />
    <uses-permission android:name="android.permission.ACCESS_WIFI_STATE" />

   <!-- 如您需要接入地理围栏业务,建议集成以下权限(可选)-->
    <uses-permission android:name="android.permission.ACCESS_COARSE_LOCATION" />
    <uses-permission android:name="android.permission.ACCESS_FINE_LOCATION" />
    <uses-permission android:name="android.permission.ACCESS_BACKGROUND_LOCATION" />

    <!-- 如您需要对应设备通知相关的能力,建议集成以下权限(可选)-->
    <uses-permission android:name="com.huawei.android.launcher.permission.CHANGE_BADGE" /><!-- 华为角标 -->
    <uses-permission android:name="com.vivo.notification.permission.BADGE_ICON" /><!-- VIVO角标权限 -->
    <uses-permission android:name="com.hihonor.android.launcher.permission.CHANGE_BADGE" /><!--honor 角标-->
    <uses-permission android:name="android.permission.VIBRATE" /><!--振动器权限,JPUSH支持通知开启振动功能,小米推送必须-->

    <!-- 扩展备用权限(可选)-->
    <permission android:name="${applicationId}.permission.JOPERATE_MESSAGE" android:protectionLevel="signature"/>
    <uses-permission android:name="${applicationId}.permission.JOPERATE_MESSAGE" />


    <application
        android:icon="@drawable/ic_launcher"
        android:label="@string/app_name"
        android:name="Your Application Name">

        <!-- Required SDK 核心功能-->
        <!-- 可配置 android:process 参数将 PushService 放在其他进程中 -->
        <service
            android:name="cn.jpush.android.service.PushService"
            android:enabled="true"
            android:exported="false" >
            <intent-filter>
                <action android:name="cn.jpush.android.intent.REGISTER" />
                <action android:name="cn.jpush.android.intent.REPORT" />
                <action android:name="cn.jpush.android.intent.PushService" />
                <action android:name="cn.jpush.android.intent.PUSH_TIME" />
            </intent-filter>
        </service>


 <!-- since 3.0.9 Required SDK 核心功能-->
        <provider
            android:authorities="您应用的包名.DataProvider"
            android:name="cn.jpush.android.service.DataProvider"
            android:exported="true"
            android:process=":pushcore"
        />

        <!-- Required SDK 核心功能-->
        <receiver
            android:name="cn.jpush.android.service.PushReceiver"
            android:exported="false"
            android:enabled="true" >
          <intent-filter>
                <action android:name="cn.jpush.android.intent.NOTIFICATION_RECEIVED_PROXY" />
                <category android:name="您应用的包名"/>
            </intent-filter>
        </receiver>

        <!-- Required SDK 核心功能-->
        <activity
            android:name="cn.jpush.android.ui.PushActivity"
            android:configChanges="orientation|keyboardHidden"
            android:theme="@android:style/Theme.NoTitleBar"
            android:exported="true" >
            <intent-filter>
                <action android:name="cn.jpush.android.ui.PushActivity" />
                <category android:name="android.intent.category.DEFAULT" />
                <category android:name="您应用的包名" />
            </intent-filter>
        </activity>
        <!-- SDK 核心功能-->
        <activity
            android:name="cn.jpush.android.ui.PopWinActivity"
            android:configChanges="orientation|keyboardHidden"
            android:exported="true"
            android:theme="@style/JPushDialogStyle">
            <intent-filter>
                <category android:name="android.intent.category.DEFAULT" />
                <action android:name="cn.jpush.android.ui.PopWinActivity" />
                <category android:name="您应用的包名" />
            </intent-filter>
        </activity>


        <!-- Since JCore2.0.0 Required SDK核心功能-->
     <!-- 可配置android:process参数将Service放在其他进程中;android:enabled属性不能是false -->
        <!-- 这个是自定义Service,要继承极光JCommonService,可以在更多手机平台上使得推送通道保持的更稳定 -->
         <service android:name="xx.xx.XService"
                 android:enabled="true"
                 android:exported="false"
                 android:process=":pushcore">
                 <intent-filter>
                     <action android:name="cn.jiguang.user.service.action" />
                 </intent-filter>
         </service>

        <!-- Required SDK 核心功能-->
        <receiver android:name="cn.jpush.android.service.AlarmReceiver" />

        <!-- 新的 tag/alias 接口结果返回需要开发者配置一个自定义的Service -->
        <!-- 该广播需要继承 JPush 提供的 JPushMessageReceiver 类, 并如下新增一个 Intent-Filter -->
        <receiver
            android:name="自定义 Receiver"
            android:enabled="true"
            android:exported="false" >
            <intent-filter>
                <action android:name="cn.jpush.android.intent.RECEIVER_MESSAGE" />
                <category android:name="您应用的包名" />
            </intent-filter>
        </receiver>


        <!--Required SDK核心功能 since 3.3.0,主要用来统一各大推送厂商跳转逻辑,透明窗体也是为了通知跳转时候,保持UI效果一致。-->
        <activity
            android:name="cn.jpush.android.service.JNotifyActivity"
            android:exported="true"
            android:taskAffinity=""
            android:theme="@style/JPushTheme">
            <intent-filter>
                <action android:name="cn.jpush.android.intent.JNotifyActivity" />
                <category android:name="android.intent.category.DEFAULT" /><!--Required SDK核心功能 since 4.2.2-->
                <category android:name="您应用的包名" />
            </intent-filter>
        </activity>
        <!-- since 4.6.0 Required SDK核心功能,各大推送厂商跳转 备份Activity。防止JNotifyActivity 被封后,通知不能跳转。 -->
        <activity
            android:name="cn.android.service.JTransitActivity"
            android:exported="true"
            android:taskAffinity=""
            android:theme="@style/JPushTheme" >
            <intent-filter>
                <action android:name="cn.android.service.JTransitActivity" />
                <category android:name="android.intent.category.DEFAULT"/>
                <category android:name="${applicationId}" />
            </intent-filter>
        </activity>
        <!-- since 5.0.0 Required SDK核心功能 -->
        <provider
            android:name="cn.jpush.android.service.InitProvider"
            android:authorities="${applicationId}.jiguang.InitProvider"
            android:exported="false"
            android:readPermission="${applicationId}.permission.JPUSH_MESSAGE"
            android:writePermission="${applicationId}.permission.JPUSH_MESSAGE" />
        <!-- Required. For publish channel feature -->
        <!-- JPUSH_CHANNEL 是为了方便开发者统计 APK 分发渠道。-->
        <!-- 例如: -->
        <!-- 发到 Google Play 的 APK 可以设置为 google-play; -->
        <!-- 发到其他市场的 APK 可以设置为 xxx-market。 -->
        <meta-data android:name="JPUSH_CHANNEL" android:value="developer-default"/>
        <!-- Required. AppKey copied from Portal -->
        <meta-data android:name="JPUSH_APPKEY" android:value="您应用的 Appkey"/>
    </application>
</manifest>
技术支持
当出现问题时:
- 请仔细阅读 Android FAQ 文档,查看是否有遗漏。
- 你可以到极光社区搜索类似问题
- 给我们的 support 发邮件 support@jiguang.cn
为了更快速的解决问题,在寻求帮助时,请提供下列信息:
- 你需要咨询的产品是 JPush,是否同时使用了极光其他的产品
- 你所调用的是什么 API,所传参数,完整的报错信息,出现异常的时间点
- 如果收不到消息,提供应用的 Appkey,消息的 Message ID,设备的 registration ID 信息
- 如果是 SDK 问题请提供对应的 SDK 版本和完整的日志记录,日志信息请使用 TXT 文件上传
- 出现异常的设备是 Android ,列出具体的机型和系统

