
Android SDK 集成指南
使用提示
本文是极光运营增长 Android SDK 标准的集成指南文档。用以指导 SDK 的使用方法,默认读者已经熟悉 IDE(Eclipse 或者 Android Studio)的基本使用方法,以及具有一定的 Android 编程知识基础。
本篇指南匹配的极光运营增长 Android SDK 版本为:2.0.0 及以后版本。
获取应用信息
完成数据源接入后,进入「数据源列表-详情」查看 AppKey 和 scheme。详情参考 Android 平台接入。
自动集成方式(推荐)
使用 mavenCentral 自动集成的开发者,不需要在项目中添加 jar 和 so,mavenCentral 会自动完成依赖;在 AndroidManifest.xml 中不需要添加任何 SDK 相关的配置,mavenCentral 会自动导入。
添加工程配置
在 Project 根目录的主 gradle 中配置 mavenCentral 支持(新建 Project 默认配置就支持)。
          buildscript {
    repositories {
        google()
        mavenCentral()
    }
    ......
}

allprojects {
    repositories {
        google()
        mavenCentral()
    }
}
配置依赖和替换变量
在 Module 的 gradle 中添加依赖和 AndroidManifest 的替换变量,最新 SDK 版本以更新日志为准。
注意:JCore 必须为 4.1.0 及以上版本,否则无法初始化成功!
//在gradle的Android节点下添加,如下
android {
...
...
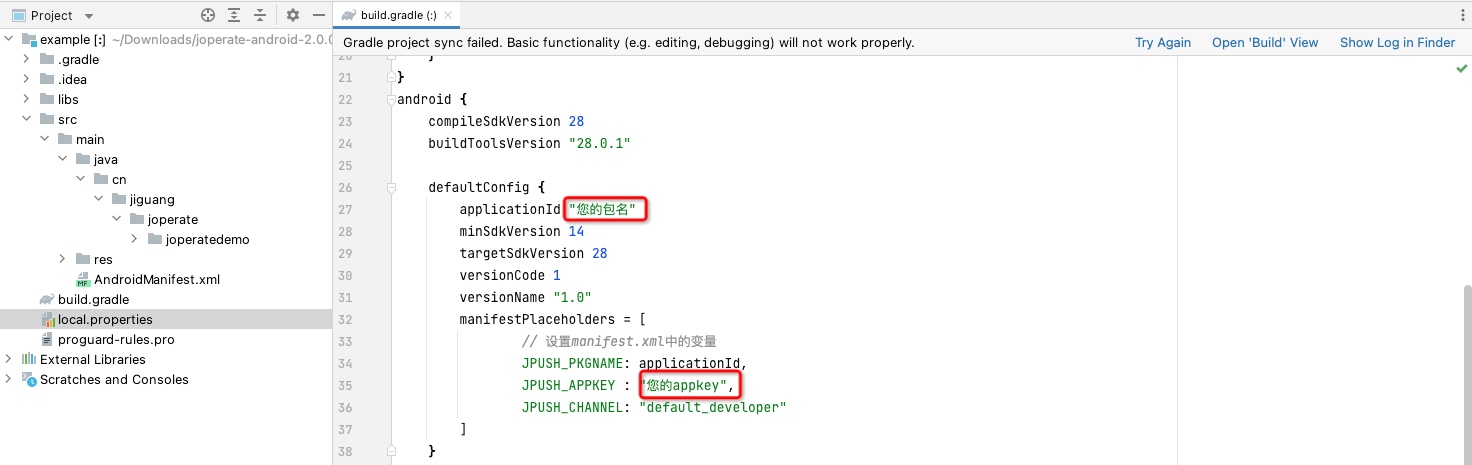
defaultConfig {
applicationId "你的包名"
...
...
manifestPlaceholders = [
// 设置manifest.xml中的变量
JPUSH_PKGNAME: applicationId,
JPUSH_APPKEY : "你的 Appkey ", //必填,此 appkey 须已绑定数据源,获取详情参考上文「获取应用信息」
JPUSH_CHANNEL: "developer-default", //暂时填写默认值即可.
]
}
}
dependencies {
......
implementation 'cn.jiguang.sdk:jcore:4.5.3' // JCore 必须为 4.1.0 及以上版本,此处以 JCore 4.5.3 版本为例。
implementation 'cn.jiguang.sdk:joperate:2.0.9'
}
配置 Service
需要额外在 Androidmanifest 中配置一个 Service,以在更多手机平台上获得更稳定的支持,示例如下:
              <service android:name="cn.jpush.android.service.JCommonService"
        android:process=":pushcore"
        android:enabled="true"
        android:exported="true">
        <intent-filter>
            <action android:name="cn.jiguang.user.service.action" />
        </intent-filter>
    </service>
配置 provider
需要额外在 Androidmanifest 中配置一个 provider,以在更多手机平台上获得更稳定的支持,示例如下:
              <provider
        android:exported="false"
        android:authorities="${applicationId}.jiguang.InitProvider"
        android:name="cn.jpush.android.service.InitProvider">
    </provider>
配置和代码说明
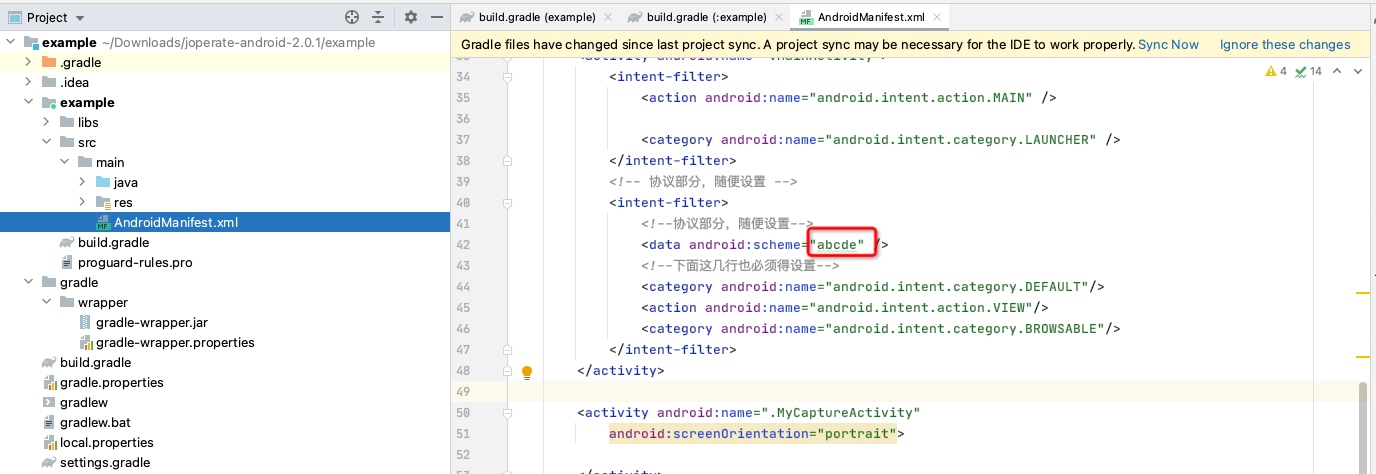
配置 scheme
scheme 获取详情参考上文 获取应用信息。
          <!--在对应的Activity配置你的scheme-->
<intent-filter>
    <data android:scheme="你的scheme" />
    <!--下面这几行也必须得设置-->
    <category android:name="android.intent.category.DEFAULT"/>
    <action android:name="android.intent.action.VIEW"/>
    <category android:name="android.intent.category.BROWSABLE"/>
</intent-filter>
初始化服务
需要在 Application 中初始化,SDK 提供的 API 接口,都主要集中在cn.jiguang.joperate.api.JOperateInterface类里。其他 API 的使用方法请参考接口文档:Android SDK API 。
          public class TApplication extends Application {
    @Override
    public void onCreate() {
        super.onCreate();
        JOperateInterface.setDebug(true);//生产环境须删除
        JOperateInterface.getInstance(getApplicationContext()).initialize();
        JOperateInterface.getInstance(getApplicationContext()).operationStart();
    }
}
混淆
若您的 App 开启了混淆,请为我们的 SDK 添加下述混淆规则。
          -keep class cn.jiguang.**{
    *;
}
-dontwarn javax.annotation.**
-dontwarn sun.misc.Unsafe
-dontwarn org.conscrypt.*
-dontwarn okio.**


###其他混淆
-keep class android.support.v4.**{
    public *;
}
-keep class android.support.v7.**{
    public *;
}

-keepclassmembers class * extends android.app.Activity { public void *(android.view.View);
}
-keepclassmembers enum * {
public static **[] values();
public static ** valueOf(java.lang.String);
}
验证集成结果
注册完成后,可以调用以下接口获取 CUID:
JOperateInterface.getInstance(getApplicationContext()).getCuid();
集成完成后,如果输出以下日志则代表您已经集成成功。
          ......
I/JIGUANG-JCore: [ConnectingHelper] Login with - juid:61812152402, appKey:64abbe577f5f67ddca43832b, sdkVersion:196870||||||||65536, pluginPlatformType:0
......
D/MainFragment: updataData cuid:10000400010
数据校验模式
若需要查看实时上报可以扫码进入数据校验模式,详情参考 数据校验文档。
Demo 使用
- 在 build.gradle 中配置 applicationId 和 JPUSH_APPKEY,appkey 获取详情参考 Android 平台接入。
- 在 Androidmanifest 里配置您的 scheme,scheme 获取详情参考 Android 平台接入。
- 直接运行安装到手机设备。
其他集成方式
组包服务集成步骤
组包服务是对手动集成 SDK 的封装服务,通过将 SDK 组合到单独的 jiguang module ,将手动集成的共同配置业务隐藏,开发者只需关注自己本身的个性化配置,减少集成步骤,提高开发者接入效率。
如您需要使用 JOperate 组包服务,请在组包服务界面勾选 JOperate 服务,并 组装 SDK。
jiguang_sdk.zip 集成压缩包内容
jiguang
- JIGUANG SDK 组合包
- 资源文件等已在该包中进行依赖,无需在手动拷贝依赖
jiguang-demo
- JIGUANG SDK 组合包集成 demo。
- 是一个完整的 Android 项目,通过这个演示了组包服务的基本用法,可以用来做参考。
- 根据您勾选的服务自动组合构建,组包前预设的相关配置会同时预埋到 demo 中
导入 JIGUANG SDK
通过 AS 将 SDK 作为 module 导入项目
导入步骤:AndroidStudio -> File -> New -> Import Module -> 选择 jiguang 导入
配置 JIGUANG SDK
settings.gradle 配置添加:
include ':jiguang'
在应用 module gradle 中 添加 SDK 依赖
          android {
    ......
    defaultConfig {
        applicationId "com.xxx.xxx" //JOperate  上注册的包名.
        ......

        manifestPlaceholders = [
            JPUSH_PKGNAME : applicationId,
            JPUSH_APPKEY : "你的 Appkey", //JOperate  上注册的包名对应的 Appkey.
            JPUSH_CHANNEL : "developer-default", // 暂时填写默认值即可.
        ]
        ......
    }
    ......
}

dependencies {
    ......

    implementation project(':jiguang')
    ......
}
手动集成方式
手动集成压缩包下载链接:前往下载
添加 SDK 到工程中
1.解压缩 joperate-android-.zip 集成压缩包。
2.复制libs/* 到工程 libs/ 目录下。
配置 AndroidManifest
根据 SDK 压缩包里的 AndroidManifest.xml 样例文件,来配置应用程序项目的 AndroidManifest.xml 。
1.将 AndroidManifest 中引用的 applicationId、JPUSH_APPKEY、JPUSH_CHANNEL 更改为你的参数值。
如果使用 android studio,在 build.gradle 配置中 defaultConfig 节点下配置,如:
//在gradle的Android节点下添加,如下
android {
    ...
    ...
    defaultConfig {
        applicationId "你的包名"
        ...
        ...

        manifestPlaceholders = [
                // 设置manifest.xml中的变量
                JPUSH_PKGNAME: applicationId,
                JPUSH_APPKEY :  "你的 Appkey ", //Portal上注册的包名对应的 appKey.
                JPUSH_CHANNEL:  "developer-default", //暂时填写默认值即可.
        ]
    }
}
dependencies {
        ......
        implementation fileTree(dir: "libs", include: ["*.jar"])

}
2.在 AndroidManifest.xml 下配置以下内容:
<permission android:name="${applicationId}.permission.JOPERATE_MESSAGE" android:protectionLevel="signature"/>
<uses-permission android:name="${applicationId}.permission.JOPERATE_MESSAGE" />
<!--定位-->
<uses-permission android:name="android.permission.ACCESS_FINE_LOCATION"/>
<uses-permission android:name="android.permission.ACCESS_COARSE_LOCATION"/>
<!--设备信息-->
<uses-permission android:name="android.permission.READ_PHONE_STATE"/>
<!--网络-->
<uses-permission android:name="android.permission.INTERNET"/>
<uses-permission android:name="android.permission.ACCESS_WIFI_STATE"/>
<uses-permission android:name="android.permission.ACCESS_NETWORK_STATE"/>
<!--存储-->
<uses-permission android:name="android.permission.WRITE_EXTERNAL_STORAGE" />
<uses-permission android:name="android.permission.READ_EXTERNAL_STORAGE" />

 <application>
        <!--配置多进程Service-->
        <service android:name="cn.jpush.android.service.JCommonService"
            android:process=":pushcore"
            android:enabled="true"
            android:exported="true">
            <intent-filter>
                <action android:name="cn.jiguang.user.service.action" />
            </intent-filter>
        </service>
        <!-- Required SDK核心功能 -->
        <receiver
            android:name="cn.jpush.android.service.AlarmReceiver"
            android:exported="false" />
        <!-- Required -->
        <meta-data
            android:name="JPUSH_APPKEY"
            android:value="${JPUSH_APPKEY}" /> <!-- </>值来自开发者平台取得的AppKey -->
        <meta-data
            android:name="JPUSH_CHANNEL"
            android:value="${JPUSH_CHANNEL}" />
 </application>
运行 Demo
压缩包附带的 example 是一个 API 演示例子。你可以将它导入到你的工程,并将你的 appKey 填入到 example 的 AndroidManifest 中,然后直接运行起来测试。
技术支持
当出现问题时:
- 你可以到极光社区搜索类似问题
- 给我们的 support 发邮件 support@jiguang.cn

