iOS SDK Integration Guide
SDK Instructions
Applicable Version
This article matches the SDK version: after r2.1.5. Check out the latest updates for the latest SDK updates. New version of Push SDK can be used with Xcode 6 and above, and old version of SDK needs to be run with Xcode 5 (1.7.4)
Resource
Package name as JPush-iOS-SDK-{version number}
-
The lib folder: contains the header file JPUSHService.h, the static library files jpush-ios-x.x.x.a, jcore-ios-x.x.x.a, and supporting iOS versions 6.0 and above. (Please note: The simulator does not support APNs)
-
pdf file: Integration Guide
-
demo folder: example
Create an Application
- Create an application on the management portal of JPush and upload the APNs certificate. If you do not know much about APNs certificates, please refer to:
Setup Guide of iOS Certificate
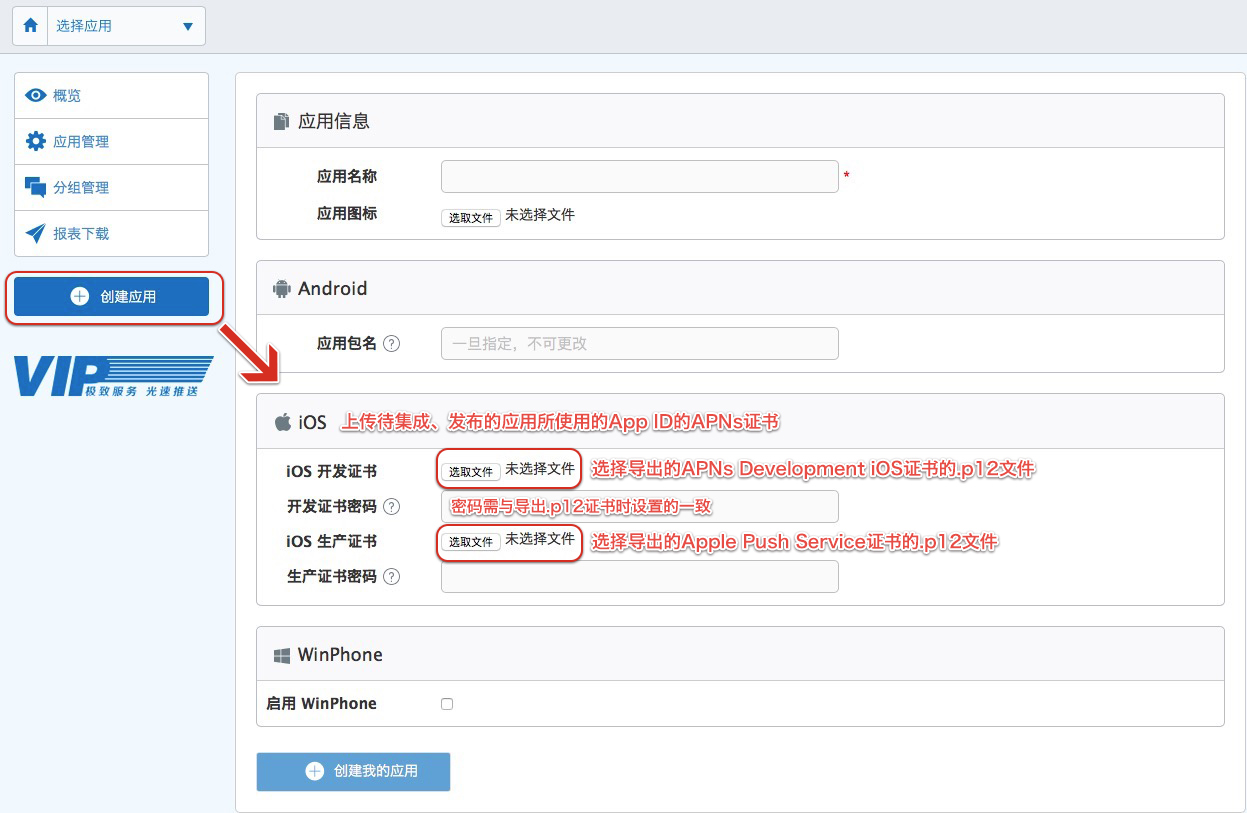
- After the creation is successful, an AppKey is automatically generated to identify the application.
Configuration Engineering
Import SDK
Option 1: Cocoapods Import
- Download address through Cocoapods:
pod 'JPush'
- If you need to install a specific version, use the following method (take the 3.0.2 version as an example)::
pod 'JPush', '3.0.2'
Option 2: Manually Import
-
Download the latest SDK on Jiguang official website
-
Extract the SDK package and select "Add files to 'Your project name'..." in Xcode. Add the extracted lib subfolder (including JPUSHService.h, jpush-ios-xxxa, jcore-ios-xxxa) to your project directory
-
Add Framework
-
CFNetwork.framework
-
CoreFoundation.framework
-
CoreTelephony.framework
-
SystemConfiguration.framework
-
CoreGraphics.framework
-
Foundation.framework
-
UIKit.framework
-
Security.framework
-
libz.tbd (the following version of Xcode7 is libz.dylib)
-
AdSupport.framework (for IDFA needs; do not add if you do not use IDFA)
-
UserNotifications.framework (Xcode8 and above)
-
libresolv.tbd (required for JPush 2.2.0 and above, the following version of Xcode7 is libresolv.dylib)
-
Note: If you integrate JPush 3.0.1 and above, and also integrate other Jiguang SDKs (eg: JMessage 3.0.0 and above)
1. Cocoapods import, suggestions are updated to the latest version online to avoid conflicts caused by inconsistent Jcore version.
2. Manually import, just keep a jcore-ios-x.x.x.a static library file in the project.
Build Settings
If your project needs to support iOS systems less than 7.0, please go to Build Settings to turn off the bitCode option, otherwise it will not compile properly.
- Set the User Header Search Paths and Library Search Paths under Search Paths. For example, the SDK folder (default as lib) is in the same directory as the project file, then just set both to "$(SRCROOT)/{The name of the folder where the static library is located. }"
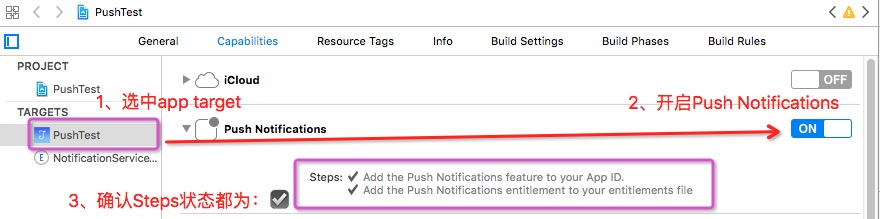
Capabilities
If you are using Xcode 8 and above environment to develop, please open the Capabilities->Push Notifications of Application Target, as shown in the figure:
Allow Xcode7 to Support Http Transfer Method
If you are using version 2.1.9 or above, you do not need to configure this step. If you are using Xcode 7 or later, you need to manually configure the key and value in the plist of the App project to support HTTP transmission:
Option 1: Configure Based on Domain Name
-
Add a Key:NSAppTransportSecurity in the project info.plist, which is a type dictionary.
-
Then add an NSExceptionDomains, which is a type dictionary;
-
Add the required supporting domains to NSExceptionDomains. jpush.cn as Key, is a dictionary type.
-
Two properties need to be set below each domain: NSI IncludeSubdomains, NSExceptionAllowsInsecureHTTPLoads. Both properties are Boolean and the values are YES and YES, respectively.

Option 2: Global Configuration
  <key>NSAppTransportSecurity</key>
  <dict>
    <key>NSAllowsArbitraryLoads</key>
    <true/>
  </dict>
Add Header Files
Add the following code to the location referring header file in the AppDelegate.m.
// 引入JPush功能所需头文件
#import "JPUSHService.h"
// iOS10注册APNs所需头文件
#ifdef NSFoundationVersionNumber_iOS_9_x_Max
#import <UserNotifications/UserNotifications.h>
#endif
// 如果需要使用idfa功能所需要引入的头文件(可选)
#import <AdSupport/AdSupport.h>
Add Delegate
Add Delegate for AppDelegate.
Reference Code::
@interface AppDelegate ()<JPUSHRegisterDelegate>

@end
Add Initialization Code
From version 2.1.0, the API class is named JPUSHService and the original APService is no longer used.
Add Initialization APNs Code
Please add the following code to
-(BOOL)application:(UIApplication *)application didFinishLaunchingWithOptions:(NSDictionary *)launchOptions
  //Required
  //notice: 3.0.0及以后版本注册可以这样写,也可以继续用之前的注册方式
  JPUSHRegisterEntity * entity = [[JPUSHRegisterEntity alloc] init];
  entity.types = JPAuthorizationOptionAlert|JPAuthorizationOptionBadge|JPAuthorizationOptionSound;
  if ([[UIDevice currentDevice].systemVersion floatValue] >= 8.0) {
    // 可以添加自定义categories
    // NSSet<UNNotificationCategory *> *categories for iOS10 or later
    // NSSet<UIUserNotificationCategory *> *categories for iOS8 and iOS9
  }
  [JPUSHService registerForRemoteNotificationConfig:entity delegate:self];
Add Initialization JPush Code
Please add the following code to
-(BOOL)application:(UIApplication *)application didFinishLaunchingWithOptions:(NSDictionary *)launchOptions
  // Optional
  // 获取IDFA
  // 如需使用IDFA功能请添加此代码并在初始化方法的advertisingIdentifier参数中填写对应值
  NSString *advertisingId = [[[ASIdentifierManager sharedManager] advertisingIdentifier] UUIDString];

  // Required
  // init Push
  // notice: 2.1.5版本的SDK新增的注册方法,改成可上报IDFA,如果没有使用IDFA直接传nil
  // 如需继续使用pushConfig.plist文件声明appKey等配置内容,请依旧使用[JPUSHService setupWithOption:launchOptions]方式初始化。
  [JPUSHService setupWithOption:launchOptions appKey:appKey
                        channel:channel
               apsForProduction:isProduction
          advertisingIdentifier:advertisingId];
Some Parameter Descriptions::
-
appKey
- Select the application on the Web Portal and click "Settings" to get its appkey value. Make sure the appkey configured in the app is the same as the appkey generated on the portal after the app is created.
-
channel
- Specify the download channel of the application package. To facilitate the statistics of channels, the specific value is defined by you, such as App Store.
-
apsForProduction
-
Add in Version 1.3.1 to identify the APNs certificate environment used by the current application.
-
0 (the default value) indicates that the development certificate is used, and 1 indicates that the application is issued by using the production certificate.
-
Note: The value of this field must be the same as the certificate environment of Code Settings configured in Build Settings.
-
-
advertisingIdentifier
- See About IDFA for details.
Register APNs Successfully and Report DeviceToken
Please implement this callback method in AppDelegate.m and add the code in the callback method
- (void)application:(UIApplication *)application
didRegisterForRemoteNotificationsWithDeviceToken:(NSData *)deviceToken {

  /// Required - 注册 DeviceToken
  [JPUSHService registerDeviceToken:deviceToken];
}
Fail to Register the APNs Interface (Optional)
- (void)application:(UIApplication *)application didFailToRegisterForRemoteNotificationsWithError:(NSError *)error {
  //Optional
  NSLog(@"did Fail To Register For Remote Notifications With Error: %@", error);
}
Add Callback Method of Processing APNs Notification
Please implement this callback method in AppDelegate.m and add the code in the callback method
#pragma mark- JPUSHRegisterDelegate

// iOS 10 Support
- (void)jpushNotificationCenter:(UNUserNotificationCenter *)center willPresentNotification:(UNNotification *)notification withCompletionHandler:(void (^)(NSInteger))completionHandler {
  // Required
  NSDictionary * userInfo = notification.request.content.userInfo;
  if([notification.request.trigger isKindOfClass:[UNPushNotificationTrigger class]]) {
    [JPUSHService handleRemoteNotification:userInfo];
  }
  completionHandler(UNNotificationPresentationOptionAlert); // 需要执行这个方法,选择是否提醒用户,有Badge、Sound、Alert三种类型可以选择设置
}

// iOS 10 Support
- (void)jpushNotificationCenter:(UNUserNotificationCenter *)center didReceiveNotificationResponse:(UNNotificationResponse *)response withCompletionHandler:(void (^)())completionHandler {
  // Required
  NSDictionary * userInfo = response.notification.request.content.userInfo;
  if([response.notification.request.trigger isKindOfClass:[UNPushNotificationTrigger class]]) {
    [JPUSHService handleRemoteNotification:userInfo];
  }
  completionHandler();  // 系统要求执行这个方法
}

- (void)application:(UIApplication *)application didReceiveRemoteNotification:(NSDictionary *)userInfo fetchCompletionHandler:(void (^)(UIBackgroundFetchResult))completionHandler {

  // Required, iOS 7 Support
  [JPUSHService handleRemoteNotification:userInfo];
  completionHandler(UIBackgroundFetchResultNewData);
}

- (void)application:(UIApplication *)application didReceiveRemoteNotification:(NSDictionary *)userInfo {

  // Required,For systems with less than or equal to iOS6
  [JPUSHService handleRemoteNotification:userInfo];
}
Add Callback Method of Handling JPush Custom Message
To use JPush's custom message functionality, refer to the documentation to implement the callback method of processing a custom message.
Successful Operation
The real machine debugs the project. If the console outputs the following log, it means that you have successfully integrated.
2016-08-19 17:12:12.745823 219b28[1443:286814]  | JPUSH | I - [JPUSHLogin]
----- login result -----
uid:5460310207
registrationID:171976fa8a8620a14a4
If you have problems during debugging, please refer to: iOS SDK Debugging Guide
Advanced Features
About IDFA
R2.1.5 adds an interface for uploading IDFA strings
 + (void)setupWithOption:(NSDictionary *)launchingOption
                  appKey:(NSString *)appKey
                 channel:(NSString *)channel
        apsForProduction:(BOOL)isProduction
   advertisingIdentifier:(NSString *)advertisingId;
If you do not use IDFA, you can still use the interface
+ (void)setupWithOption:(NSDictionary *)launchingOption
                  appKey:(NSString *)appKey
                 channel:(NSString *)channel
        apsForProduction:(BOOL)isProduction;
Monitoring of JPush SDK Related Event
Developers are advised to add the following types of notifications provided in the API:
extern NSString * const kJPFNetworkIsConnectingNotification; // Joining
extern NSString * const kJPFNetworkDidSetupNotification; // Establish connection
extern NSString * const kJPFNetworkDidCloseNotification; // Close connection
extern NSString * const kJPFNetworkDidRegisterNotification; // Registration succeeded
extern NSString *const kJPFNetworkFailedRegisterNotification; // Registration failed
extern NSString * const kJPFNetworkDidLoginNotification; // Login succeeded
Tips:
The Registration id needs to be added to the method that registers the kJPFNetworkDidLoginNotification notification, or it can call the [registrationIDCompletionHandler:] method and get it through the completionHandler.
extern NSString * const kJPFNetworkDidReceiveMessageNotification; // Receive custom messages (non-APNs)
Among them, the data passed by kJPFNetworkDidReceiveMessageNotification can be obtained through the userInfo method in NSNotification, including title, content, extras information, etc.
Please refer to the documentation: iOS SDK API
Statistics of Notification Delivery
Tips:
The new Notification Service Extension feature in iOS 10 is controlled by the mutable-content field.
If using the Web console, check the mutable-content option in the "optional settings";
if using the RESTFul API, set the mutable-content field to true.
From the iOS JPush SDK 3.0.7 version, developers can use the Notification Service Extension SDK to report the delivery status of every APNs message.
Instructions::
-
Introduce two files, jpush-extension-ios-xxx.a and JPushNotificationExtensionService.h, into your Service Extentsion project.
-
Call the [jpushSetAppkey:] method to set your appkey. Please note that the appkey should be the same as the appkey of your Jiguang app.
-
Report your apns message by calling the [jpushReceiveNotificationRequest:] method to complete delivery statistics; display apns in the block callback for this method.
For more specific usage examples, please refer to the demo code included in the compress.
Reference document: iOS SDK API
Voip Push
- After iOS 8, a Voip push based on the PushKit framework was introduced, which enables the user's APP to wake up the APP and execute code if it is killed.
- Voip does not distinguish between development and production certificates. Both Apple Push Notification service SSL (Sandbox & Production)and VoIP Services Certificate support Voip push.
Add PushKit.Framework library
- Introducing the PusuKit.framework library as an optional method
- Import header file #import
- AppDelegate implements the PKPushRegistryDelegate protocol
Add Voip Authority
Open the Voice over IP option in Project-> Capabilities-> Background Modes
Code
- Implement Voip registration in didFinishLaunchingWithOptions method
- (void)voipRegistration{
  dispatch_queue_t mainQueue = dispatch_get_main_queue();
  PKPushRegistry *voipRegistry = [[PKPushRegistry alloc] initWithQueue:mainQueue];
  voipRegistry.delegate = self;
  // Set the push type to VoIP
  voipRegistry.desiredPushTypes = [NSSet setWithObject:PKPushTypeVoIP];
}
- Submit Token
/// The system returns VoipToken and reports it to the server
- (void)pushRegistry:(PKPushRegistry *)registry didUpdatePushCredentials:(PKPushCredentials *)pushCredentials forType:(PKPushType)type{
    [JPUSHService registerVoipToken:pushCredentials.token];
}
- After receiving Voip push, call the receipt interface, which is used to count Voip delivery.
- (void)pushRegistry:(PKPushRegistry *)registry didReceiveIncomingPushWithPayload:(PKPushPayload *)payload forType:(PKPushType)type{
  // Submit receipt to server
  [JPUSHService handleVoipNotification:payload.dictionaryPayload];
}

- (void)pushRegistry:(PKPushRegistry *)registry didReceiveIncomingPushWithPayload:(PKPushPayload *)payload forType:(PKPushType)type withCompletionHandler:(void(^)(void))completion{
  // Submit receipt to server
  [JPUSHService handleVoipNotification:payload.dictionaryPayload];
}
Technical Support
Email Contact: support@jiguang.cn