
Create tags
This article aims to guide users how toJiguangThe console creates the label.
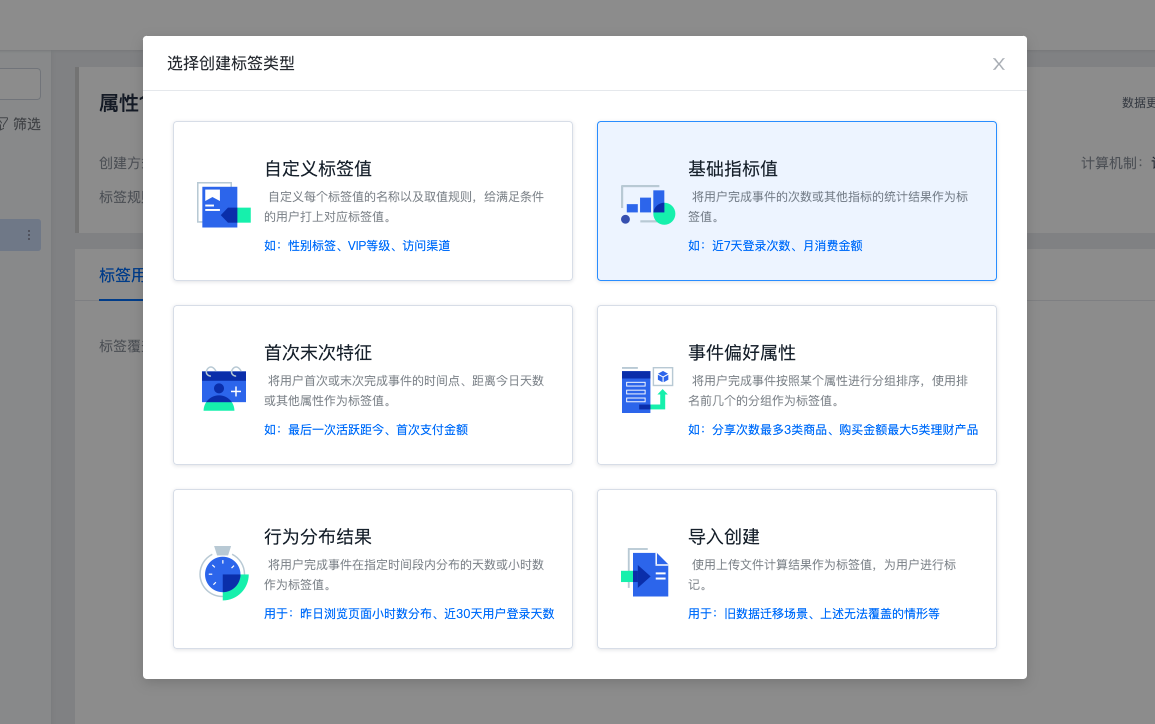
Choose how to create
Currently, it supports custom tag values, basic indicator values, first and last characteristics, event preference attributes, behavior distribution results and import creation methods. Enter the [User Tag]-[Tag System] page and click "Create Tag" to make your selection.

Basic information settings
Fill in the label display name, label name, label group, label status and introduction.
Tag names support uppercase and lowercase letters, numbers, underscores, and symbols, such as:open_APP, cannot be changed after setting.

Custom tag value
Customize the name and calculation rules of each tag value to divide the population into multiple layers. Such as gender labels,VIPlevel, access channels, etc. The creation steps are as follows:
- On the Create Tag page, select the creation method: Custom tag value.
- Select the calculation mechanism: once, once a day, weekly, or monthly. The corresponding label types will be displayed on the right side according to the selected calculation mechanism.
- Dynamic label: refers to a calculated label.
- Static label: refers to a label that is only calculated once.
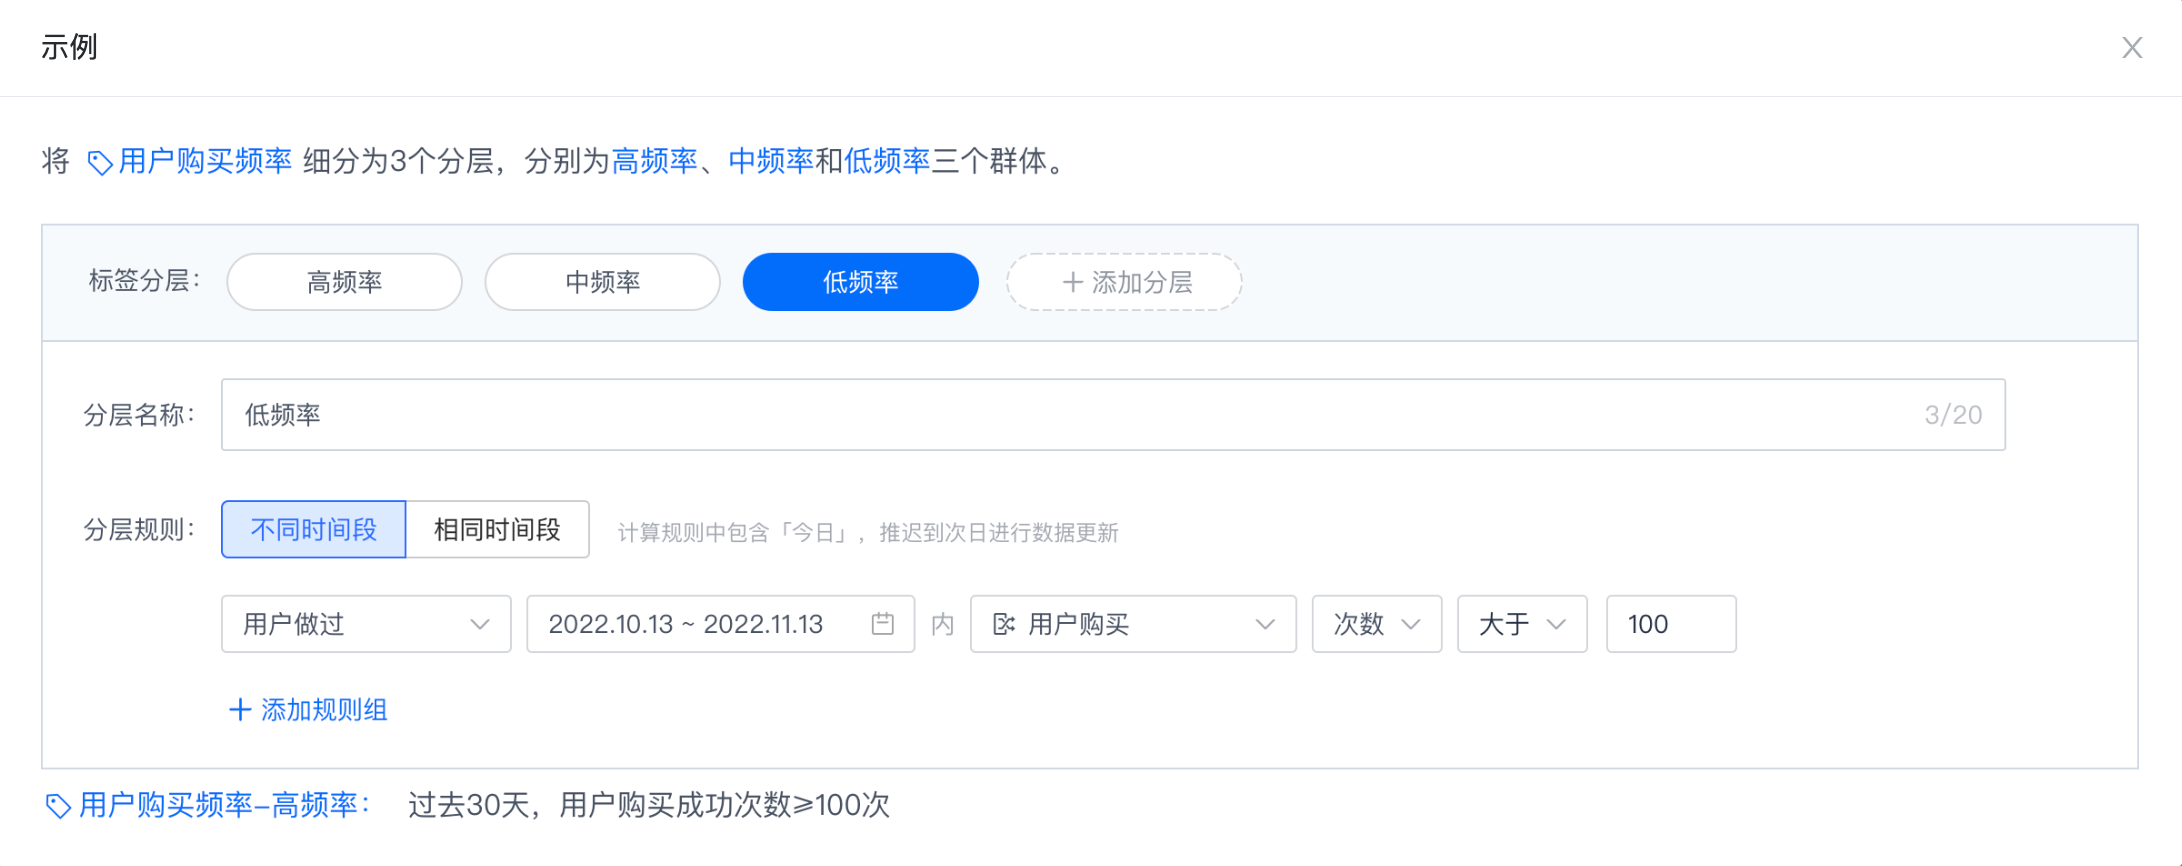
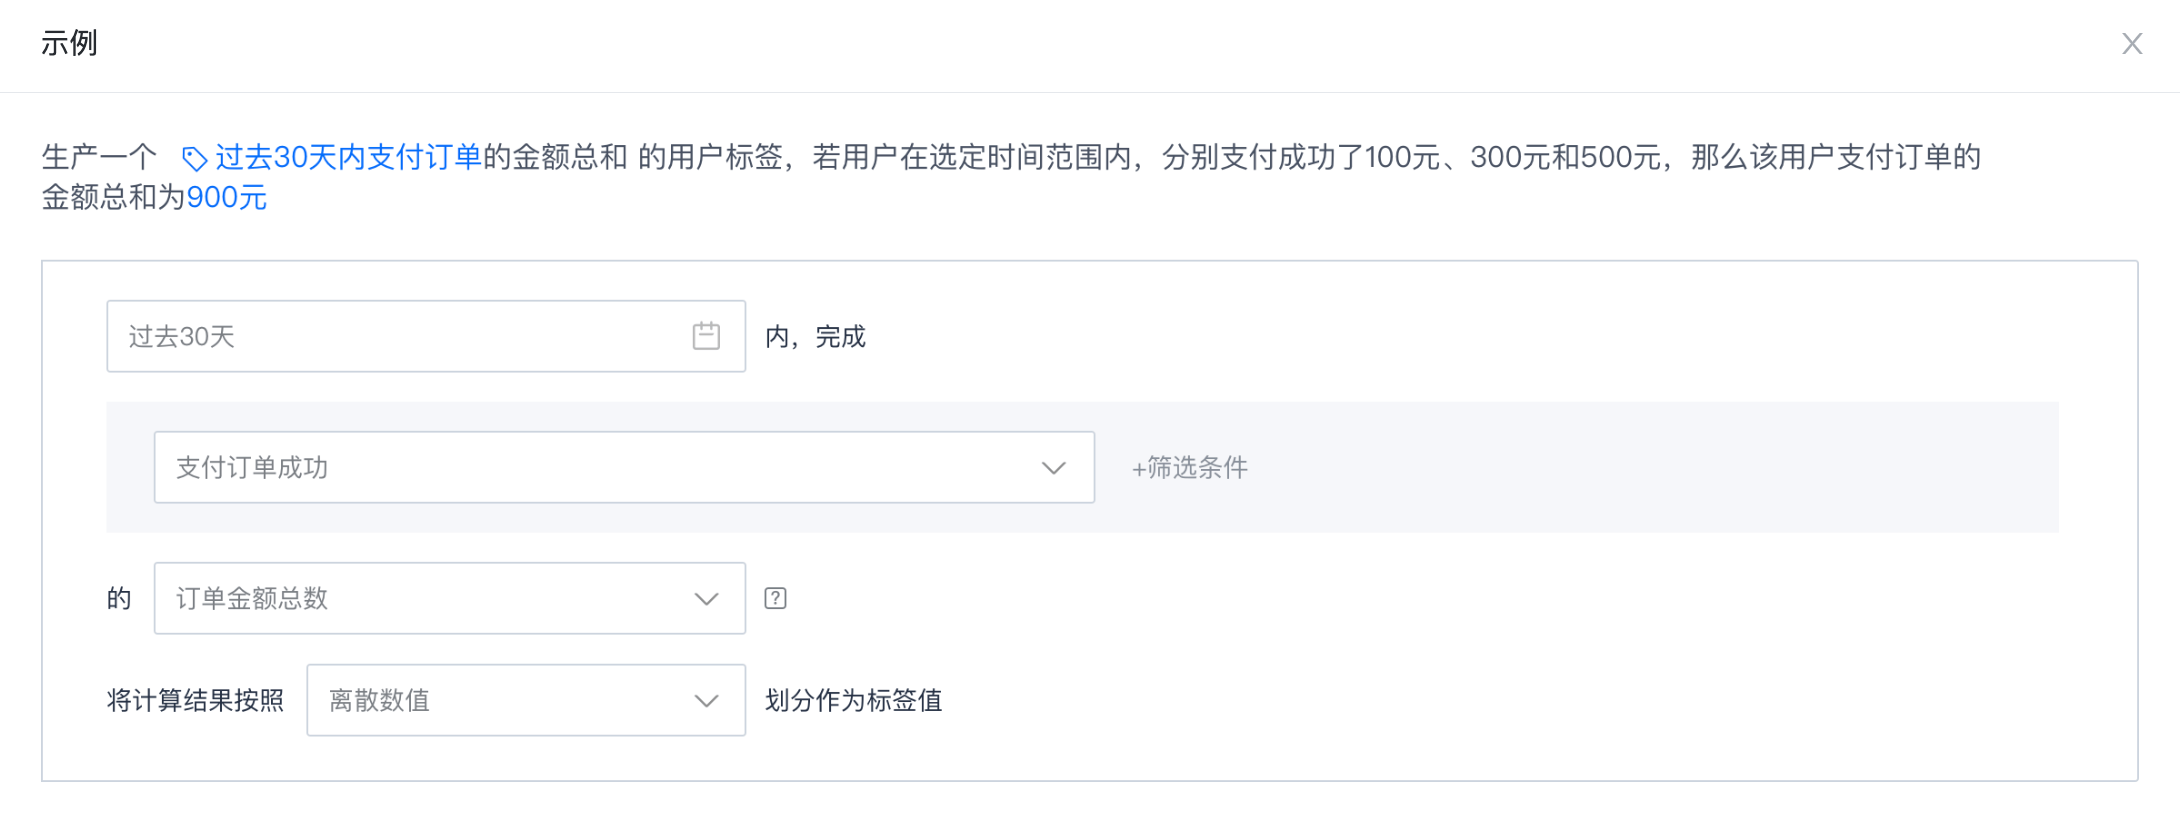
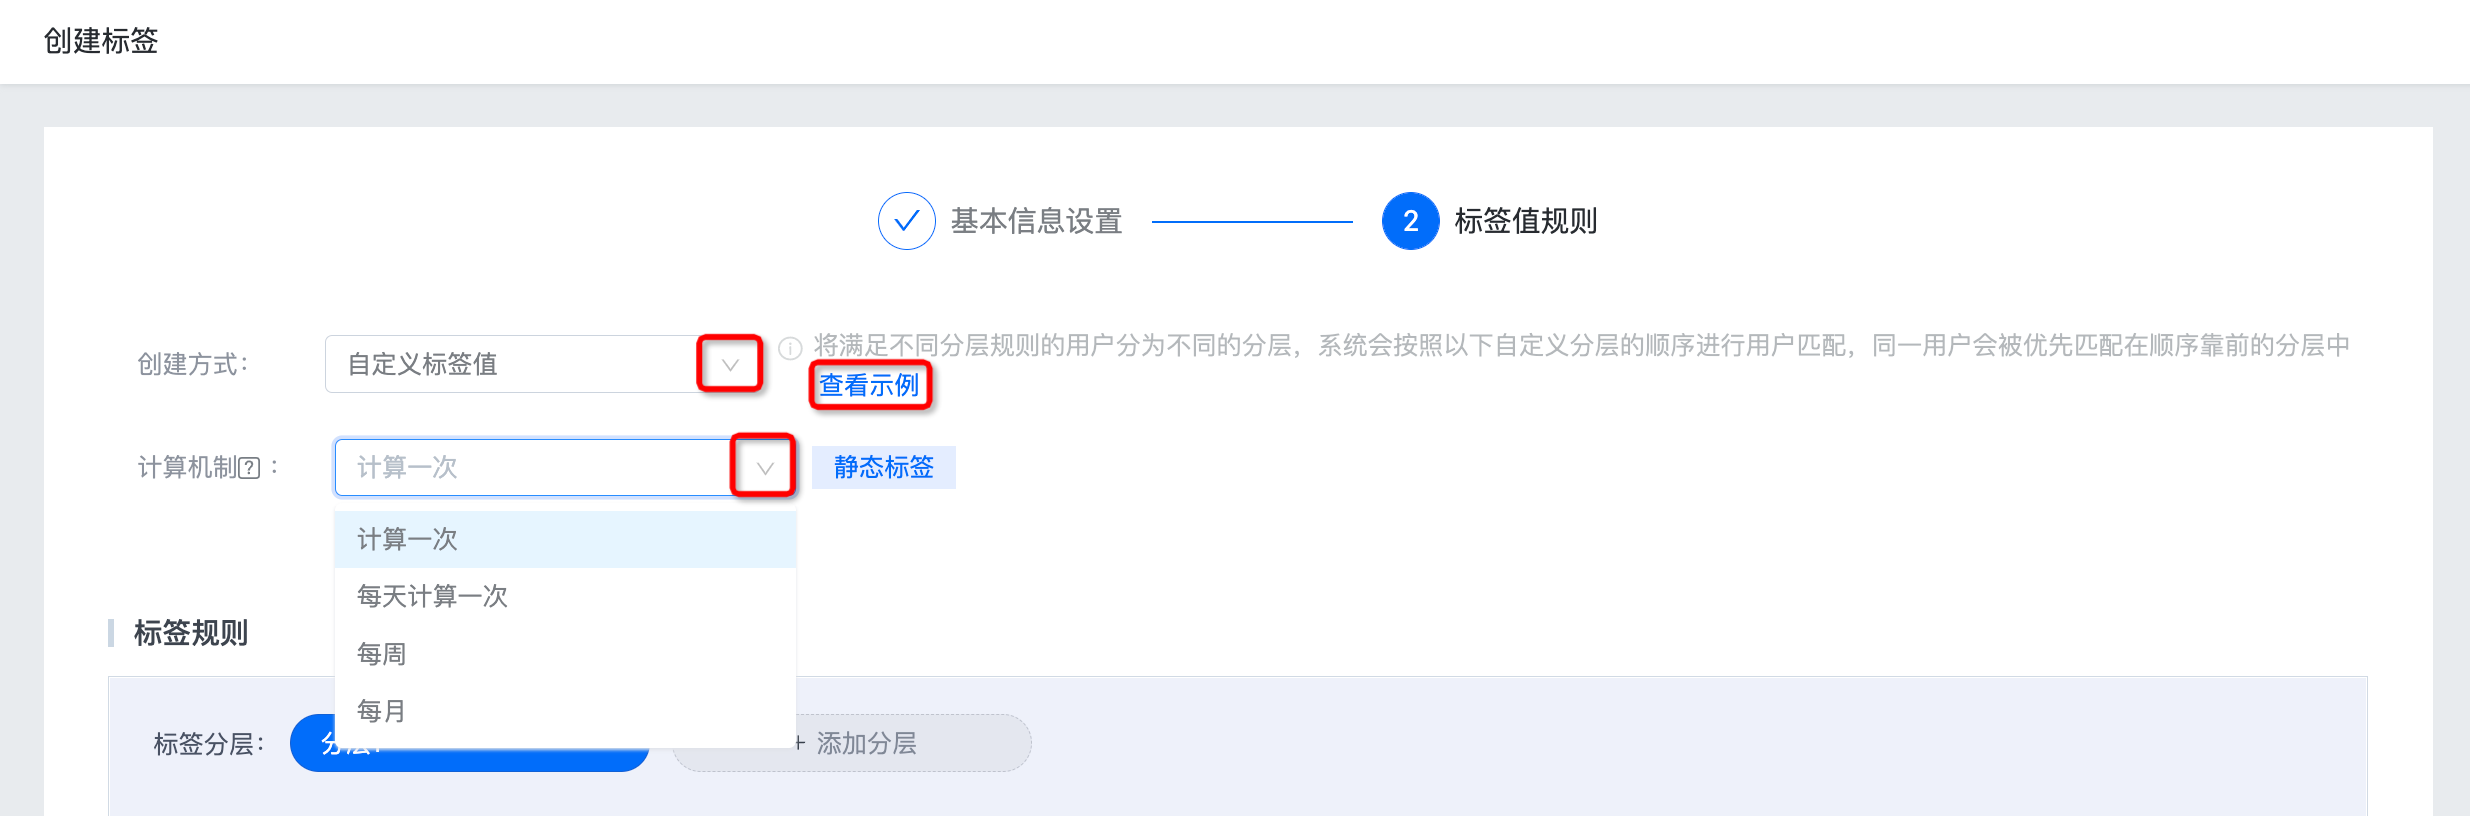 3. Click "View Example" to see how to set label rules, as follows:
 4. Set label rules.
Set label rules
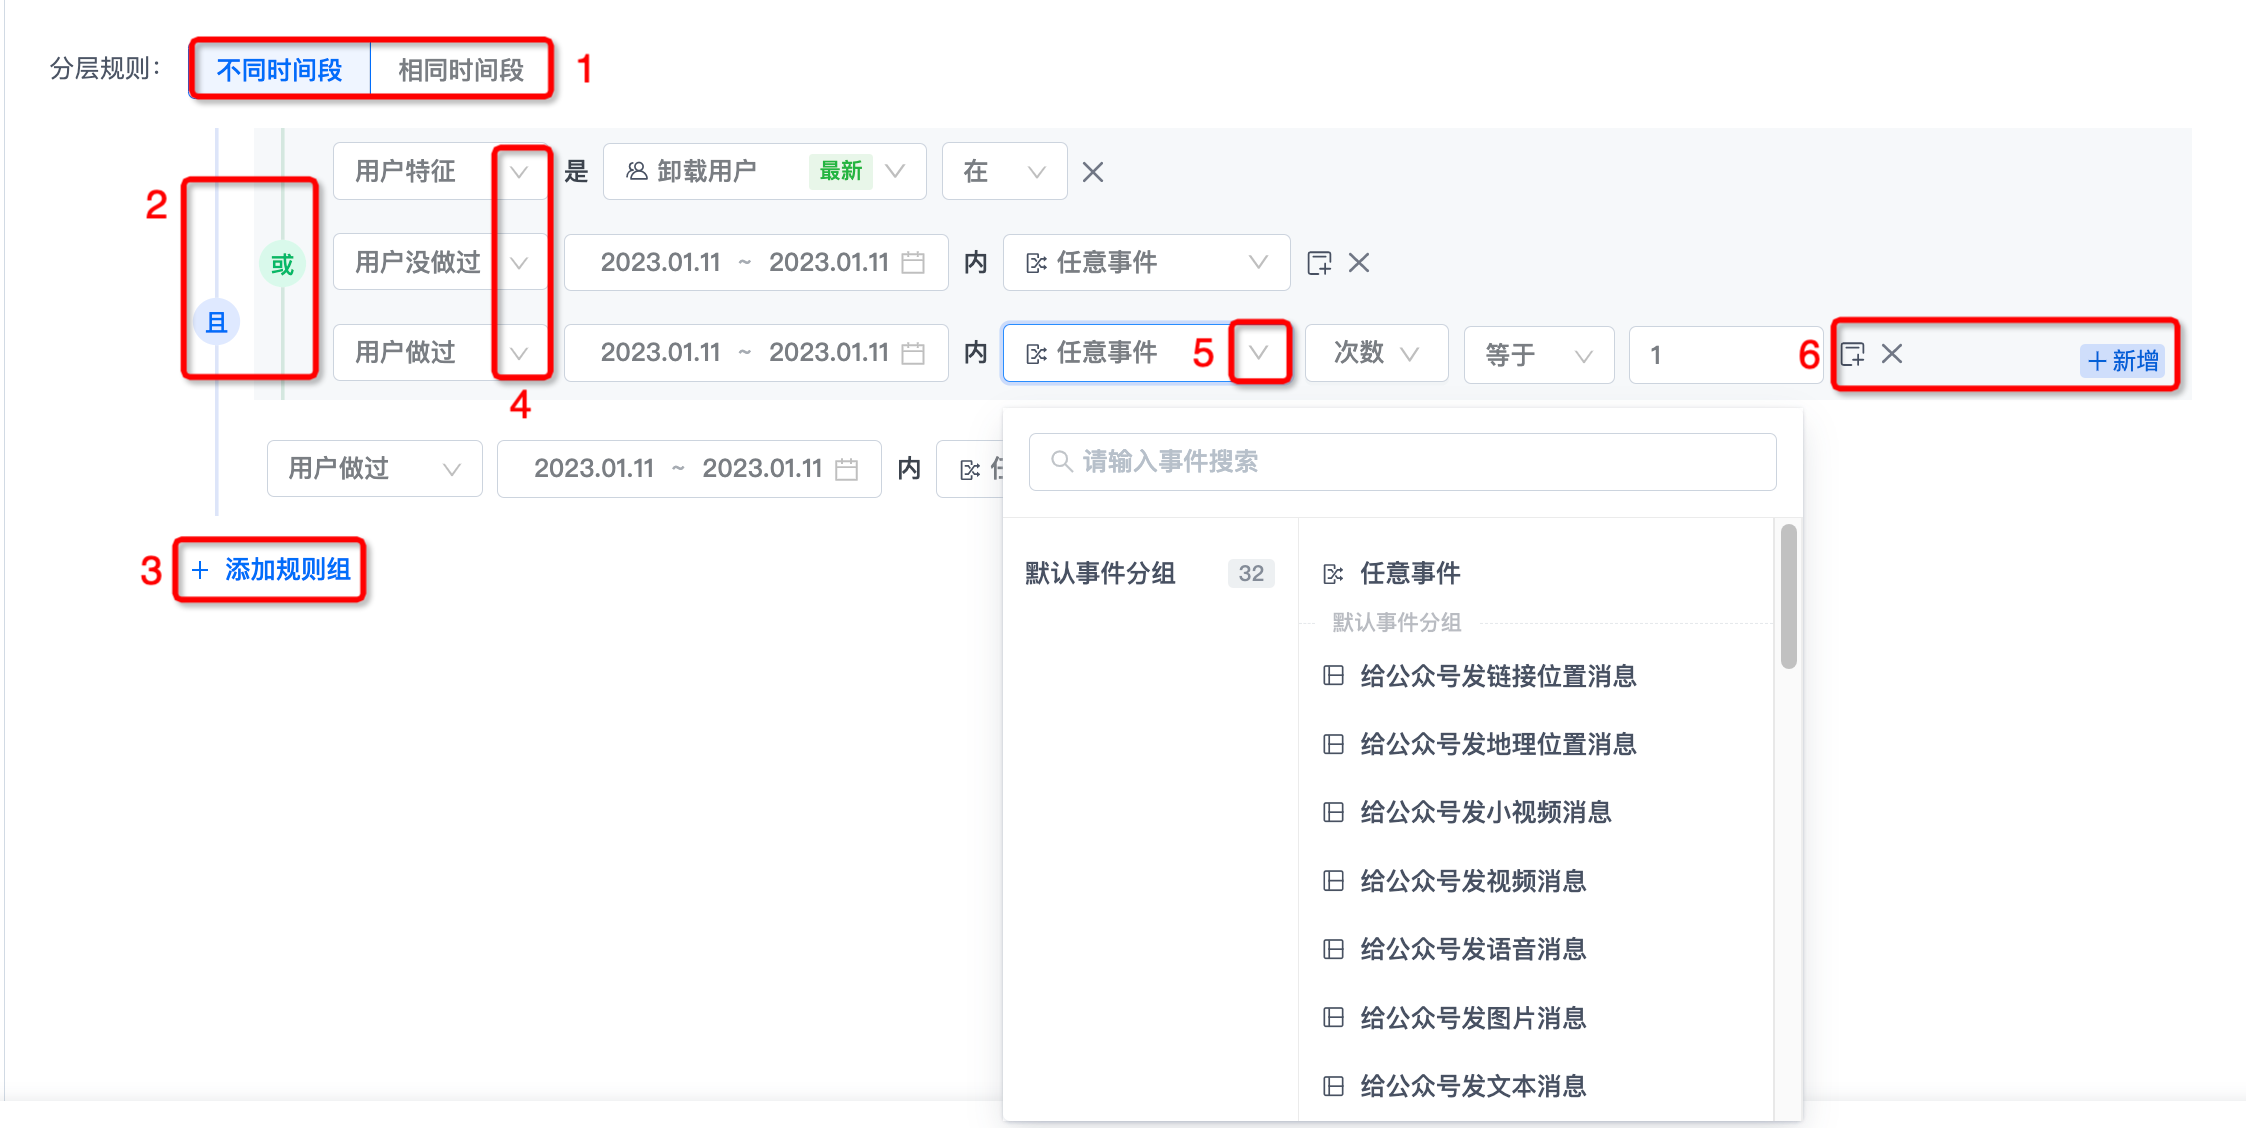
- You can create multiple label layers to divide users who meet different layering rules into different layers. The system will match users in the order of the following custom layers, and the same user will be matched first in the layer with the highest order.
- Supports adding, copying and deleting label layers, and up to 25 layers can be added.
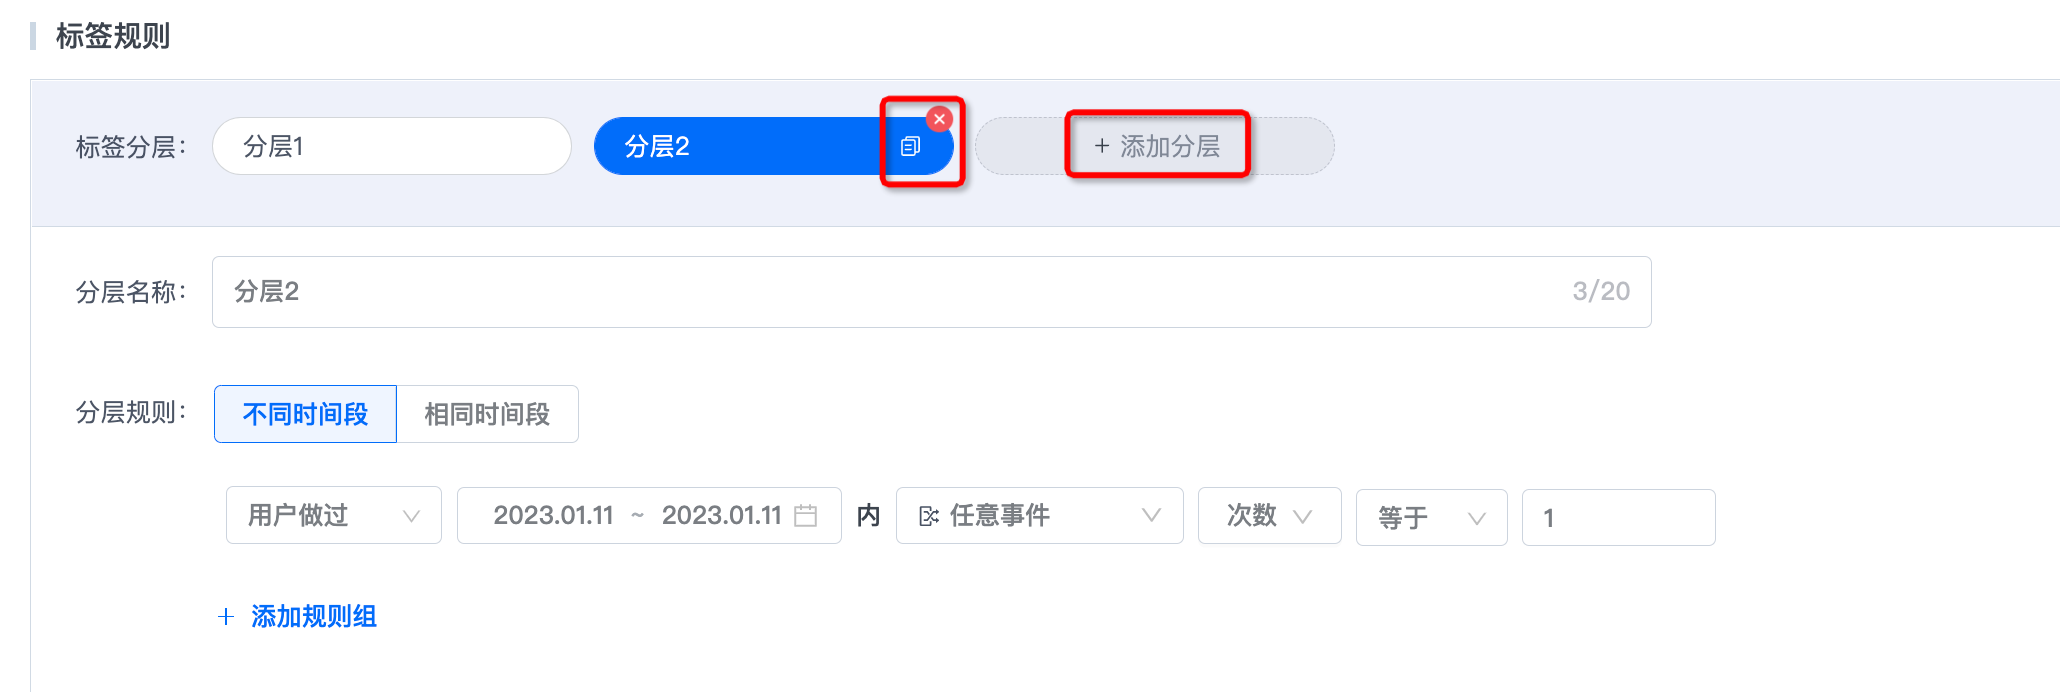
- At 1, you can set the time rules for filtering.
- Different time periods: Each rule can customize the filtering time period.
- Same time period: All rules are filtered in the same time period.
- Click "and" or "or" at 2 to switch the intersection and union relationship.
- Click "Add Rule Group" at 3 to add a new rule group.
- At 4, you can select user characteristics, filter conditions that the user has done, and that the user has not done.
- At 5 you can select an event created in the data center or "any event".
- At 6, you can add new rules, add filter conditions, and delete rules.
Complete creation
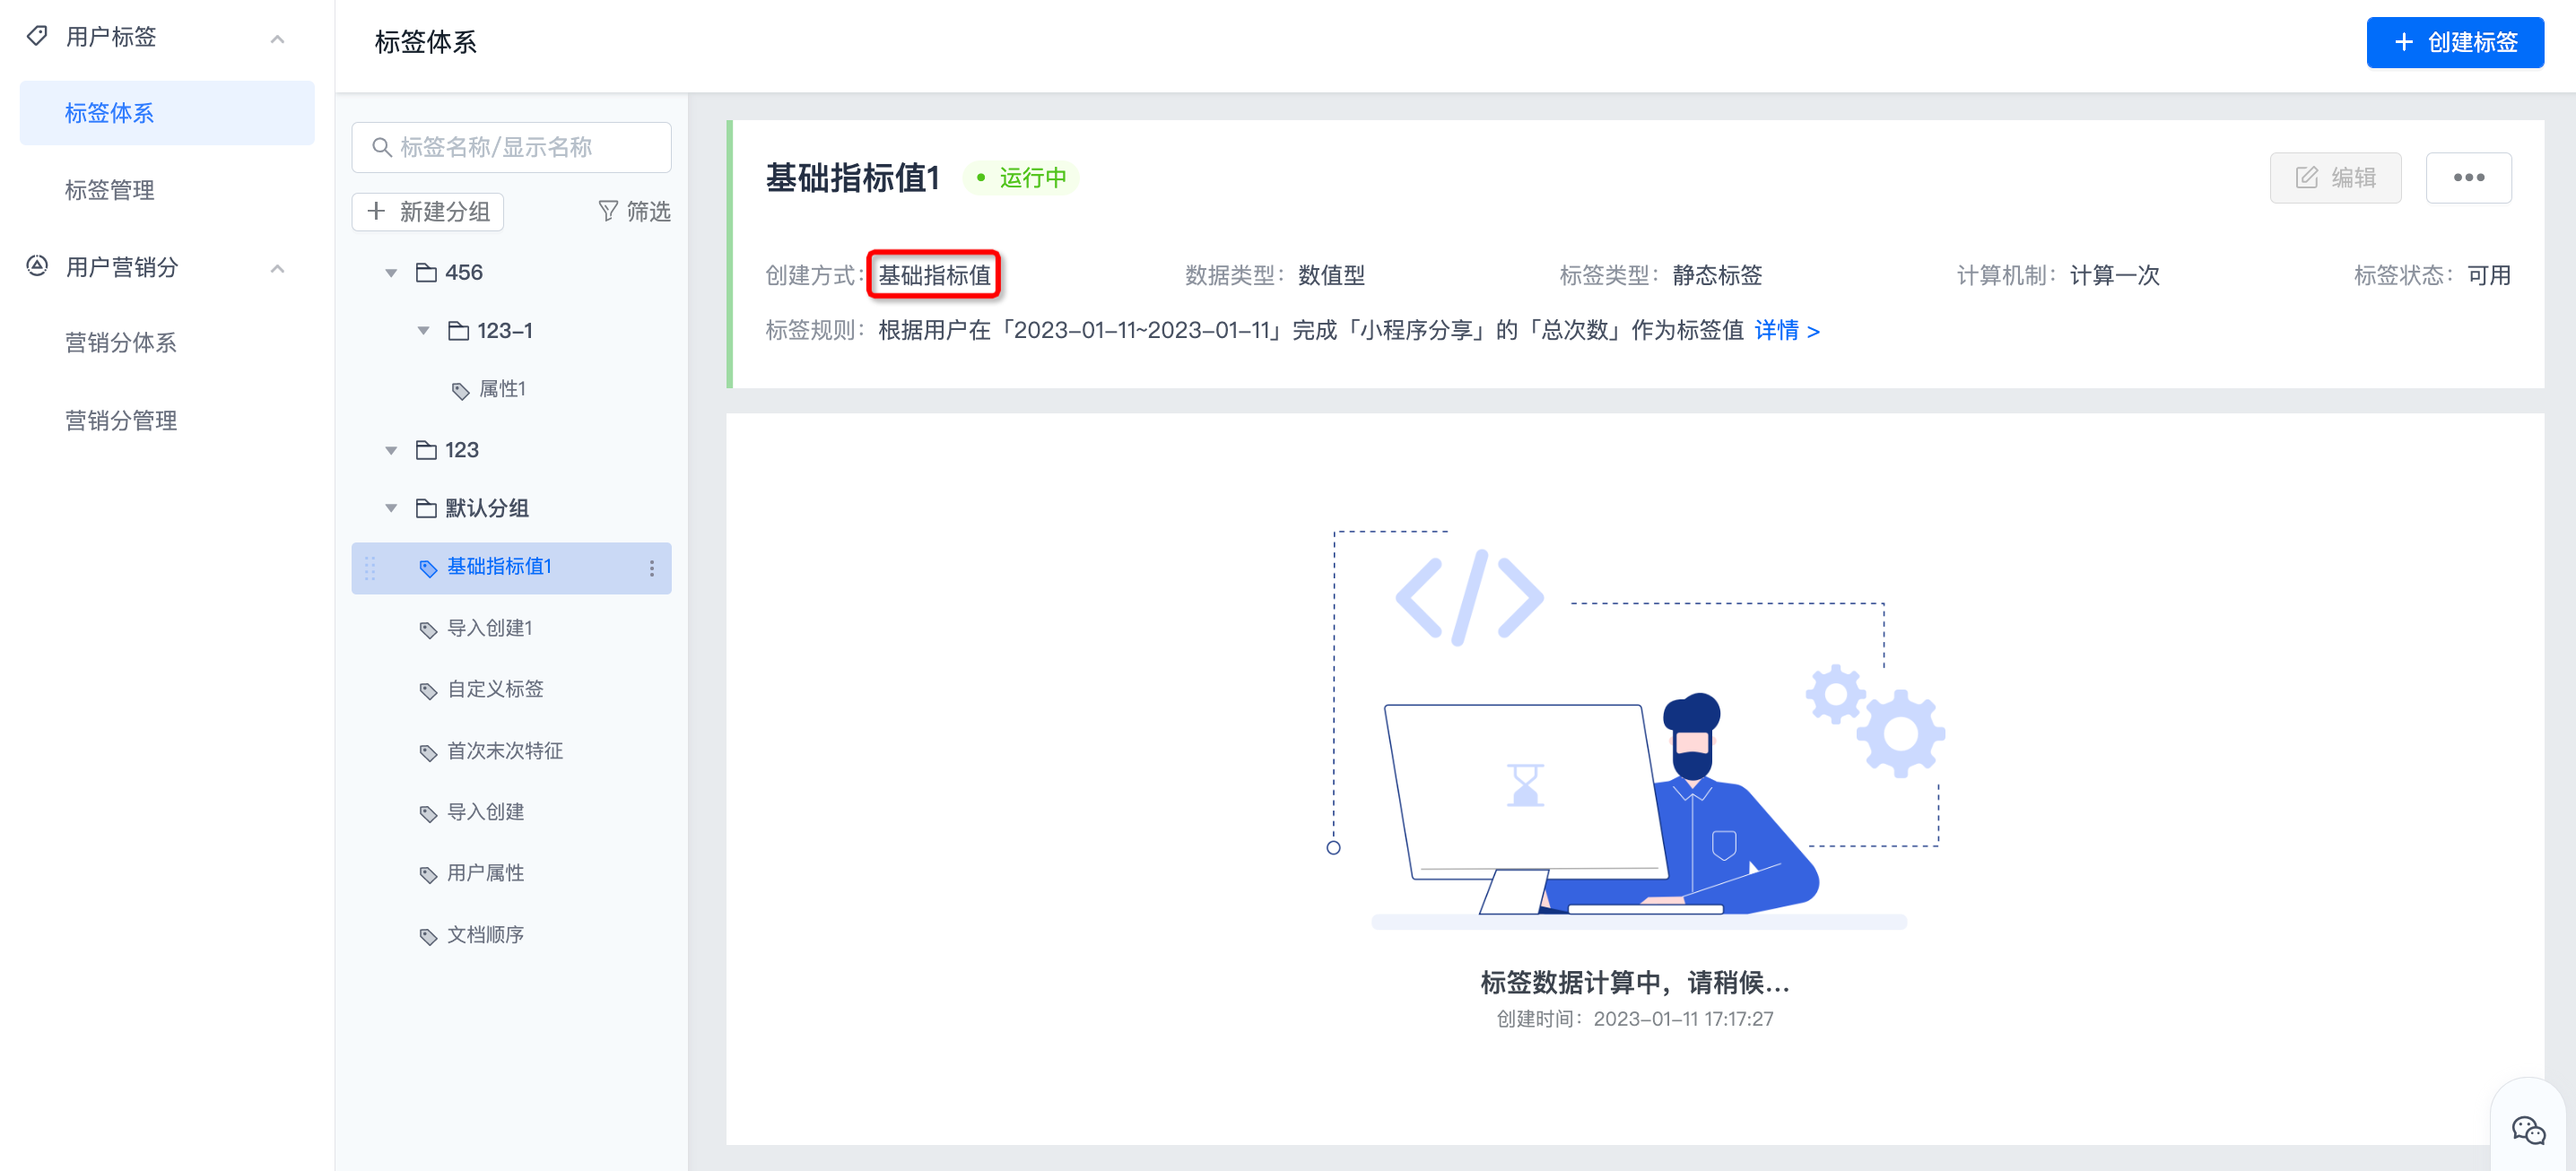
After the rules for each label layer are configured, click "Save" to complete the creation. The creation method is displayed as: Custom label value. After the calculation is completed, the tag user distribution and historical data will be displayed.

Basic indicator value
Use the number of times users complete events or the statistical results of other indicators as label values, such as: number of logins in the past 7 days, monthly consumption amount. The creation steps are as follows:
- On the create label page, select the creation method: basic indicator value.
- Select the calculation mechanism: once, once a day, weekly, or monthly. The corresponding label types will be displayed on the right side according to the selected calculation mechanism.

- Click "View Example" to see how to set label rules, as follows:
- Set label rules.
Set label rules
- Set the filtering period.
- Select the event in "Data Center - Event Management" at 1.
- After selecting an event, you can click 2 places to add filter conditions, and click 3 places to delete filter conditions.
- Click "And" at 4 to switch the intersection and union relationship of the filter conditions.
- Click 5 to switch the total number of times, order total, etc.
- Calculation results support division according to discrete values, percentages, and numerical intervals.

Complete creation
After completing the rule configuration, click "Save" to complete the creation. The creation method is displayed as: basic indicator value. After the calculation is completed, the tag user distribution and historical data will be displayed.
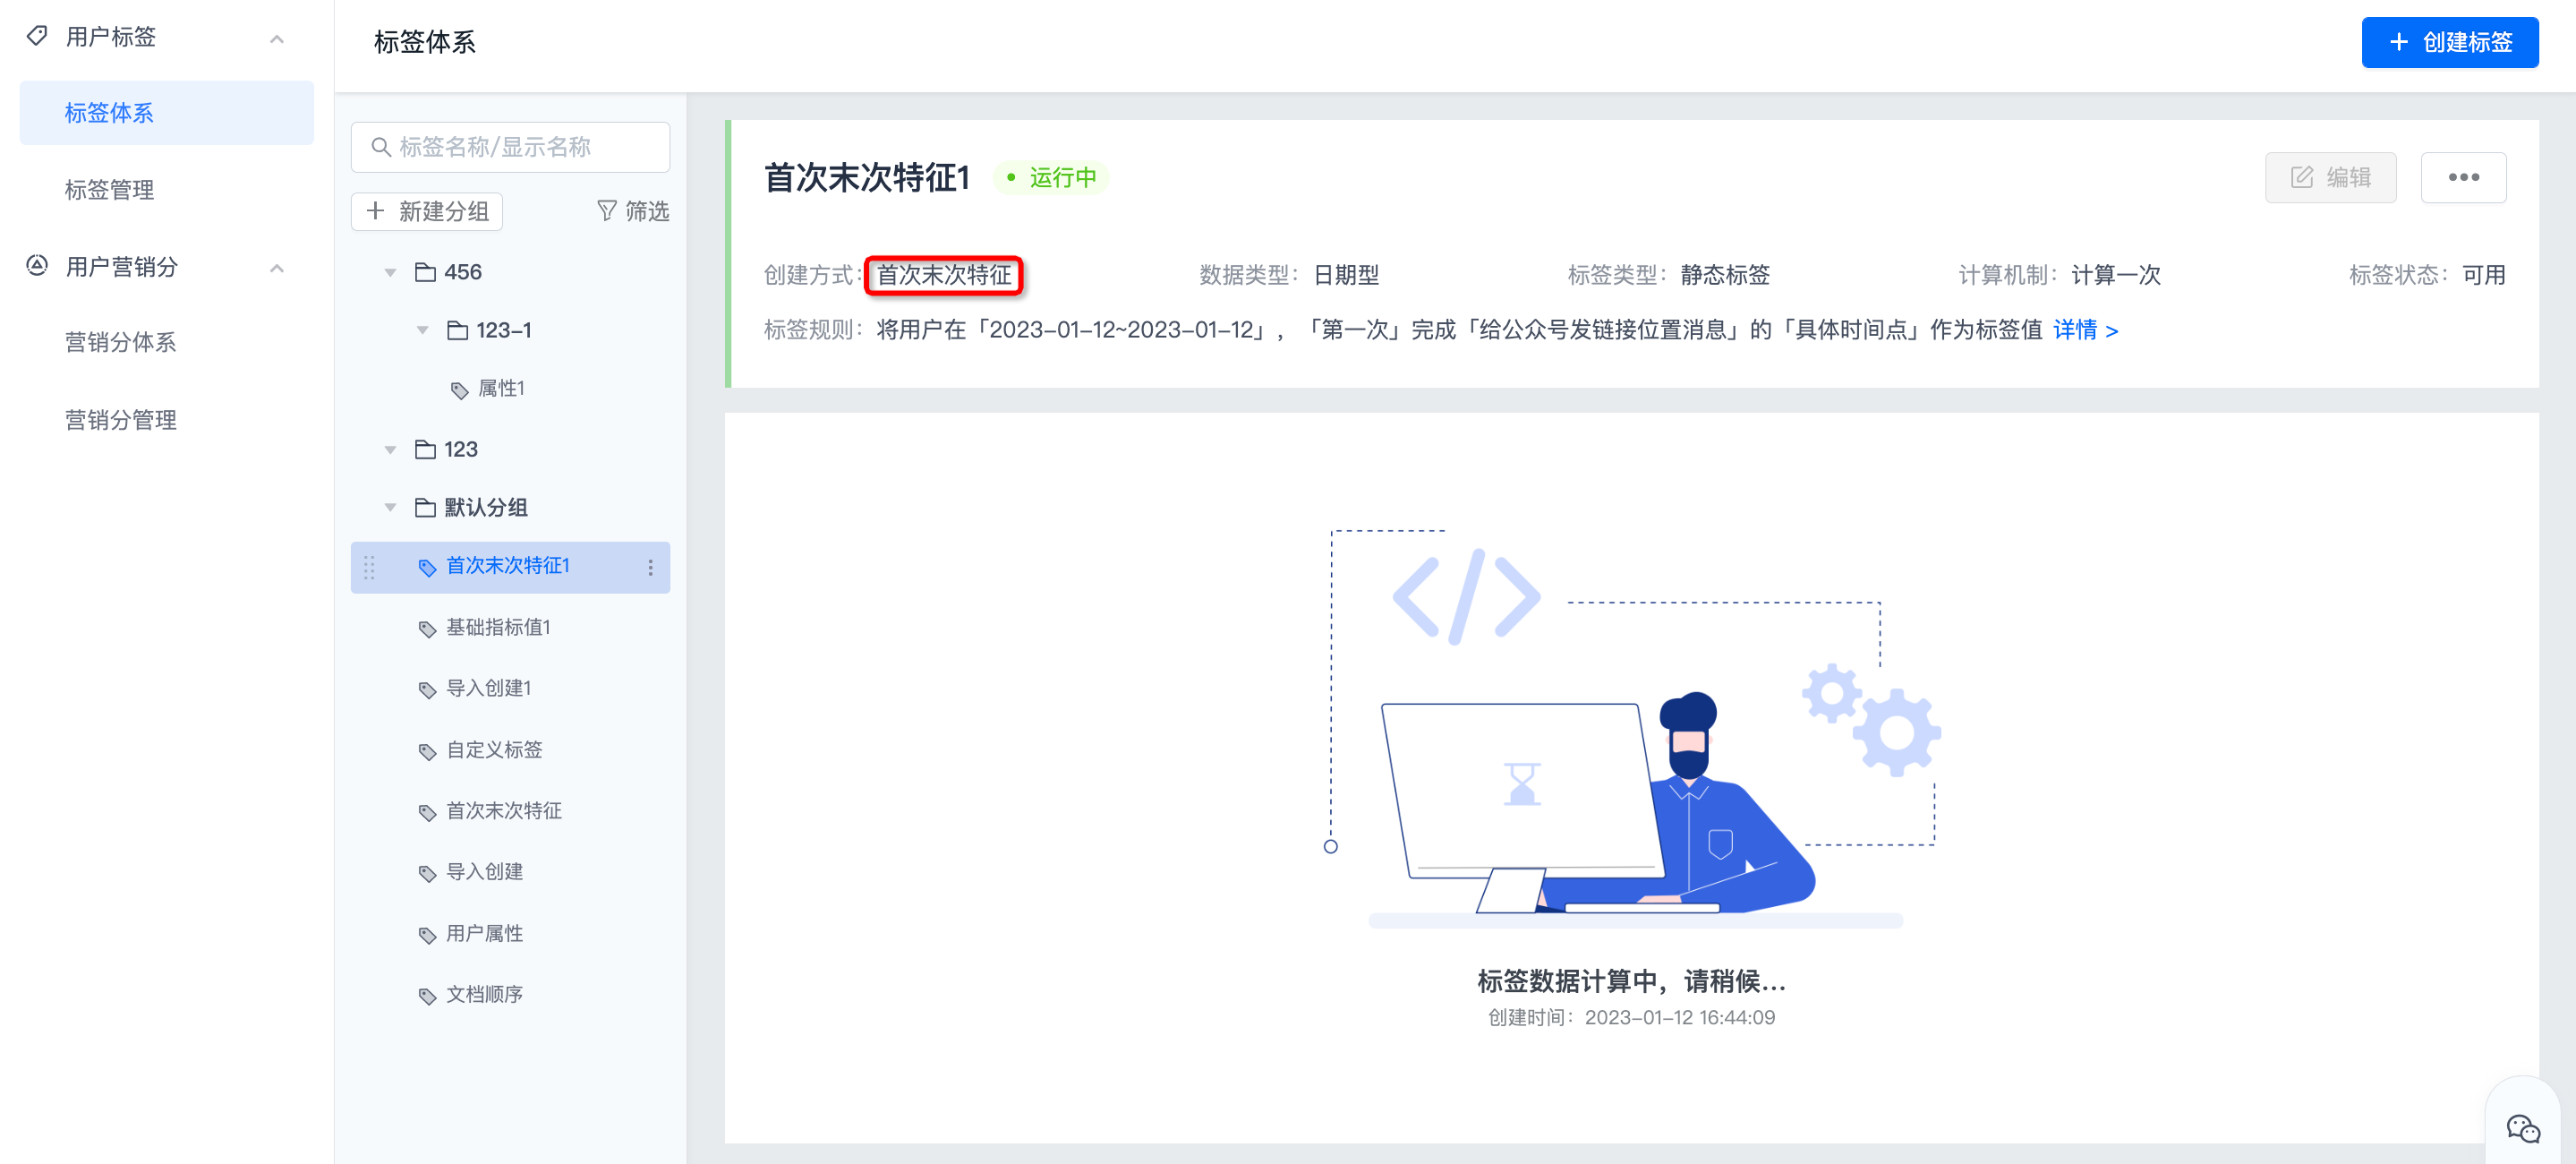
First and last characteristics
Use the time point when the user first or last completed the event, the number of days until today, or other attributes as the label value. For example: last active date, first payment amount. The creation steps are as follows:
- On the create label page, select the creation method: first and last features.
- Select the calculation mechanism: once, once a day, weekly, or monthly. The corresponding label types will be displayed on the right side according to the selected calculation mechanism.
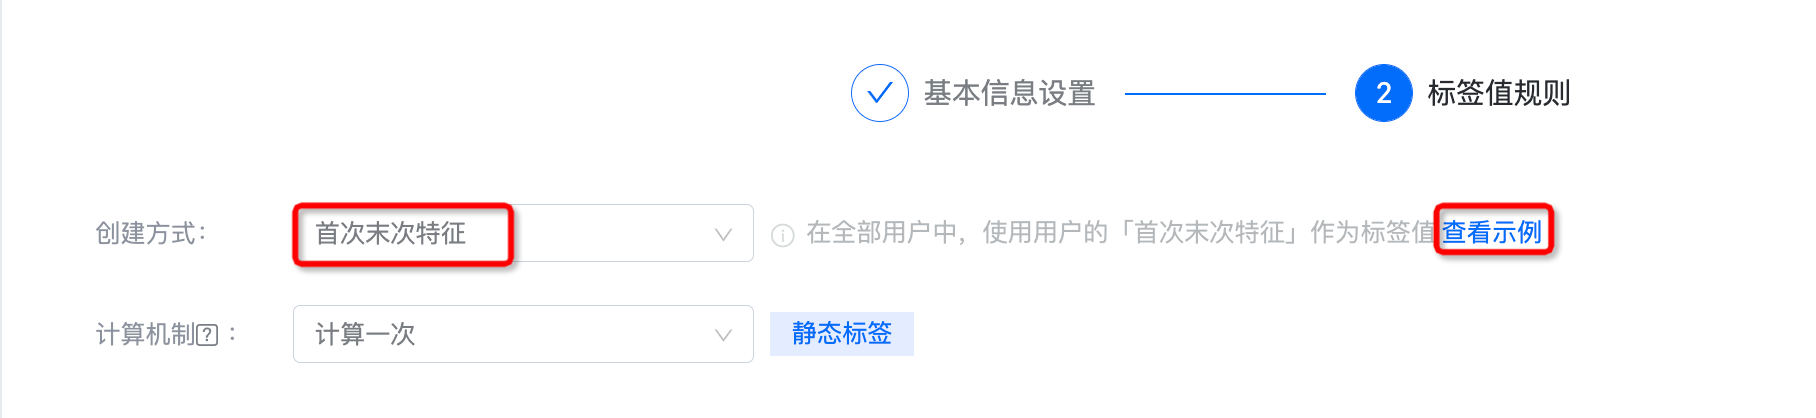
- Click "View Example" to see how to set label rules, as follows:
- Set label rules.
Set label rules
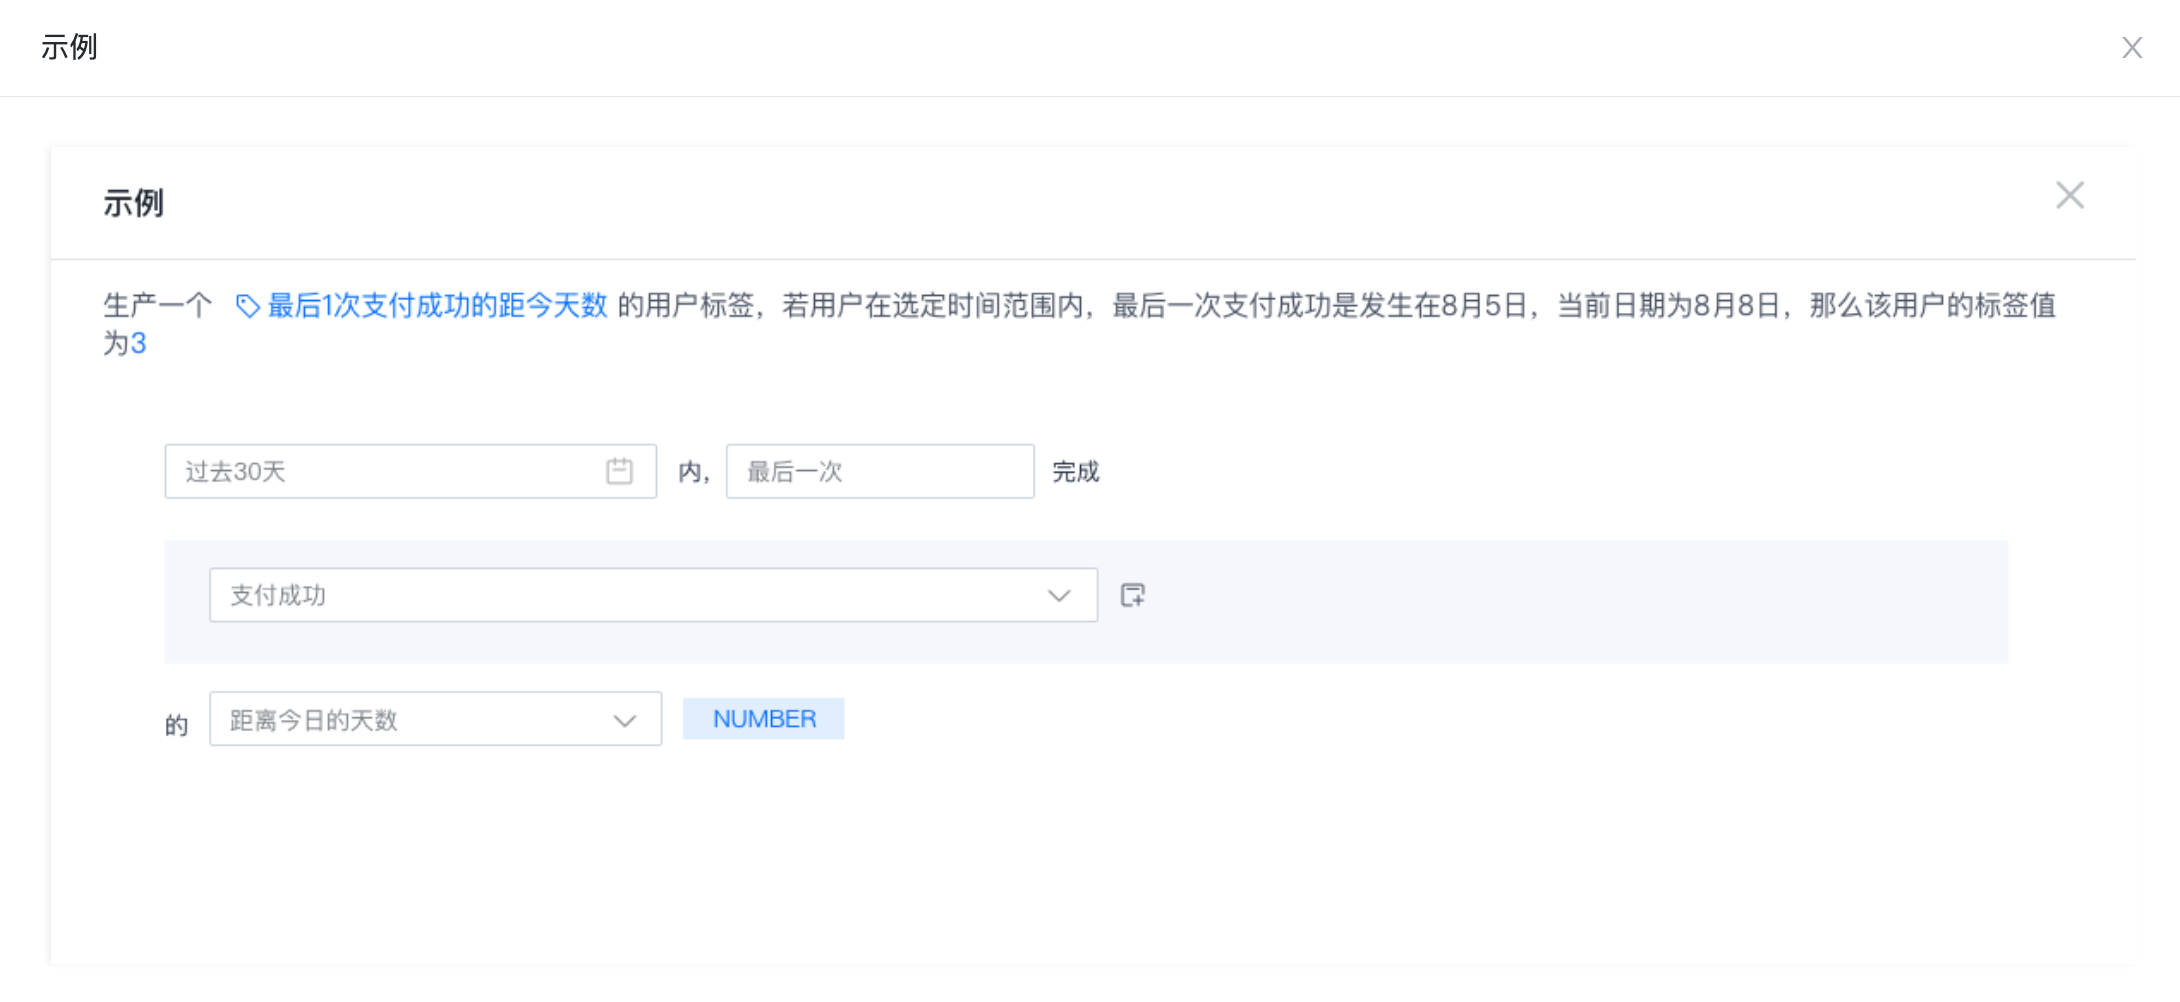
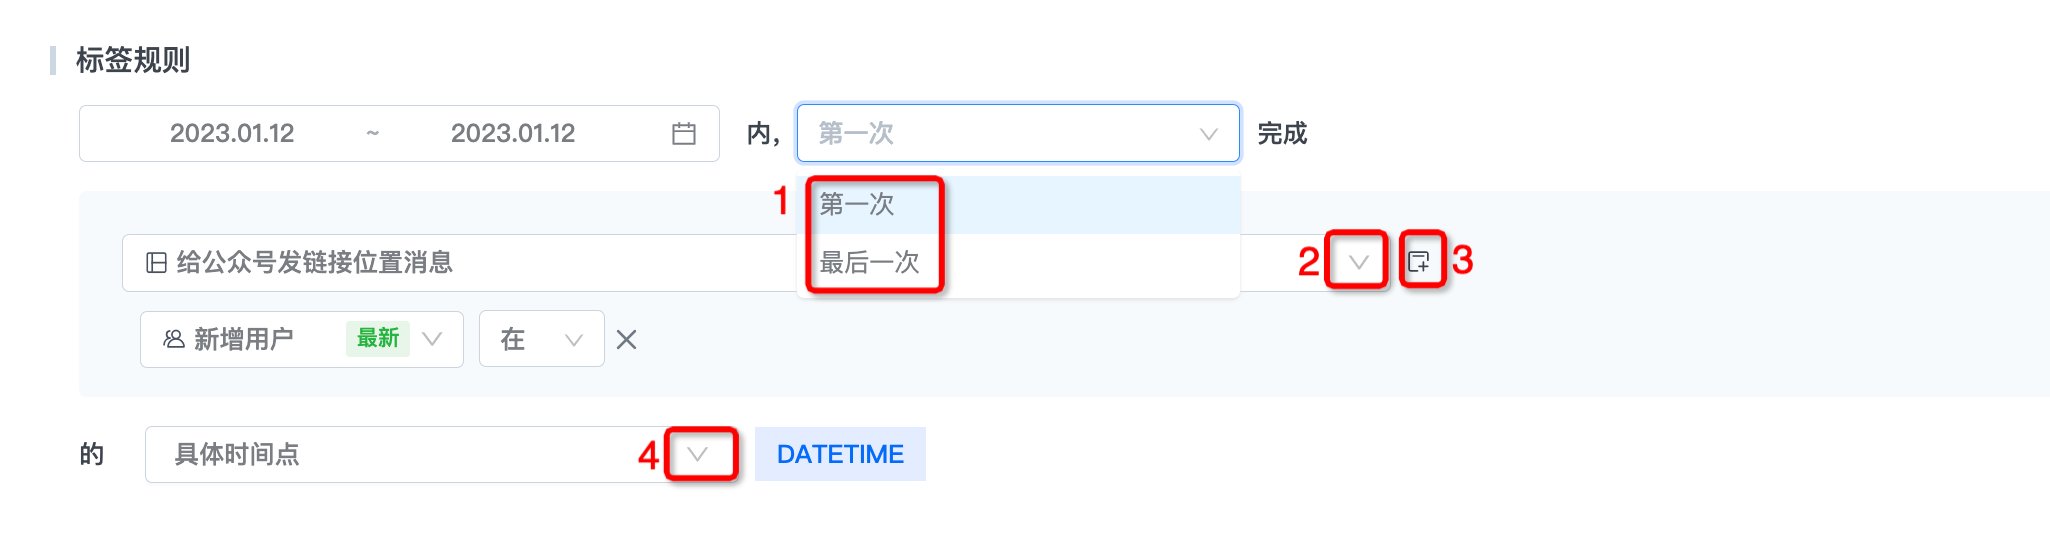
- Set the filter period, select "First" or "Last" at 1.
- Select the event in "Data Center - Event Management" at 2 places.
- After selecting the event, you can click 3 places to add filter conditions.
- Click 4 to select "specific time point", "number of days from today", etc.
- Calculation results support division according to discrete values, percentages, and numerical intervals.
Complete creation
After completing the rule configuration, click "Save" to complete the creation. The creation method is displayed as: first and last characteristics. After the calculation is completed, the tag user distribution and historical data will be displayed.
event preference properties
Group and sort user completion events according to a certain attribute, and use the top groups as label values. For example: the 3 categories of products with the most shares and the 5 categories of financial products with the largest purchase amount. The creation steps are as follows:
- On the create label page, select the creation method: event preference attribute.
- Select the calculation mechanism: once, once a day, weekly, or monthly. The corresponding label types will be displayed on the right side according to the selected calculation mechanism.
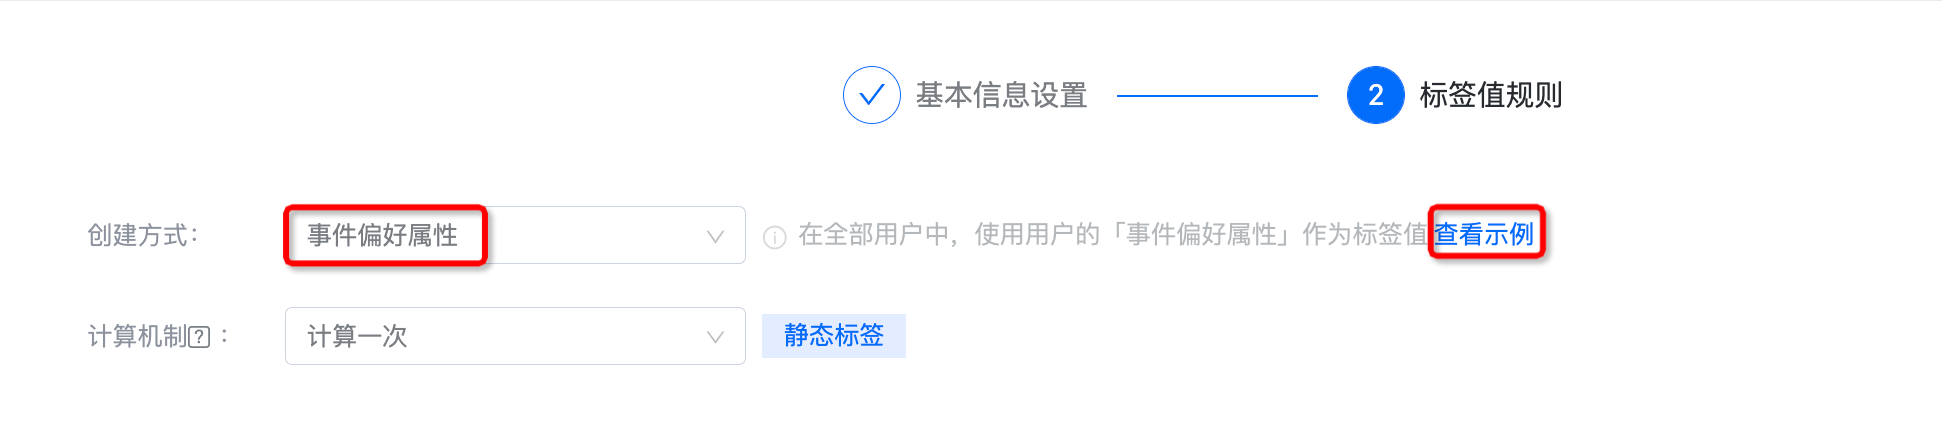
- Click "View Example" to see how to set label rules, as follows:
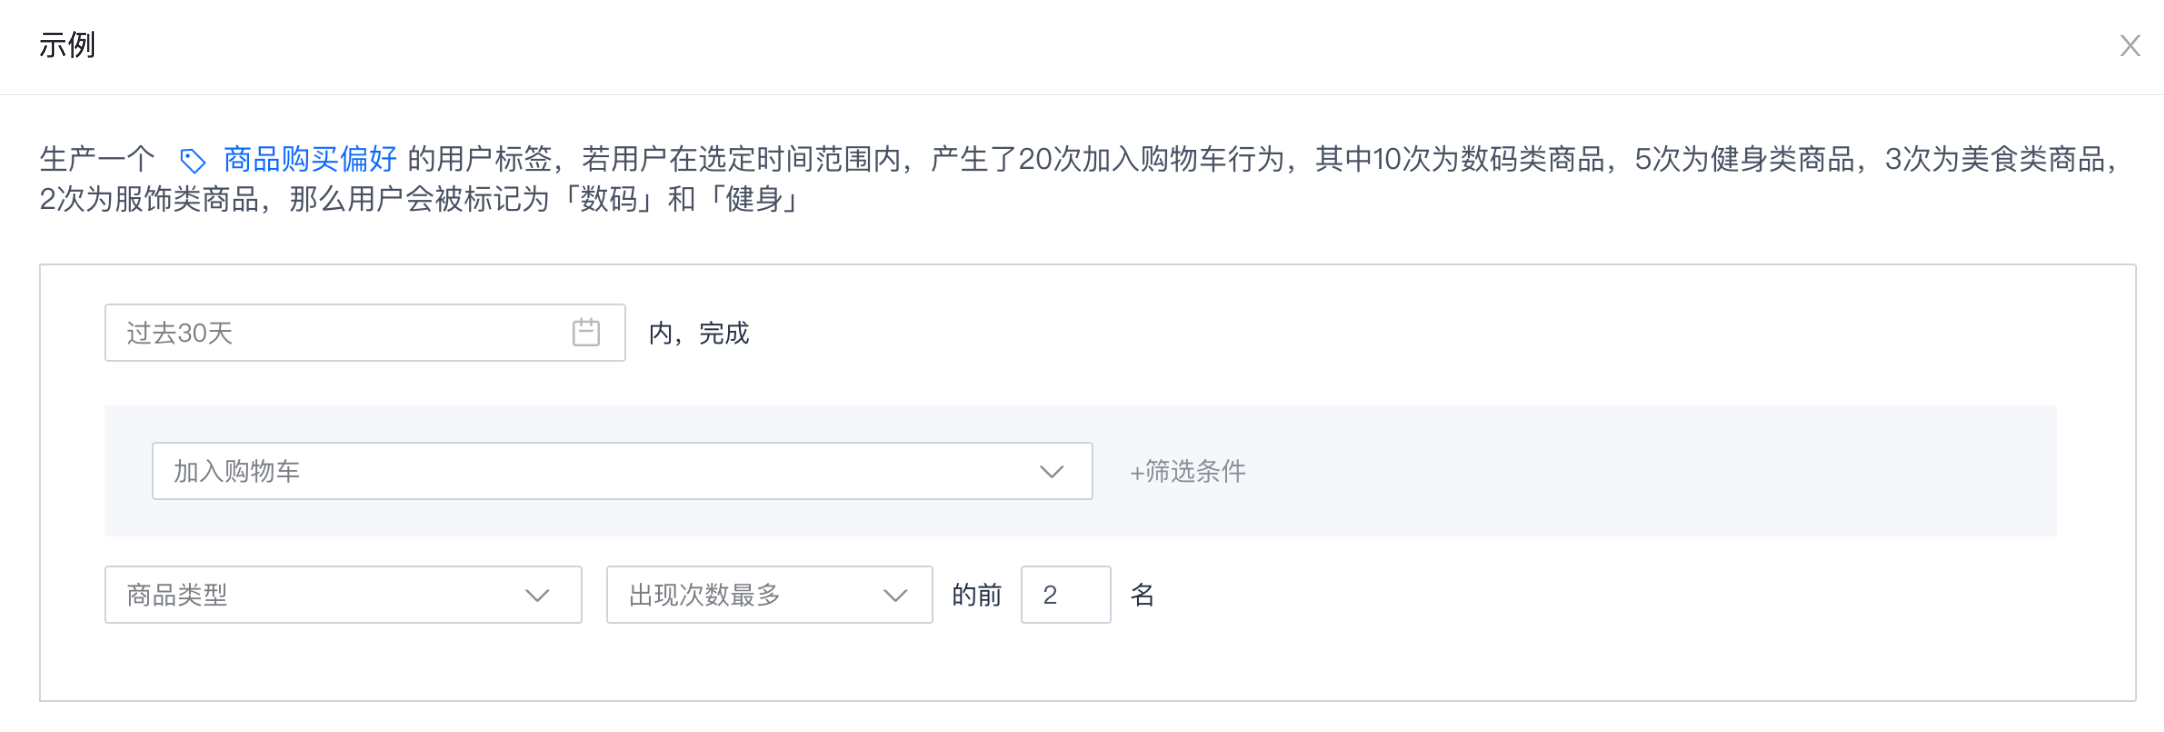
- Set label rules.
Set label rules
- Select the event in "Data Center - Event Management" at 1.
- After selecting an event, you can click 2 places to add filter conditions, supporting the selection of event attributes, user attributes,user segmentand marketing points.
- Click 3 to select the event attributes associated with the event.
- Click 4 to select "Maximum value", "Most occurrences", etc.
Complete creation
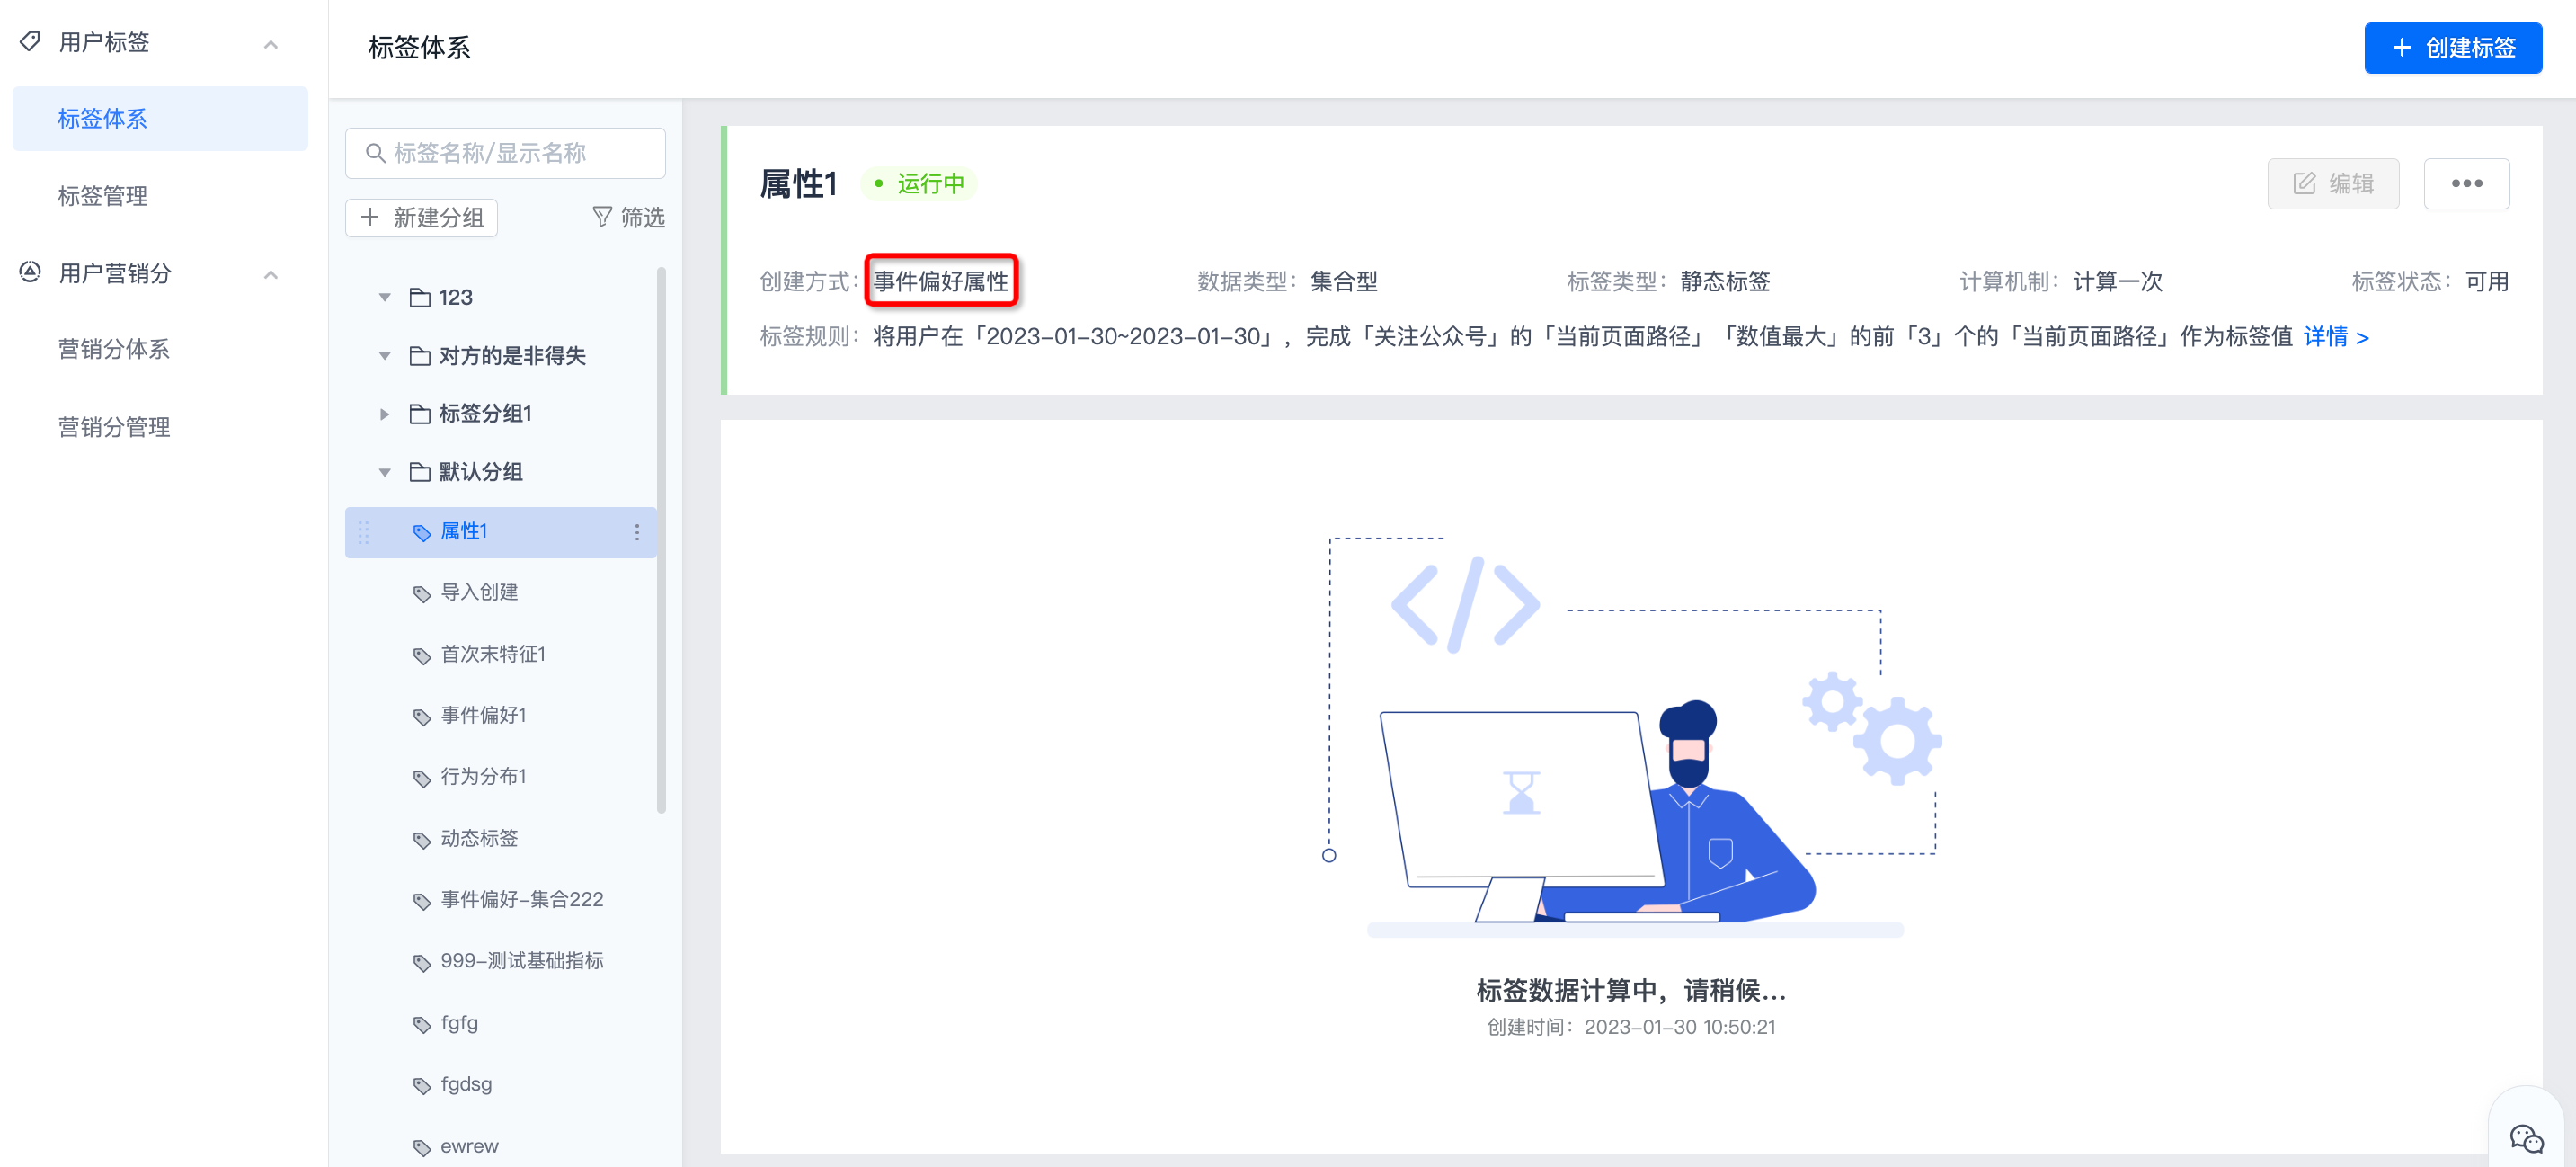
After completing the rule configuration, click "Save" to complete the creation. The creation method is displayed as: event preference attribute. After the calculation is completed, the tag user distribution and historical data will be displayed.
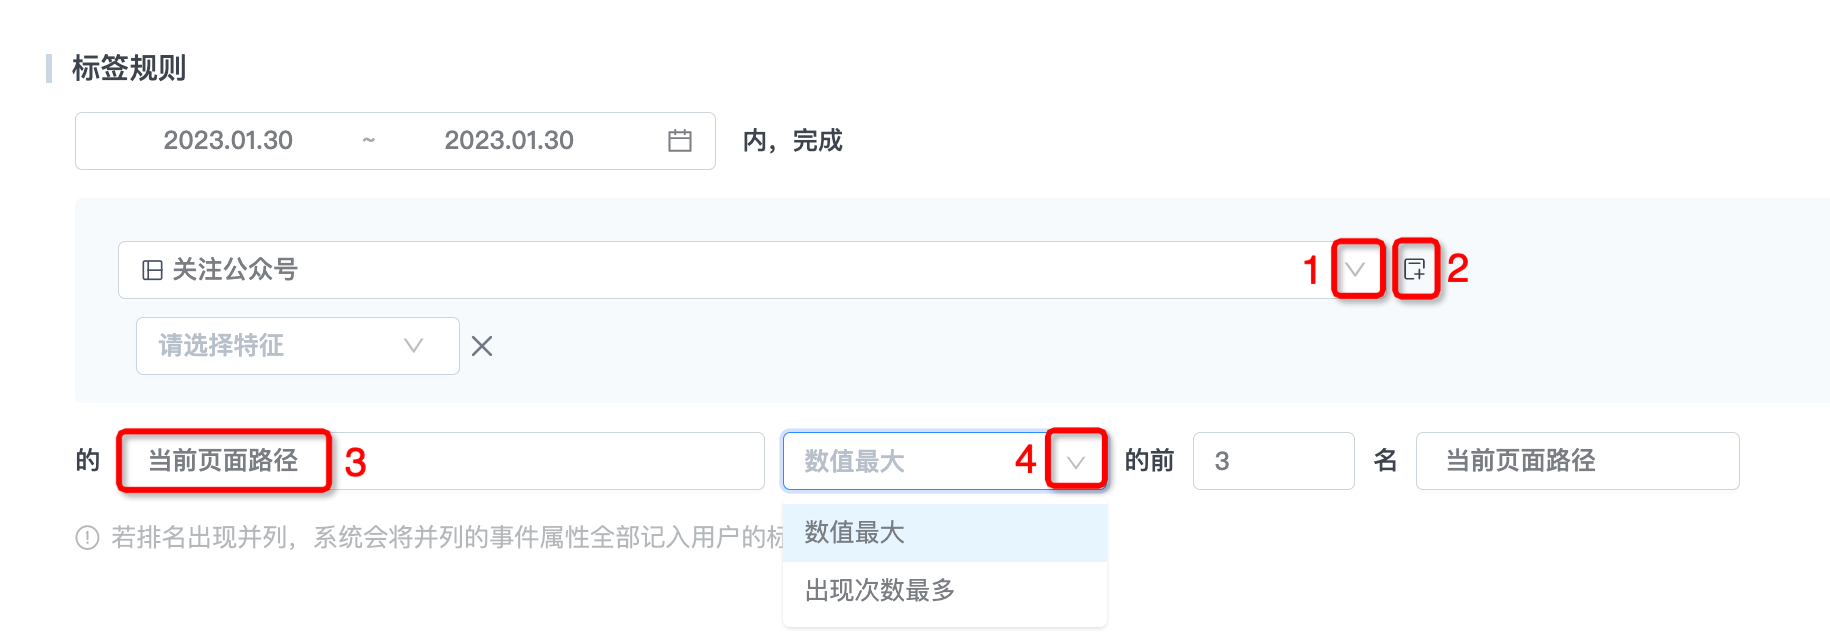
Behavior distribution results
Use the number of days or hours that user completion events are distributed within the specified time period as the label value. For example: the distribution of page browsing hours yesterday and the number of user login days in the past 30 days. The creation steps are as follows:
- On the Create Label page, select the creation method: Behavior Distribution Result.
- Select the calculation mechanism: once, once a day, weekly, or monthly. The corresponding label types will be displayed on the right side according to the selected calculation mechanism.
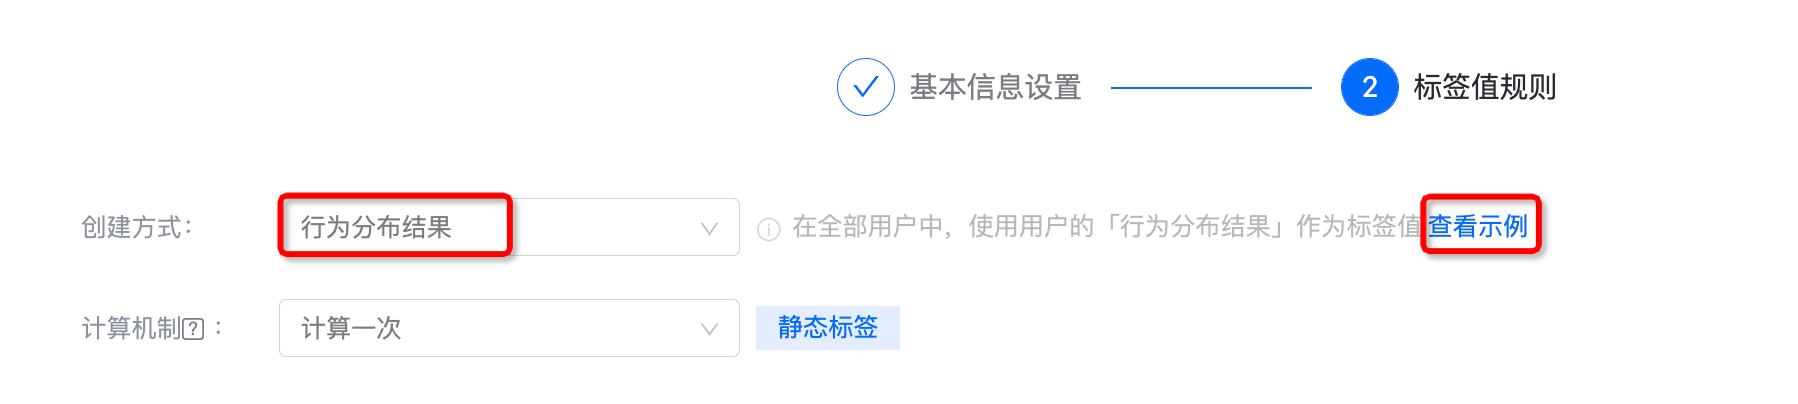
- Click "View Example" to see how to set label rules, as follows:
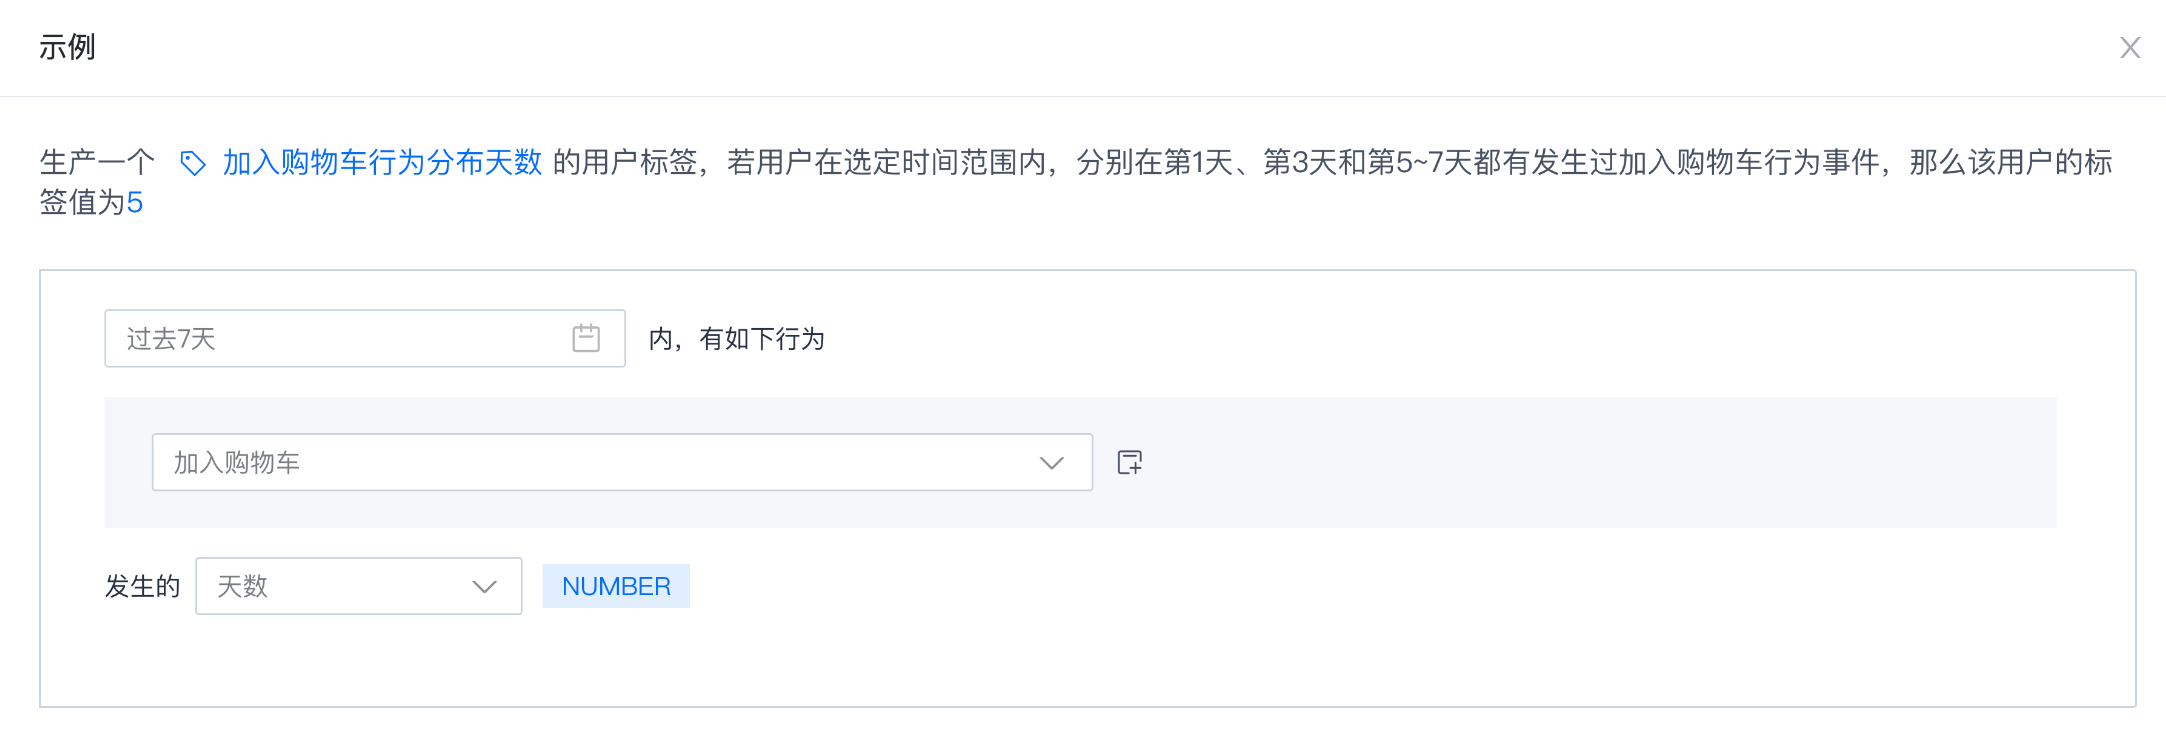
- Set label rules.
Set label rules
- Select the event in "Data Center - Event Management" at 1.
- After selecting an event, you can click 2 places to add filter conditions, supporting the selection of event attributes, user attributes,user segmentand marketing points.
- Click 3 to select "number of days", "number of hours", etc.
Complete creation
After completing the rule configuration, click "Save" to complete the creation. The creation method is displayed as: Behavior distribution results. After the calculation is completed, the tag user distribution and historical data will be displayed.

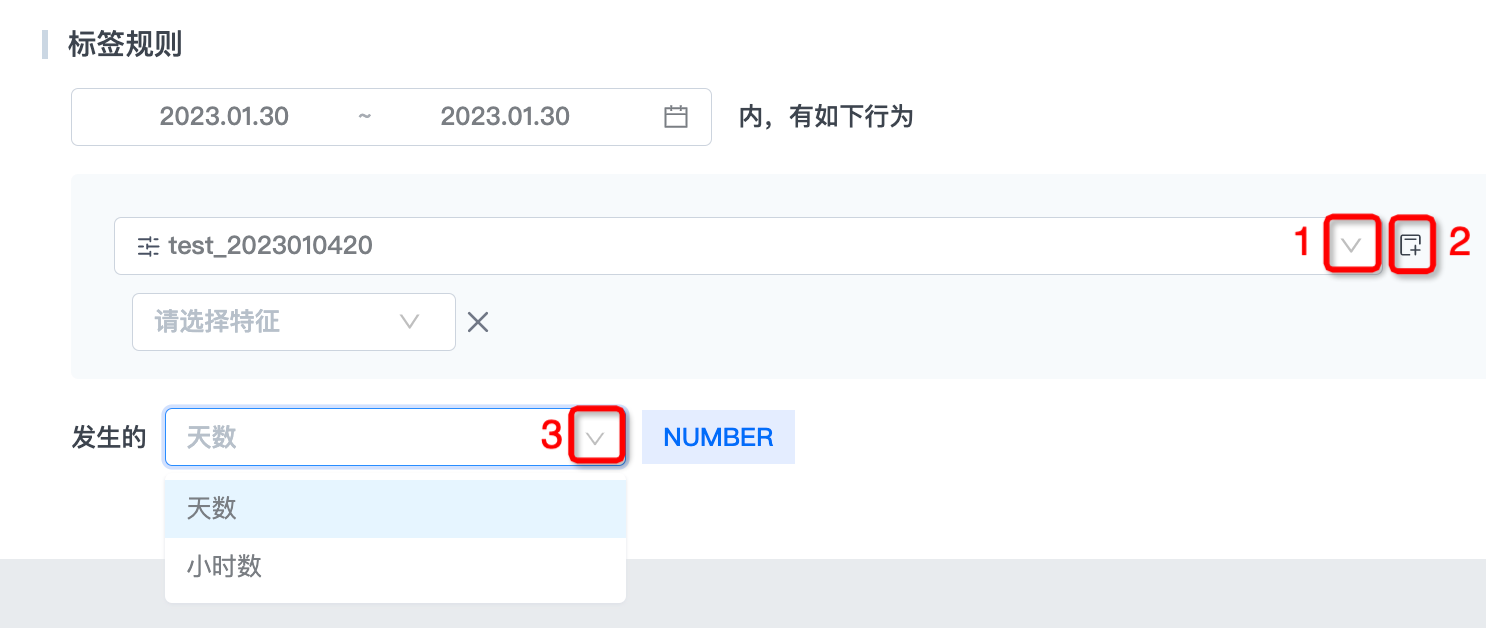
Import create
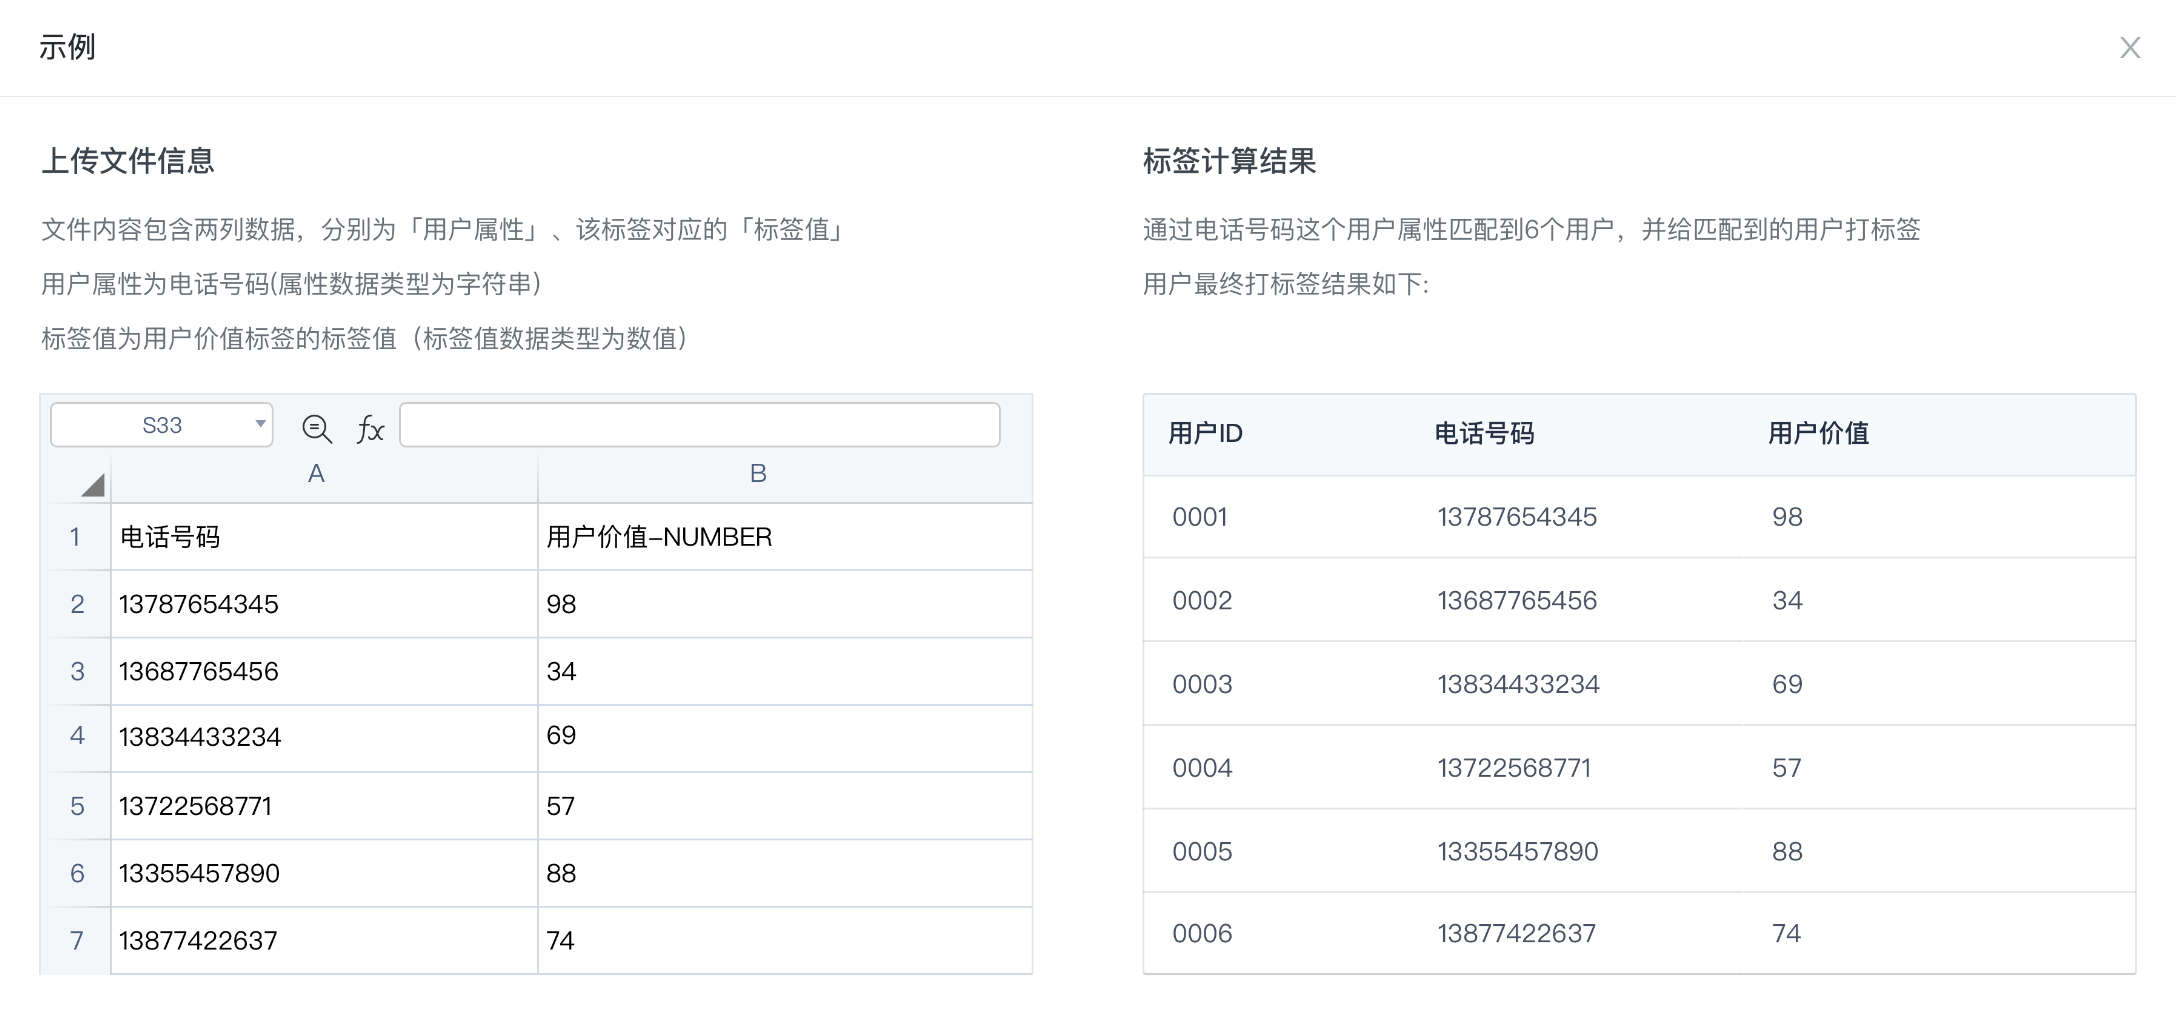
By uploading files to the user CUID Or user attribute sets label value for dimension. Used for: old data migration scenarios, situations that cannot be covered above, etc. The creation steps are as follows:
- On the create label page, select "Import Create" as the creation method.

- Click "View Example", the details are as follows:
- Set tag value rules.
Set tag value rules
- Select a tag value type, supported STRING、NUMBER、BOOL、DATETIME、LIST。
- Upload type selection CUID or one of the user properties.
- Click "Template Download" to obtain the template corresponding to the upload type.
- Fill in the user data according to the downloaded template and click "Upload User Data".
If the tag value field is empty or the data type does not match, the invalid data will be discarded.

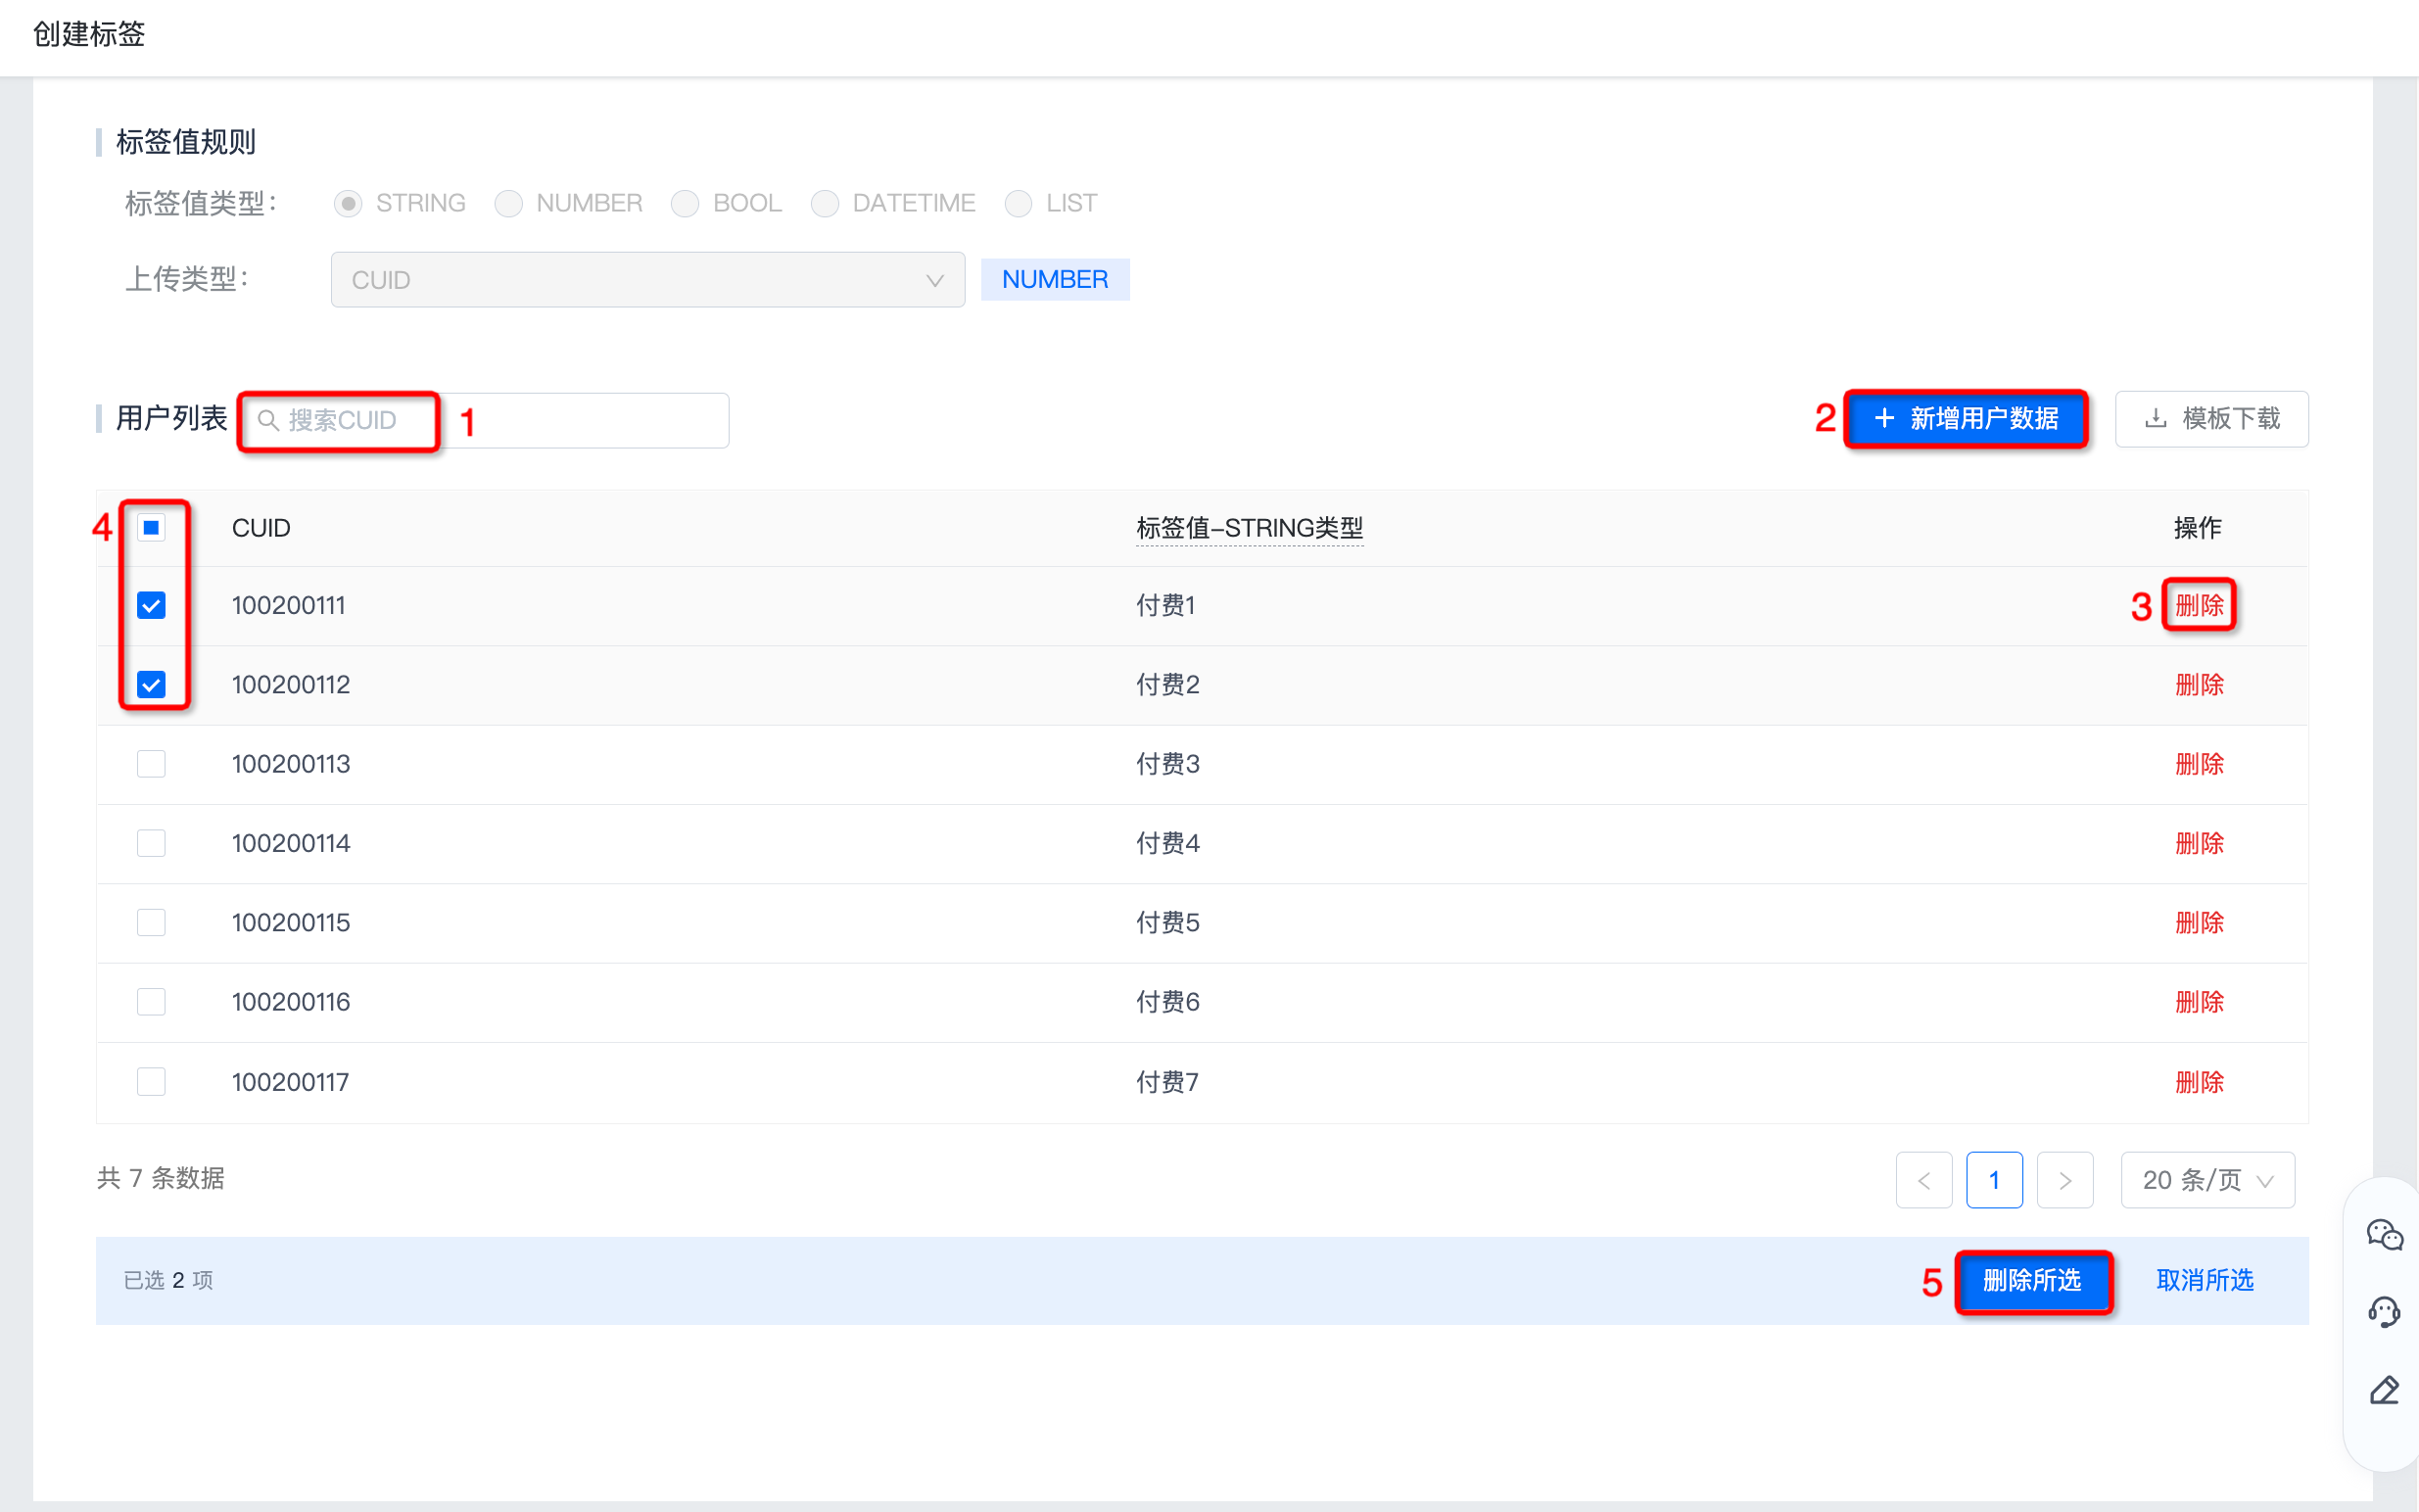
User list management
- Select upload type CUID For example, after uploading data, you can pass at 1 CUID Search.
- Click "Add User Data" in 2 places to continue uploading files. Up to 100 Thousands of pieces of data.
- If you need to delete a piece of user information, click "Delete" at 3 to delete it immediately.
- Supports batch deletion of user information. Check 4 user information that needs to be deleted, and click "Delete Selected" on 5 places to delete it immediately.
Complete creation
Click "Save" to complete the creation. The creation method is displayed as: import creation. After the calculation is completed, the label score distribution and historical data will be displayed.


