
HarmonyOS SDK Integration Guide
Usage Notes
This document is the standard integration guide for the JVerification HarmonyOS SDK.
Supported SDK version: v1.0.0 and later.
- To quickly test, follow this guide to run the Demo in minutes.
- All guides, APIs, tutorials, and updated versions are published on the JVerification documentation site.
Product Overview
JVerification integrates gateway authentication from China's three major carriers, providing one-click login and phone number verification to improve registration/login and number verification while enhancing security.
Main Scenarios
- Registration
- Login
- Secondary verification
Obtain Application Info
After creating an app on the console, open Authentication Settings → Integration Settings to obtain the AppKey.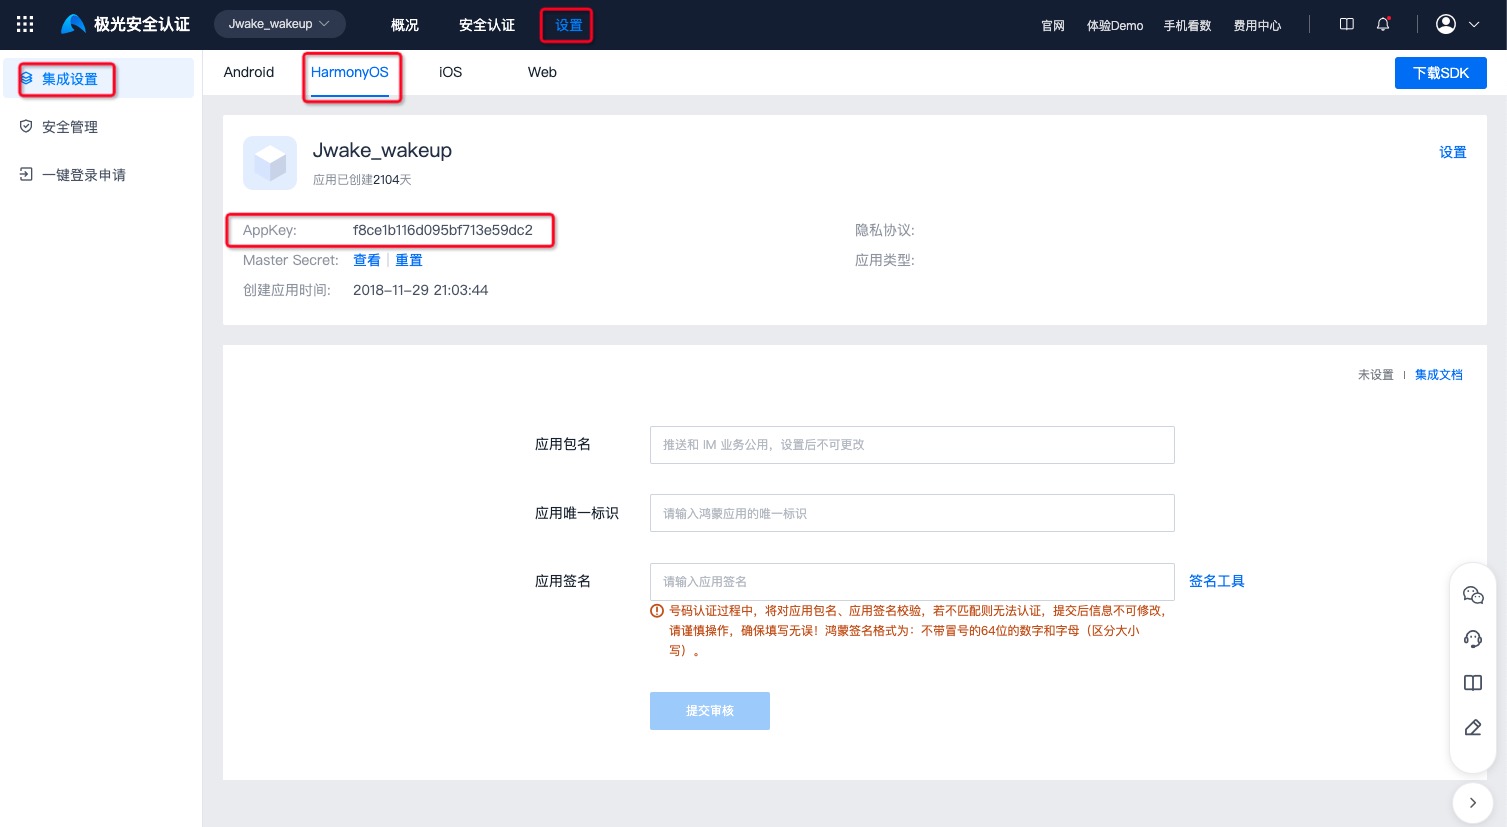
Configure App Signature
Configure the app signature on the Jiguang portal. Obtain the signature as follows:
          // Call this method in your app to get the current signature
getSign(): string {
 let bundleFlags = bundleManager.BundleFlag.GET_BUNDLE_INFO_WITH_SIGNATURE_INFO;
 let bundleInfo = bundleManager.getBundleInfoForSelfSync(bundleFlags)
 return bundleInfo.signatureInfo.fingerprint
}
Integration Methods
ohpm Automatic Integration
          "dependencies": {
 "@jg/verify": "^1.1.0" // JVerification auto integration
 "pako": "^2.1.0", // Required compression library
 "js-sha256": "^0.9.0" // Required SHA-256 library
}
Manual Integration
Download the integration package: Go to download
jverification-hmos-x.x.x-release.zip contents
jverification-hmos-x.x.x-release.har
Core Jiguang Developer Services package.
doc
Documentation
entry
HarmonyOS demo project demonstrating basic JVerification SDK usage.
HAR integration
- Unzip jverification-hmos-x.x.x-release.zip.
- Copy jverification-hmos-x.x.x-release.har to your project's
entry/hars/directory (customizable).
Note: Link jverification-hmos-x.x.x-release.har. For example, if the HAR is under entry/hars/, add to oh-package.json5 in the entry module:
          "dependencies": {
 "@jg/verify": "./hars/jverification-hmos-x.x.x-release.har" // Path where you store the HAR,
 "pako": "^2.1.0", // Required compression library
 "js-sha256": "^0.9.0" // Required SHA-256 library
}
Import UI resources
Import SDK images into AppScope/resources/base/media. Sample images are in the media folder of the package.
| File name | Description |
|---|---|
| jverify_background.png | One-click login main background |
| jverify_ctlogo.png | China Telecom logo |
| jverify_culogo.png | China Unicom logo |
| jverify_dialog_background.png | One-click login dialog background |
| jverify_dialog_close.png | One-click login dialog close button |
Update project-level build-profile.json
Note: Required by China Unicom SDK. Set useNormalizedOHMUrl as follows:
          "products": [
 {
 "name": "default",
 "signingConfig": "default",
 "compatibleSdkVersion": "5.0.0(12)",
 "runtimeOS": "HarmonyOS",
 "buildOption": {
 "strictMode": {
 "useNormalizedOHMUrl": true
 }
 },buildOption
 }
],
Configure permissions
Add required permissions in module.json5:
          "requestPermissions": [
 {
 "name": "ohos.permission.INTERNET"
 },
 {
 "name": "ohos.permission.GET_NETWORK_INFO"
 },
 {
 "name": "ohos.permission.GET_WIFI_INFO"
 },
 {
 "name": "ohos.permission.SET_NETWORK_INFO"
 },
],
Configure Jiguang portal
Main steps:
- Create an app on the Jiguang portal; you need package name and AppKey.
Note 1:
Configure the package name in
app.json5under AppScope:
          {
 "app": {
 "bundleName": "your.package.name",
 }
}
Note 2:
Configure AppKey in code, for example:
          export default class MyAbilityStage extends AbilityStage {
 onCreate() {
 JVerificationInterface.init("YOUR_APPKEY", (code, msg) => {

 });
 }
}
More features
See: HarmonyOS SDK API
Technical Support
Email: support@jiguang.cn

