
Android SDK Integration Guide
Usage Tips
This document is the standard integration guide for the Jiguang Growth Android SDK. It is intended to guide SDK usage. The default reader is already familiar with basic IDE usage, such as Eclipse or Android Studio, and has a certain foundation in Android programming.
The Jiguang Growth Android SDK version matched by this guide is: 2.0.0 and later.
Get App Information
After completing data source integration, go to [Data Source List - Details] to view the AppKey and scheme. For details, see Android Platform Integration.
Automatic Integration (Recommended)
Developers who use mavenCentral for automatic integration do not need to add jar and so files to the project. mavenCentral automatically completes dependencies. No SDK-related configuration needs to be added to AndroidManifest.xml; mavenCentral automatically imports it.
Add Project Configuration
Configure mavenCentral support in the main gradle file in the Project root directory. Newly created projects support this by default.
          buildscript {
 repositories {
 google()
 mavenCentral()
 }......
}

allprojects {
 repositories {
 google()
 mavenCentral()
 }
}
Configure Dependencies and Replacement Variables
Add dependencies and AndroidManifest replacement variables in the Module gradle file. The latest SDK version is subject to the changelog.
Note: JCore must be version 4.1.0 or later; otherwise initialization cannot succeed.
// Add under the Android node in gradle, as follows
android {......
 defaultConfig {
 applicationId "your package name"......

 manifestPlaceholders = [
 // Set variables in manifest.xml
 JPUSH_PKGNAME: applicationId,
 JPUSH_APPKEY: "your Appkey ", // Required. This appkey must have been bound to a data source. For details, see "Get App Information" above.
 JPUSH_CHANNEL: "developer-default", // Fill in the default value for now.
 ]
 }
}
dependencies {......

 implementation 'cn.jiguang.sdk:jcore:4.5.3' // JCore must be version 4.1.0 or later. JCore 4.5.3 is used as an example here.
 implementation 'cn.jiguang.sdk:joperate:2.0.9'


}
Configure Service
An additional Service needs to be configured in AndroidManifest to obtain more stable support on more mobile phone platforms. Example:
           <service android:name="cn.jpush.android.service.JCommonService"
 android:process=":pushcore"
 android:enabled="true"
 android:exported="true">
 <intent-filter>
 <action android:name="cn.jiguang.user.service.action" />
 </intent-filter>
 </service>
Configure provider
An additional provider needs to be configured in AndroidManifest to obtain more stable support on more mobile phone platforms. Example:
           <provider
 android:exported="false"
 android:authorities="${applicationId}.jiguang.InitProvider"
 android:name="cn.jpush.android.service.InitProvider">
 </provider>
Configuration and Code Description
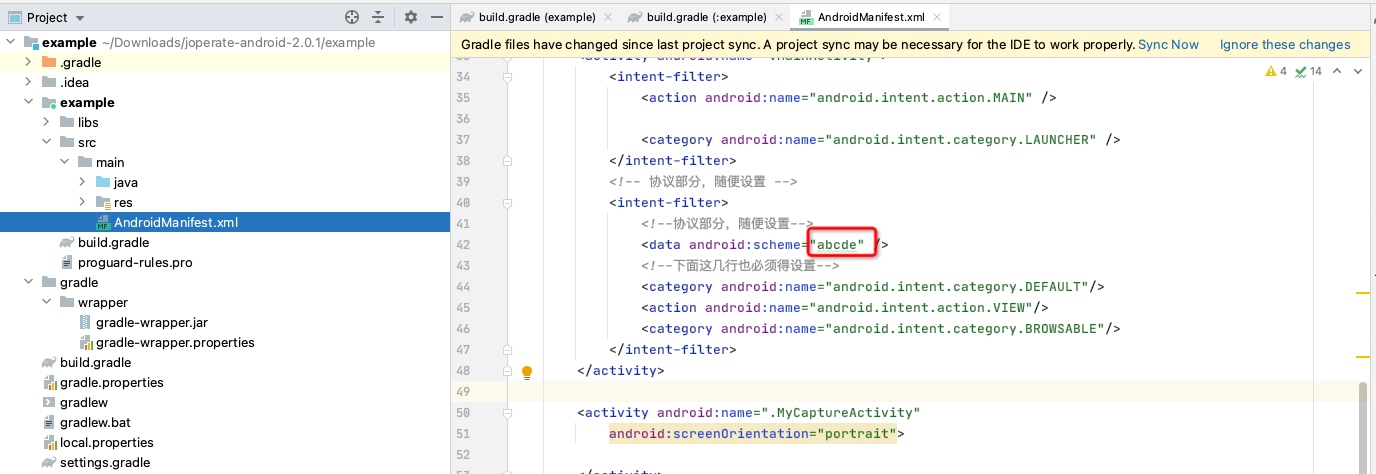
Configure scheme
For details about obtaining the scheme, see Get App Information above.
          <!--Configure your scheme in the corresponding Activity-->
<intent-filter>
 <data android:scheme="your scheme" />
 <!--The following lines must also be set-->
 <category android:name="android.intent.category.DEFAULT"/>
 <action android:name="android.intent.action.VIEW"/>
 <category android:name="android.intent.category.BROWSABLE"/>
</intent-filter>
Initialize Service
Initialization needs to be performed in Application. The APIs provided by the SDK are mainly concentrated in the cn.jiguang.joperate.api.JOperateInterface class. For how to use other APIs, see the API documentation: Android SDK API.
          public class TApplication extends Application {
 @Override
 public void onCreate() {
 super.onCreate();
 JOperateInterface.setDebug(true);// Must be removed in production environment
 JOperateInterface.getInstance(getApplicationContext()).initialize();
 JOperateInterface.getInstance(getApplicationContext()).operationStart();
 }
}
Obfuscation
If obfuscation is enabled for your app, add the following obfuscation rules for our SDK.
          -keep class cn.jiguang.**{
 *;
}
-dontwarn javax.annotation.**
-dontwarn sun.misc.Unsafe
-dontwarn org.conscrypt.*
-dontwarn okio.**


###Other obfuscation
-keep class android.support.v4.**{
 public *;
}
-keep class android.support.v7.**{
 public *;
}

-keepclassmembers class * extends android.app.Activity { public void *(android.view.View);
}
-keepclassmembers enum * {
public static **[] values();
public static ** valueOf(java.lang.String);
}
Verify Integration Result
After registration is complete, you can call the following API to obtain the CUID:
JOperateInterface.getInstance(getApplicationContext()).getCuid();
After integration is complete, if the following log is output, integration has succeeded.
          I/JIGUANG-JCore: [ConnectingHelper] Login with - juid:61812152402, appKey:64abbe577f5f67ddca43832b, sdkVersion:196870||||||||65536, pluginPlatformType:0......
D/MainFragment: updataData cuid:10000400010
Data Validation Mode
If you need to view real-time reporting, you can scan the QR code to enter data validation mode. For details, see the Data Validation Document.
Demo Usage
Configure
applicationIdandJPUSH_APPKEYinbuild.gradle. For details about obtaining appkey, see Android Platform Integration.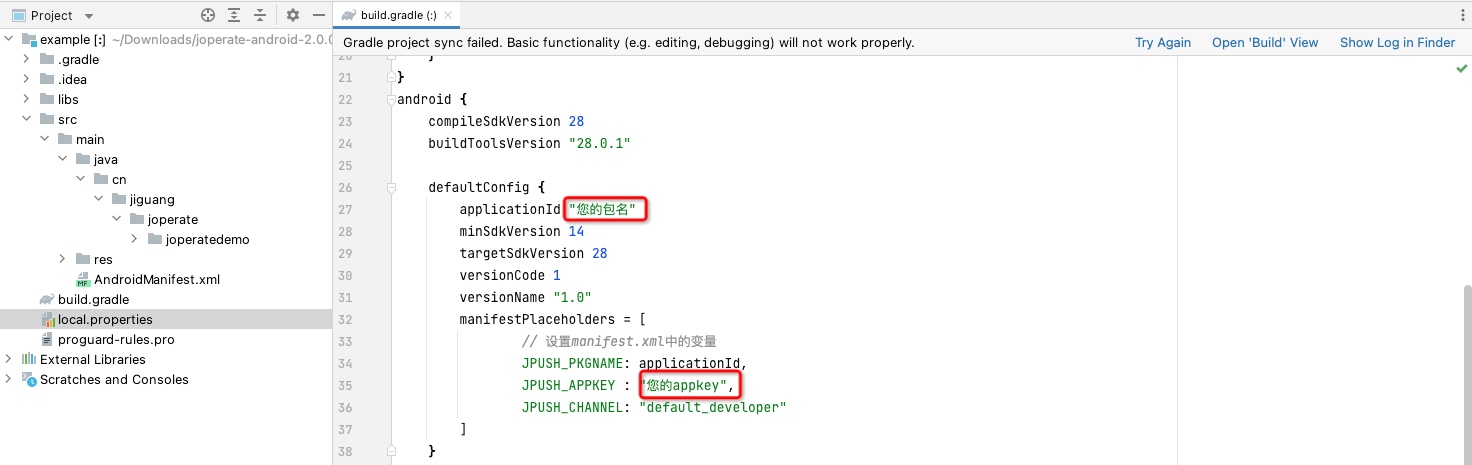
Configure your scheme in AndroidManifest. For details about obtaining the scheme, see Android Platform Integration.
Run directly and install to a mobile device.
Other Integration Methods
Package Assembly Service Integration Steps
The package assembly service is an encapsulated service for manual SDK integration. By combining the SDK into a separate jiguang module, it hides the common configuration work of manual integration. Developers only need to focus on their own personalized configuration, reducing integration steps and improving integration efficiency.
If you need to use the JOperate package assembly service, select the JOperate service on the package assembly service page and assemble the SDK.
Contents of the jiguang_sdk.zip Integration Package
jiguang
JIGUANG SDK combined package.
Resource files and other dependencies are already included in this package, so no manual dependency copy is required.
jiguang-demo
JIGUANG SDK combined package integration demo.
This is a complete Android project that demonstrates the basic usage of the package assembly service and can be used as a reference.
It is automatically assembled and built based on the services you selected. Related preset configuration before assembly is also embedded in the demo.
Import JIGUANG SDK
Use Android Studio to import the SDK as a module into the project.
Import steps: AndroidStudio -> File -> New -> Import Module -> select jiguang to import.
Configure JIGUANG SDK
Add the following configuration to settings.gradle:
include ':jiguang'
Add SDK dependency in the app module gradle:
          android {......
 defaultConfig {
 applicationId "com.xxx.xxx" // Package name registered on JOperate.......

 manifestPlaceholders = [
 JPUSH_PKGNAME: applicationId,
 JPUSH_APPKEY: "your Appkey", // Appkey corresponding to the package name registered on JOperate.
 JPUSH_CHANNEL: "developer-default", // Fill in the default value for now.
 ]......
 }......
}

dependencies {......

 implementation project(':jiguang')......
}
Manual Integration
Manual integration package download link: Download
Add SDK to the Project
- Unzip the
joperate-android-.zipintegration package. - Copy
libs/*to the projectlibs/directory.
Configure AndroidManifest
Configure the app project's AndroidManifest.xml according to the sample AndroidManifest.xml file in the SDK package.
- Change
applicationId,JPUSH_APPKEY, andJPUSH_CHANNELreferenced in AndroidManifest to your parameter values.If using Android Studio, configure under the
defaultConfignode inbuild.gradle, for example:
// Add under the Android node in gradle, as follows
android {......
 defaultConfig {
 applicationId "your package name"......

 manifestPlaceholders = [
 // Set variables in manifest.xml
 JPUSH_PKGNAME: applicationId,
 JPUSH_APPKEY: "your Appkey ", // appKey corresponding to the package name registered on the Portal.
 JPUSH_CHANNEL: "developer-default", // Fill in the default value for now.
 ]
 }
}
dependencies {......
 implementation fileTree(dir: "libs", include: ["*.jar"])

}
- Configure the following content under
AndroidManifest.xml: ```groovy
Run Demo
The example included in the package is an API demonstration. You can import it into your project, fill your appKey into the example's AndroidManifest, and run it directly for testing.
Technical Support
When issues occur:
- You can search for similar issues in the Jiguang community.
- Email our support team at support@jiguang.cn.

