
Manufacturer channel SDK Integration Guide
This article aims to guide customers to use automatic integration to integrate the channels of various manufacturers. SDK, to achieve offline push.
- SDK For download details, see Resource download。
- SDK For the latest version number, see Change log。
Prerequisites
Integrated manufacturer channel SDK You need to apply for manufacturer channel related parameters first. For details, please refer to Manufacturer Channel Parameter Application Guide 。
Xiaomi Channel Integration Guide
Configuration mavenCentral support
exist Project root directory master gradle Medium configuration mavenCentral support. (New project Supported by default configuration)
          buildscript {
    repositories {
        mavenCentral()
    }
}

allprojects {
    repositories {
        mavenCentral()
    }
}
Configuration dependencies
in application module of gradle middle dependencies Add the following code to the node:
          dependencies {
    //厂商版本和 JPush SDK 版本保持一致
    implementation 'cn.jiguang.sdk.plugin:xiaomi:5.x.x'

    //说明:JPush SDK v5.2.4 由于特殊原因,引用方式如下
    //implementation 'cn.jiguang.sdk.plugin:xiaomi:5.2.4.a'
}
Configuration parameters
in application module of gradle middle defaultConfig Add the following code to the node:
xiaomi-v5.5.3Starting from version 1, Xiaomi’s parameters support not adding prefixes “MI-”。
          manifestPlaceholders = [
    // 设置manifest.xml中的变量
    XIAOMI_APPKEY : "您的应用对应的小米的APPKEY",// 小米平台注册的appkey,xiaomi-v5.5.3版本开始,不需要添加前缀 “MI-”
    XIAOMI_APPID : "您的应用对应的小米的APPID", // 小米平台注册的appid,xiaomi-v5.5.3版本开始,不需要添加前缀 “MI-”
]
Configuration code obfuscation
If used proguard, in order to prevent false positives warning As a result, the compilation cannot be successful. You need to add the following content to the configuration file:
          -dontwarn com.xiaomi.push.**
-keep class com.xiaomi.push.** { *; }
Integrated result judgment
If the integration is successful, the log will display as follows:
          D/JIGUANG-JPush: [XMPlatformsReceiver] xiao mi push register success
D/JIGUANG-JPush: [ThirdPushManager] doAction,action:action_register_token,bundle:Bundle[{third_key_action=action_register_token, token=Tv3KBknVcnEaXnLe89MGEH3SWVgUYdLDYzJaST30IoIGATl2tv5eu6iuT/PTO0Mj, platform=1}],enable:true
I/JIGUANG-JPush: [ThirdPushManager] uploadRegID regid:Tv3KBknVcnEaXnLe89MGEH3SWVgUYdLDYzJaST30IoIGATl2tv5eu6iuT/PTO0Mj
Xiaomi channel test method
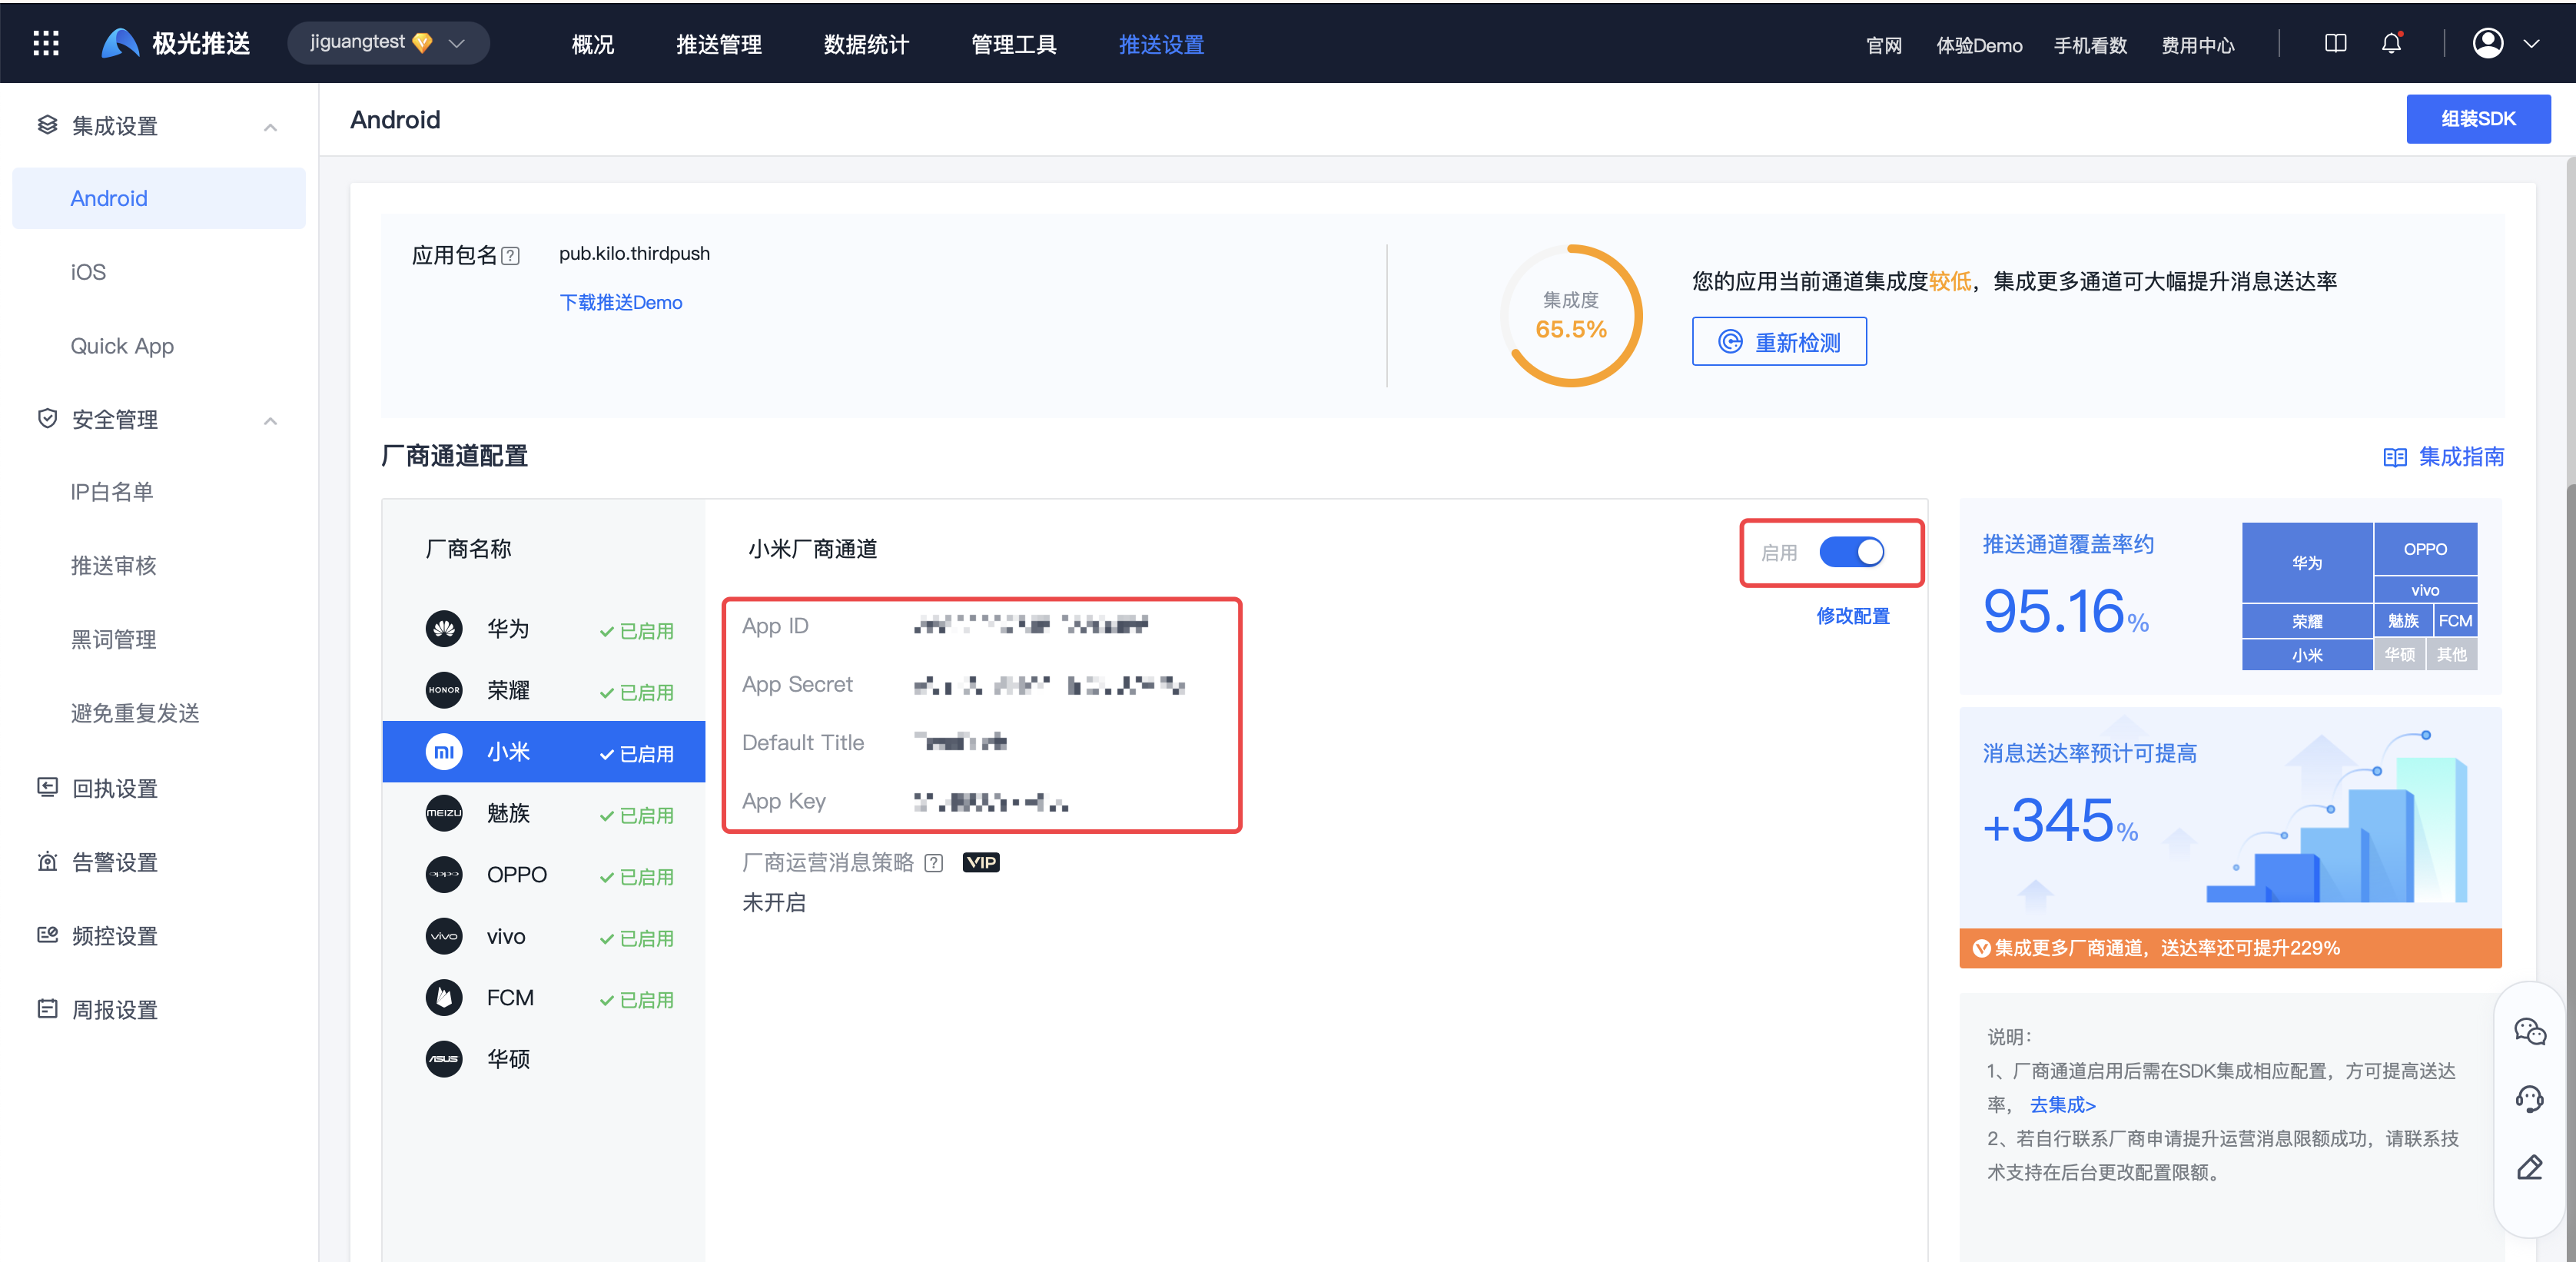
- Enter【JiguangConsole]-[Message Push]-[Push Settings]-[Integration Settings] page, fill in the parameters:AppKey、AppID、AppSecret、DefaultTitle, and click Enable.
- kill App Push after the process. If the push can be received, it means that the vendor channel integration is successful.
Millet Android Special instructions for systems 13 and above
According to Xiaomi’s official statement, its Android 13 and above, the application startup method is required to comply with Google requirements: the display call must match exactly Intent Filters to ensure a normal app experience on Xiaomi devices.
For details, please refer to Google's official documentation to learn more about Android Version 13 and above Intent Filter requirements:Google Official documentation - Intent filter
Developer debugging suggestions:
Developers can search for "App Compatibility Changes" in Xiaomi device, developer options. ENFORCE_INTENTS_TO_MATCH_INTENT_FILTERS switch, and during testing, consider turning this option on to ensure your app works properly under all conditions.
Huawei Channel Integration Guide
Configuration mavenCentral support
exist Project root directory master gradle Medium configuration mavenCentral support and agconnect rely.
          buildscript {
    repositories {
        google()
        mavenCentral()
        maven {url 'https://developer.huawei.com/repo/'}
    }
}
buildscript {
    dependencies {
        classpath 'com.huawei.agconnect:agcp:1.9.1.301'
    }
}
allprojects {
    repositories {
        google()
        mavenCentral()
        maven {url 'https://developer.huawei.com/repo/'}
    }
}
(optional) if usinggradle 8.0version, needs to be at the project level"gradle.properties” file and add the following command:
illustrate: Integrated below1.9.1.300versionAGCPlug-in, not compatiblegradle 8.0version, you need to perform this step.
apmsInstrumentationEnabled=false
Add Huawei plug-in
in application module of build.gradle Add at the bottom of the file apply plugin line of code to enable gradle Plugin:
apply plugin: 'com.huawei.agconnect'
Configuration dependencies
in application module of gradle middle dependencies Add the following code to the node and select the latest version according to the version update released by Huawei:
          dependencies {
    //JPush Android SDK 4.6.0 以上版本更新华为 HMS SDK 版本为:6.3.0.304 及以上版本,接入要求:Android Studio 3.6.1 或更高版本、Android Gradle 插件 3.5.4 或更高版本。
    //implementation 'com.huawei.hms:push:6.12.0.300'//5.9.0版本,不再需要配置,会自动拉取依赖包

    //厂商版本和 JPush SDK 版本保持一致
    implementation 'cn.jiguang.sdk.plugin:huawei:5.x.x' //5.9.0版本开始会自动拉取华为依赖包
}
- If you need to use a specific version huawei sdk, you can use the following command to no longer use the automatic pull matchinghuawei sdkimplementation ('cn.jiguang.sdk.plugin:huawei:5.x.x') { exclude group: 'cn.jiguang.sdk.plugin', module: 'huawei_th_push' //不再使用自动拉取匹配的huawei sdk } implementation 'com.huawei.hms:push:6.12.0.300' //使用指定的 huawei sdk 版本
            implementation ('cn.jiguang.sdk.plugin:huawei:5.x.x') {
     exclude group: 'cn.jiguang.sdk.plugin', module: 'huawei_th_push'   //不再使用自动拉取匹配的huawei sdk
  }
  implementation 'com.huawei.hms:push:6.12.0.300'               //使用指定的 huawei sdk 版本
This code block is shown in the floating window
Configuration agconnect-services.json document
refer to Manufacturer Channel Parameter Application Guide get agconnect-services.json file and configure it to app directory.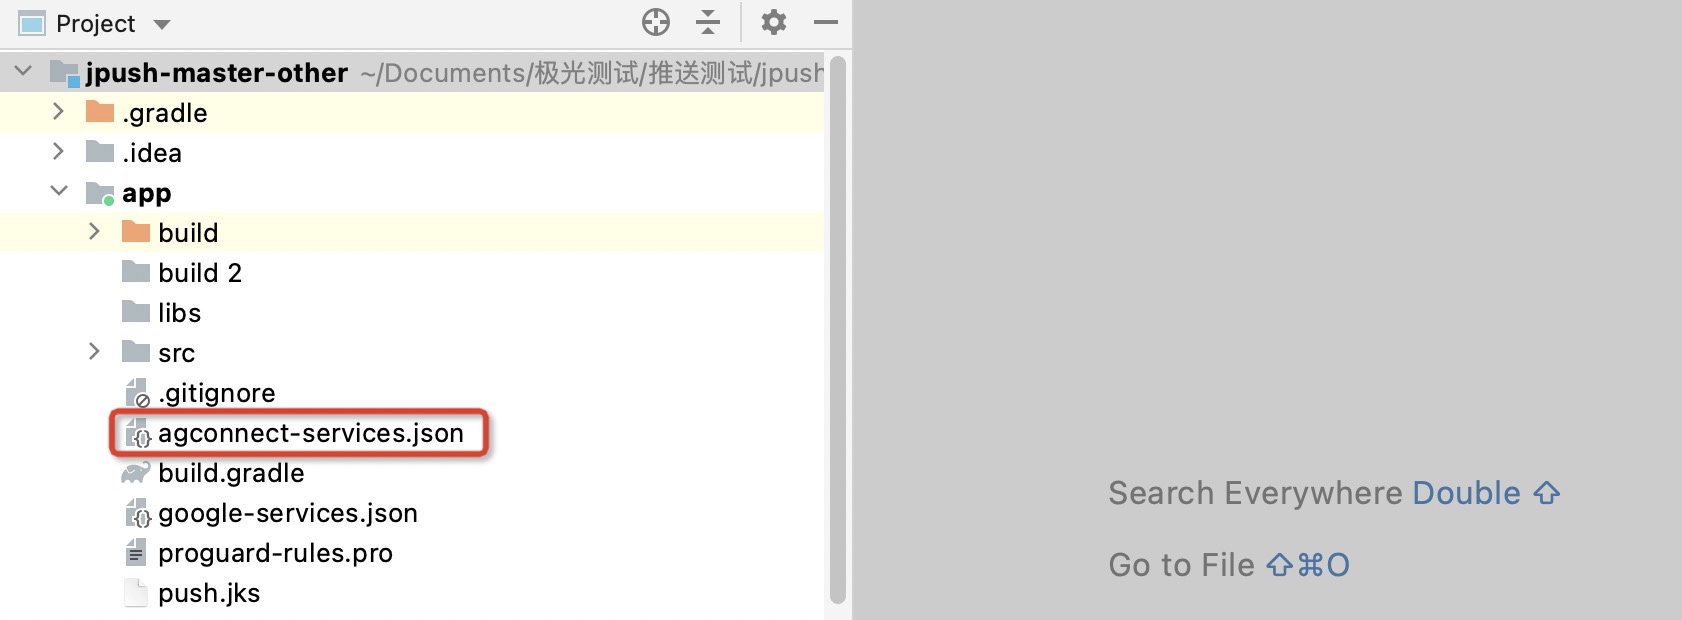
Configure signing certificate
exist build.gradle Configure the signature corresponding to the fingerprint certificate added in the Huawei backend.
HMS Service must be requested app Signature is required for successful registration, which can be used in the terminalkeytool -list -v -keystore keystorefileName Obtain the corresponding fingerprint certificate.
          signingConfigs {
        release {
            storeFile file("release.keystore")//签名文件的path
            storePassword "123456"
            keyAlias "android.keystore"
            keyPassword "123456"
        }
}

buildTypes {
        release {
            minifyEnabled true
            proguardFiles 'proguard-rules.pro'
            signingConfig signingConfigs.release
        }
        debug{
          minifyEnabled false
           signingConfig signingConfigs.release
        }
 }
Configuration code obfuscation
If used proguard, in order to prevent false positives warning As a result, the compilation cannot be successful. You need to add the following content to the configuration file:
          -ignorewarnings
-keepattributes *Annotation*
-keepattributes Exceptions
-keepattributes InnerClasses
-keepattributes Signature
-keepattributes SourceFile,LineNumberTable
-keep class com.hianalytics.android.**{*;}
-keep class com.huawei.updatesdk.**{*;}
-keep class com.huawei.hms.**{*;}
If the developer uses AndResGuard, need to be added in the obfuscation configuration file AndResGuard Whitelist.
          "R.string.hms*",
"R.string.connect_server_fail_prompt_toast",
"R.string.getting_message_fail_prompt_toast",
"R.string.no_available_network_prompt_toast",
"R.string.third_app_*",
"R.string.upsdk_*",
"R.layout.hms*",
"R.layout.upsdk_*",
"R.drawable.upsdk*",
"R.color.upsdk*",
"R.dimen.upsdk*",
"R.style.upsdk*",
"R.string.agc*"
Integrated result judgment
If the integration is successful, the log will display as follows:
          I/JIGUANG-JPush: [HWPushHelper] get huawei token:IQAAAACy0aL1AABEZ3l2C7jluCGX5XriooCvoOwK9TrjG1MTpH0CD47WPXFcAbtt3DdOeOPvX6d7xfAVctoyaOCGKRllRa-0RBP7WQrYI6SxnOp1GA
I/JIGUANG-JPush: [HWPushHelper] isNeedReport:true
D/JIGUANG-JPush: [ActionHelper] doAction:third_action
D/JIGUANG-JPush: [ThirdPushManager] doAction,action:action_register_token,bundle:Bundle[{third_key_action=action_register_token, token=IQAAAACy0aL1AABEZ3l2C7jluCGX5XriooCvoOwK9TrjG1MTpH0CD47WPXFcAbtt3DdOeOPvX6d7xfAVctoyaOCGKRllRa-0RBP7WQrYI6SxnOp1GA, platform=2}],enable:true
I/JIGUANG-JPush: [ThirdPushManager] uploadRegID regid:IQAAAACy0aL1AABEZ3l2C7jluCGX5XriooCvoOwK9TrjG1MTpH0CD47WPXFcAbtt3DdOeOPvX6d7xfAVctoyaOCGKRllRa-0RBP7WQrYI6SxnOp1GA
Huawei channel test method
- Enter【JiguangConsole]-[Message Push]-[Push Settings]-[Integration Settings] page, fill in the parameters:AppID、AppSecret、DefaultTitle, and click "Enable"

- kill App Push after the process. If the push can be received, it means that the vendor channel integration is successful.
Meizu Channel Integration Guide
Configuration mavenCentral support
exist Project root directory master gradle Medium configuration mavenCentral support. (New project Supported by default configuration)
          buildscript {
    repositories {
        mavenCentral()
    }
}

allprojects {
    repositories {
        mavenCentral()
    }
}
Configuration dependencies
in application module of gradle middle dependencies Add the following code to the node:
          dependencies {
  //厂商版本和JPush SDK版本保持一致
  implementation 'cn.jiguang.sdk.plugin:meizu:5.x.x'

  //说明:JPush SDK v5.2.4 由于特殊原因,引用方式如下
  //implementation 'cn.jiguang.sdk.plugin:meizu:5.2.4.a'
}
Add to aar(5.9.0version starting, this step is no longer required)
JPush Android SDK v5.2.2 To start, you need to introduce the Meizu manufacturer separately. aar, the steps are as follows:
download JiguangOfficial website SDK 。
Bundle
jpush-android-xxx-release/third-push/meizu/libsdown aar Copy files to applicationmodule/libsDown.
Configuration parameters
in application module of gradle middle defaultConfig Add the following code to the node:
Meizu parameters need to be prefixed with "MZ-”。
          manifestPlaceholders = [
     // 设置manifest.xml中的变量
     MEIZU_APPKEY : "MZ-您的应用对应的魅族的APPKEY", // 魅族平台注册的appkey
     MEIZU_APPID : "MZ-您的应用对应的魅族的APPID", // 魅族平台注册的appid
]
Configuration code obfuscation
If used proguard, in order to prevent false positives warning As a result, the compilation cannot be successful. You need to add the following content to the configuration file:
          -dontwarn com.meizu.cloud.**
-keep class com.meizu.cloud.** { *; }
Integrated result judgment
If the integration is successful, the log will display as follows:
          D/JIGUANG-JPush: [ActionHelper] doAction:third_action
D/JIGUANG-JPush: [ThirdPushManager] doAction,action:action_register_token,bundle:Bundle[{third_key_action=action_register_token, token=DDI5c060475064d447b40670206756d73605705037205, platform=3}],enable:true
I/JIGUANG-JPush: [ThirdPushManager] uploadRegID regid:DDI5c060475064d447b40670206756d73605705037205
Meizu manufacturer testing methods
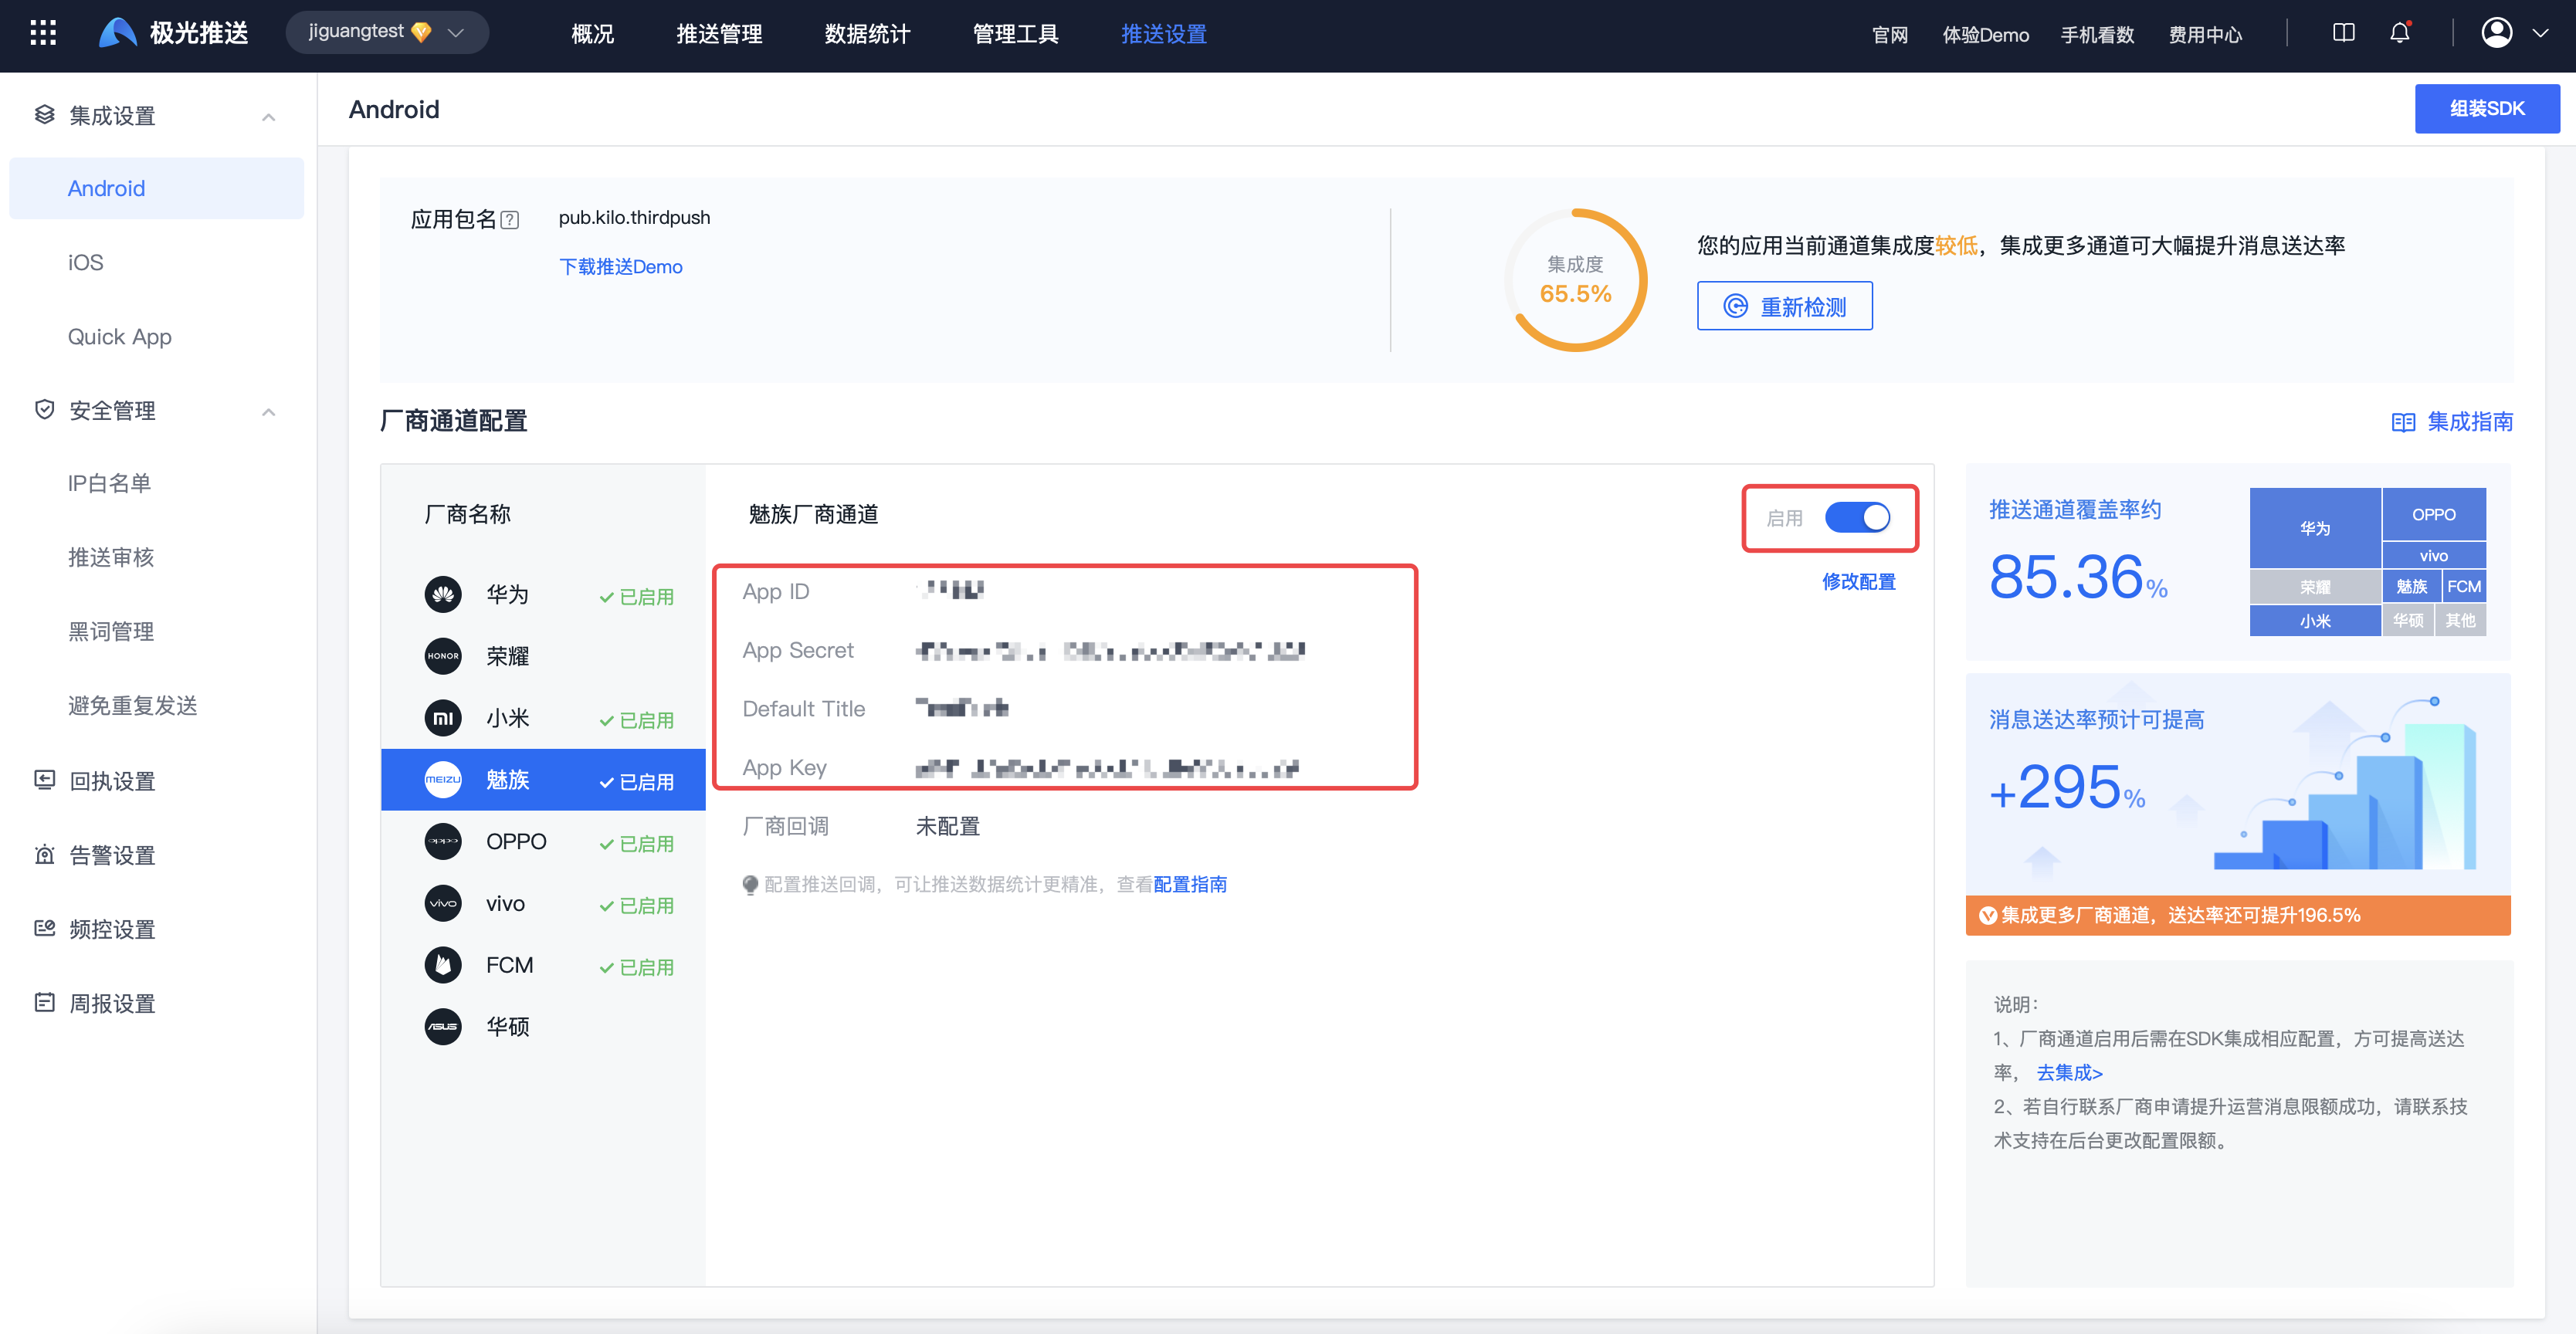
- Enter【JiguangConsole]-[Message Push]-[Push Settings]-[Integration Settings] page, fill in the parameters:AppKey、AppID、AppSecret、DefaultTitle, and click Enable.
- kill App Push after the process. If the push can be received, it means that the vendor channel integration is successful.
vivo Channel Integration Guide
Configuration mavenCentral support
exist Project root directory master gradle Medium configuration mavenCentral support. (New project Supported by default configuration)
          buildscript {
    repositories {
        mavenCentral()
    }
}

allprojects {
    repositories {
        mavenCentral()
    }
}
Configuration dependencies
in application module of gradle middle dependencies Add the following code to the node:
          dependencies{
    //厂商版本和 JPush SDK 版本保持一致
    implementation 'cn.jiguang.sdk.plugin:vivo:5.x.x'
}

//特别说明:如果您使用的是 JPush Android SDK v5.2.0 版本,你需要按照如下写法进行
dependencies{
    implementation 'cn.jiguang.sdk.plugin:vivo:5.2.0.a'
}
Configuration parameters
in application module of gradle middle defaultConfig Add the following code to the node:
          manifestPlaceholders=[
    VIVO_APPKEY : "您的应用对应的VIVO的APPKEY", // VIVO平台注册的appkey
    VIVO_APPID : "您的应用对应的VIVO的APPID", // VIVO平台注册的appid
]
Integrated result judgment
If the integration is successful, the log will display as follows:
          D/JIGUANG-JPush: [PushMessageReceiver] Vivo regId:15723354120401574713525
D/JIGUANG-JPush: [ActionHelper] doAction:third_action
D/JIGUANG-JPush: [ThirdPushManager] doAction,action:action_register_token,bundle:Bundle[{third_key_action=action_register_token, token=15723354120401574713525, platform=5}],enable:true
I/JIGUANG-JPush: [ThirdPushManager] uploadRegID regid:15723354120401574713525
Configuration code obfuscation
If used proguard, in order to prevent false positives warning As a result, the compilation cannot be successful. You need to add the following content to the configuration file:
          -dontwarn com.vivo.push.**
-keep class com.vivo.push.**{*; }
-keep class com.vivo.vms.**{*; }
vivo Channel test method
- Enter【JiguangConsole]-[Message Push]-[Push Settings]-[Integration Settings] page, fill in the parameters:AppKey、AppID、AppSecret、DefaultTitle, and click Enable.
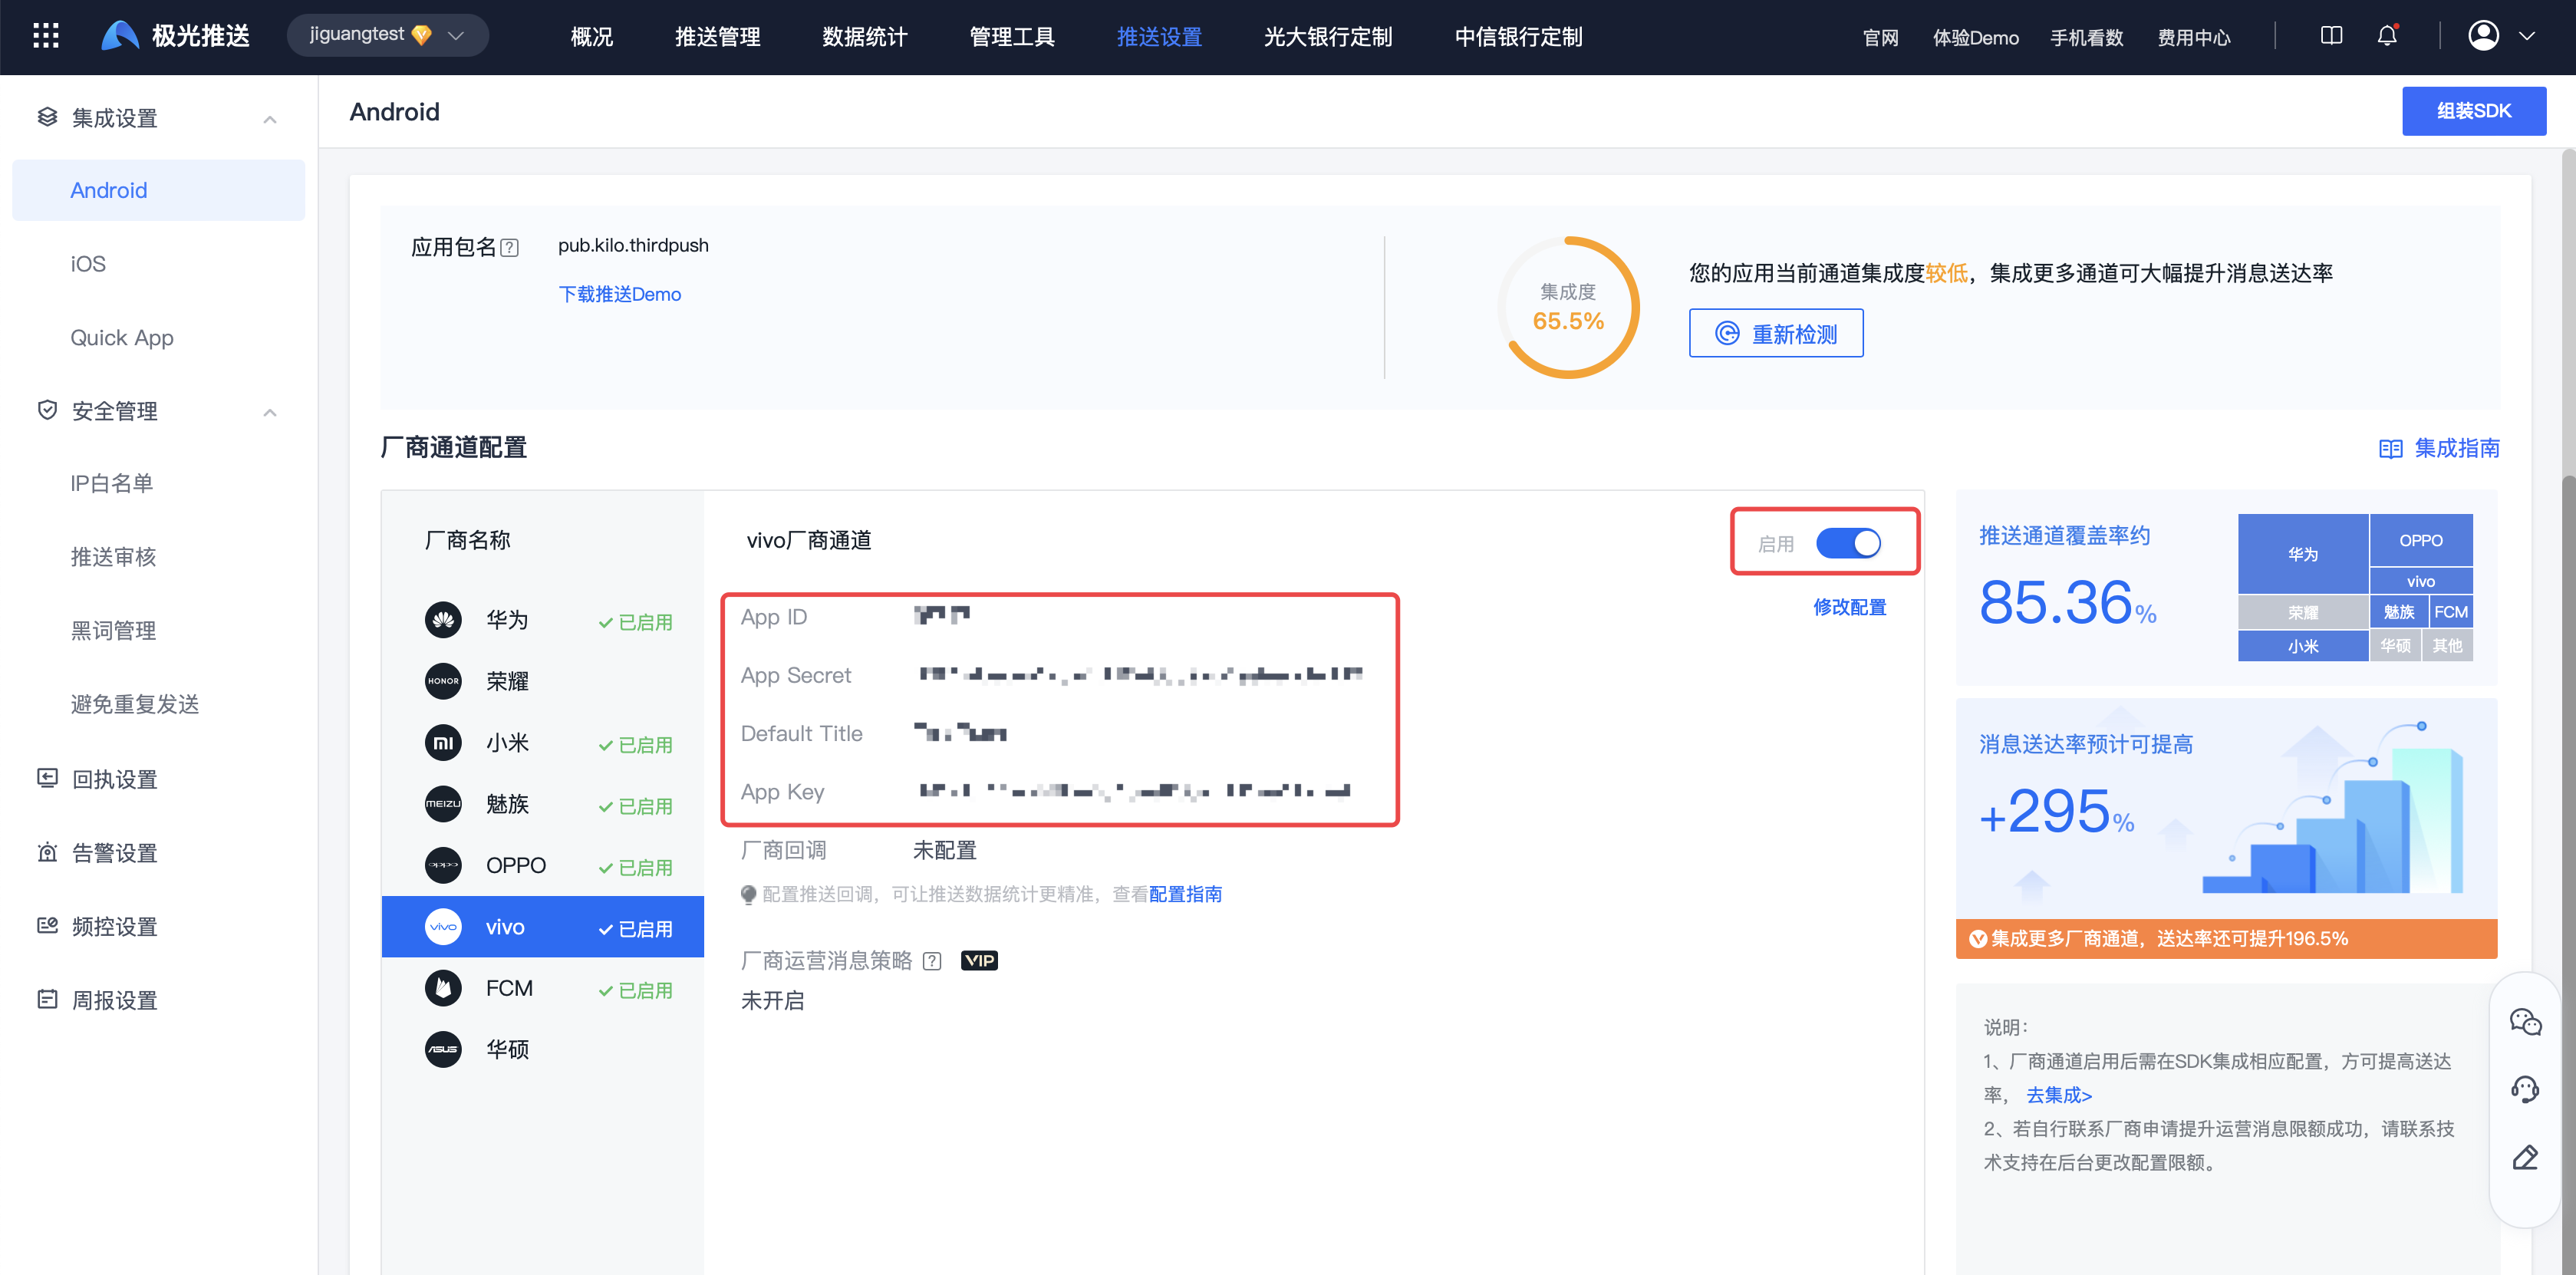
- kill App Push after the process. If the push can be received, it means that the vendor channel integration is successful.
like vivo Not on the shelves, you need to push it for testing vivo The push platform adds test devices and can only pass API Specify push parameters push_mode Deliver.
          "third_party_channel": {
    "vivo": {
        "distribution": "ospush",
        "classification": 1,
        "push_mode": 1//可选,2020/09/21 新增,对应 vivo 的 pushMode 字段,值为int 类型,值分别是:“0”表示正式推送;“1”表示测试推送,不填默认为0
    }
}
OPPO Channel Integration Guide
Configuration mavenCentral support
exist Project root directory master gradle Medium configuration mavenCentral support. (New project Supported by default configuration)
          buildscript {
    repositories {
        mavenCentral()
    }
}

allprojects {
    repositories {
        mavenCentral()
    }
}
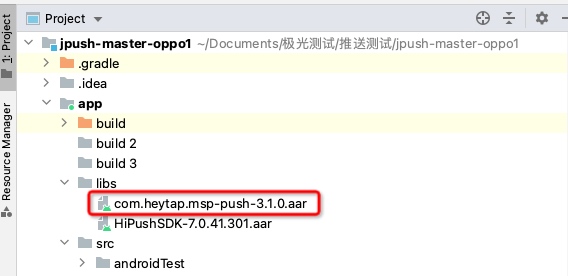
Add to aar (5.9.0version starting, this step is no longer required)
JPush Android SDK v5.9.0 Start, please ignore this step, there is no need to introduce it separately. OPPO Manufacturer's aar 。 JPush Android SDK v4.6.0 To start, you need to introduce it separately OPPO Manufacturer's aar 。
Notice:3.1.0 Need to use JPush SDK 4.8.1 and above versions.
- download JiguangOfficial website SDK 。
- Bundle
jpush-android-xxx-release/third-push/oppo/libsdown aar Copy files to applicationmodule/libsDown.
Configuration dependencies
in application module of gradle middle dependencies Add the following code to the node:
          dependencies{
    //厂商版本和 JPush SDK 版本保持一致
    implementation 'cn.jiguang.sdk.plugin:oppo:5.x.x'

    //引入 libs 中的 aar,如果项目中有此依赖不需要重复引用
    implementation fileTree(include: ['*.jar','*.aar'], dir: 'libs')

    //OPPO 3.1.0 aar 及其以上版本需要添加以下依赖
    implementation 'com.google.code.gson:gson:2.6.2'
    //implementation 'commons-codec:commons-codec:1.6' //5.9.0版本开始,不再需要此配置
    implementation 'androidx.annotation:annotation:1.1.0'
}
Configuration parameters
in application module of gradle middle defaultConfig Add the following code to the node:
OPPO The parameters need to be prefixed with "OP-”。
          manifestPlaceholders=[
    OPPO_APPKEY : "OP-您的应用对应的OPPO的APPKEY", // OPPO平台注册的appkey
    OPPO_APPID : "OP-您的应用对应的OPPO的APPID", // OPPO平台注册的appid
    OPPO_APPSECRET: "OP-您的应用对应的OPPO的APPSECRET"//OPPO平台注册的appsecret
]
Configuration code obfuscation
If used proguard, in order to prevent false positives warning As a result, the compilation cannot be successful. You need to add the following content to the configuration file:
          -dontwarn com.coloros.mcsdk.**
-keep class com.coloros.mcsdk.** { *; }

-dontwarn com.heytap.**
-keep class com.heytap.** { *; }

-dontwarn com.mcs.**
-keep class com.mcs.** { *; }
Integrated result judgment
If the integration is successful, the log will display as follows:
          D/JIGUANG-JPush: [OPushCallback] OPush registerID is OnePlus_CN_0e3c2f966c9d01d4e2423cbc9e7598b6
D/JIGUANG-JPush: [ActionHelper] doAction:third_action
D/JIGUANG-JPush: [ThirdPushManager] doAction,action:action_register_token,bundle:Bundle[{third_key_action=action_register_token, token=OnePlus_CN_0e3c2f966c9d01d4e2423cbc9e7598b6, platform=4}],enable:true
I/JIGUANG-JPush: [ThirdPushManager] uploadRegID regid:OnePlus_CN_0e3c2f966c9d01d4e2423cbc9e7598b6
OPPO Channel test method
- Enter【JiguangConsole]-[Message Push]-[Push Settings]-[Integration Settings] page, fill in the parameters:AppKey、AppID、AppSecret、MasterSecret/AppServerSecret、DefaultTitle, and click Enable.

- kill App Push after the process. If the push can be received, it means that the vendor channel integration is successful.
If the application is not on the shelves, you need to OPPO The open platform applies for push testing permissions, and each application can push every day.1000public channel message.
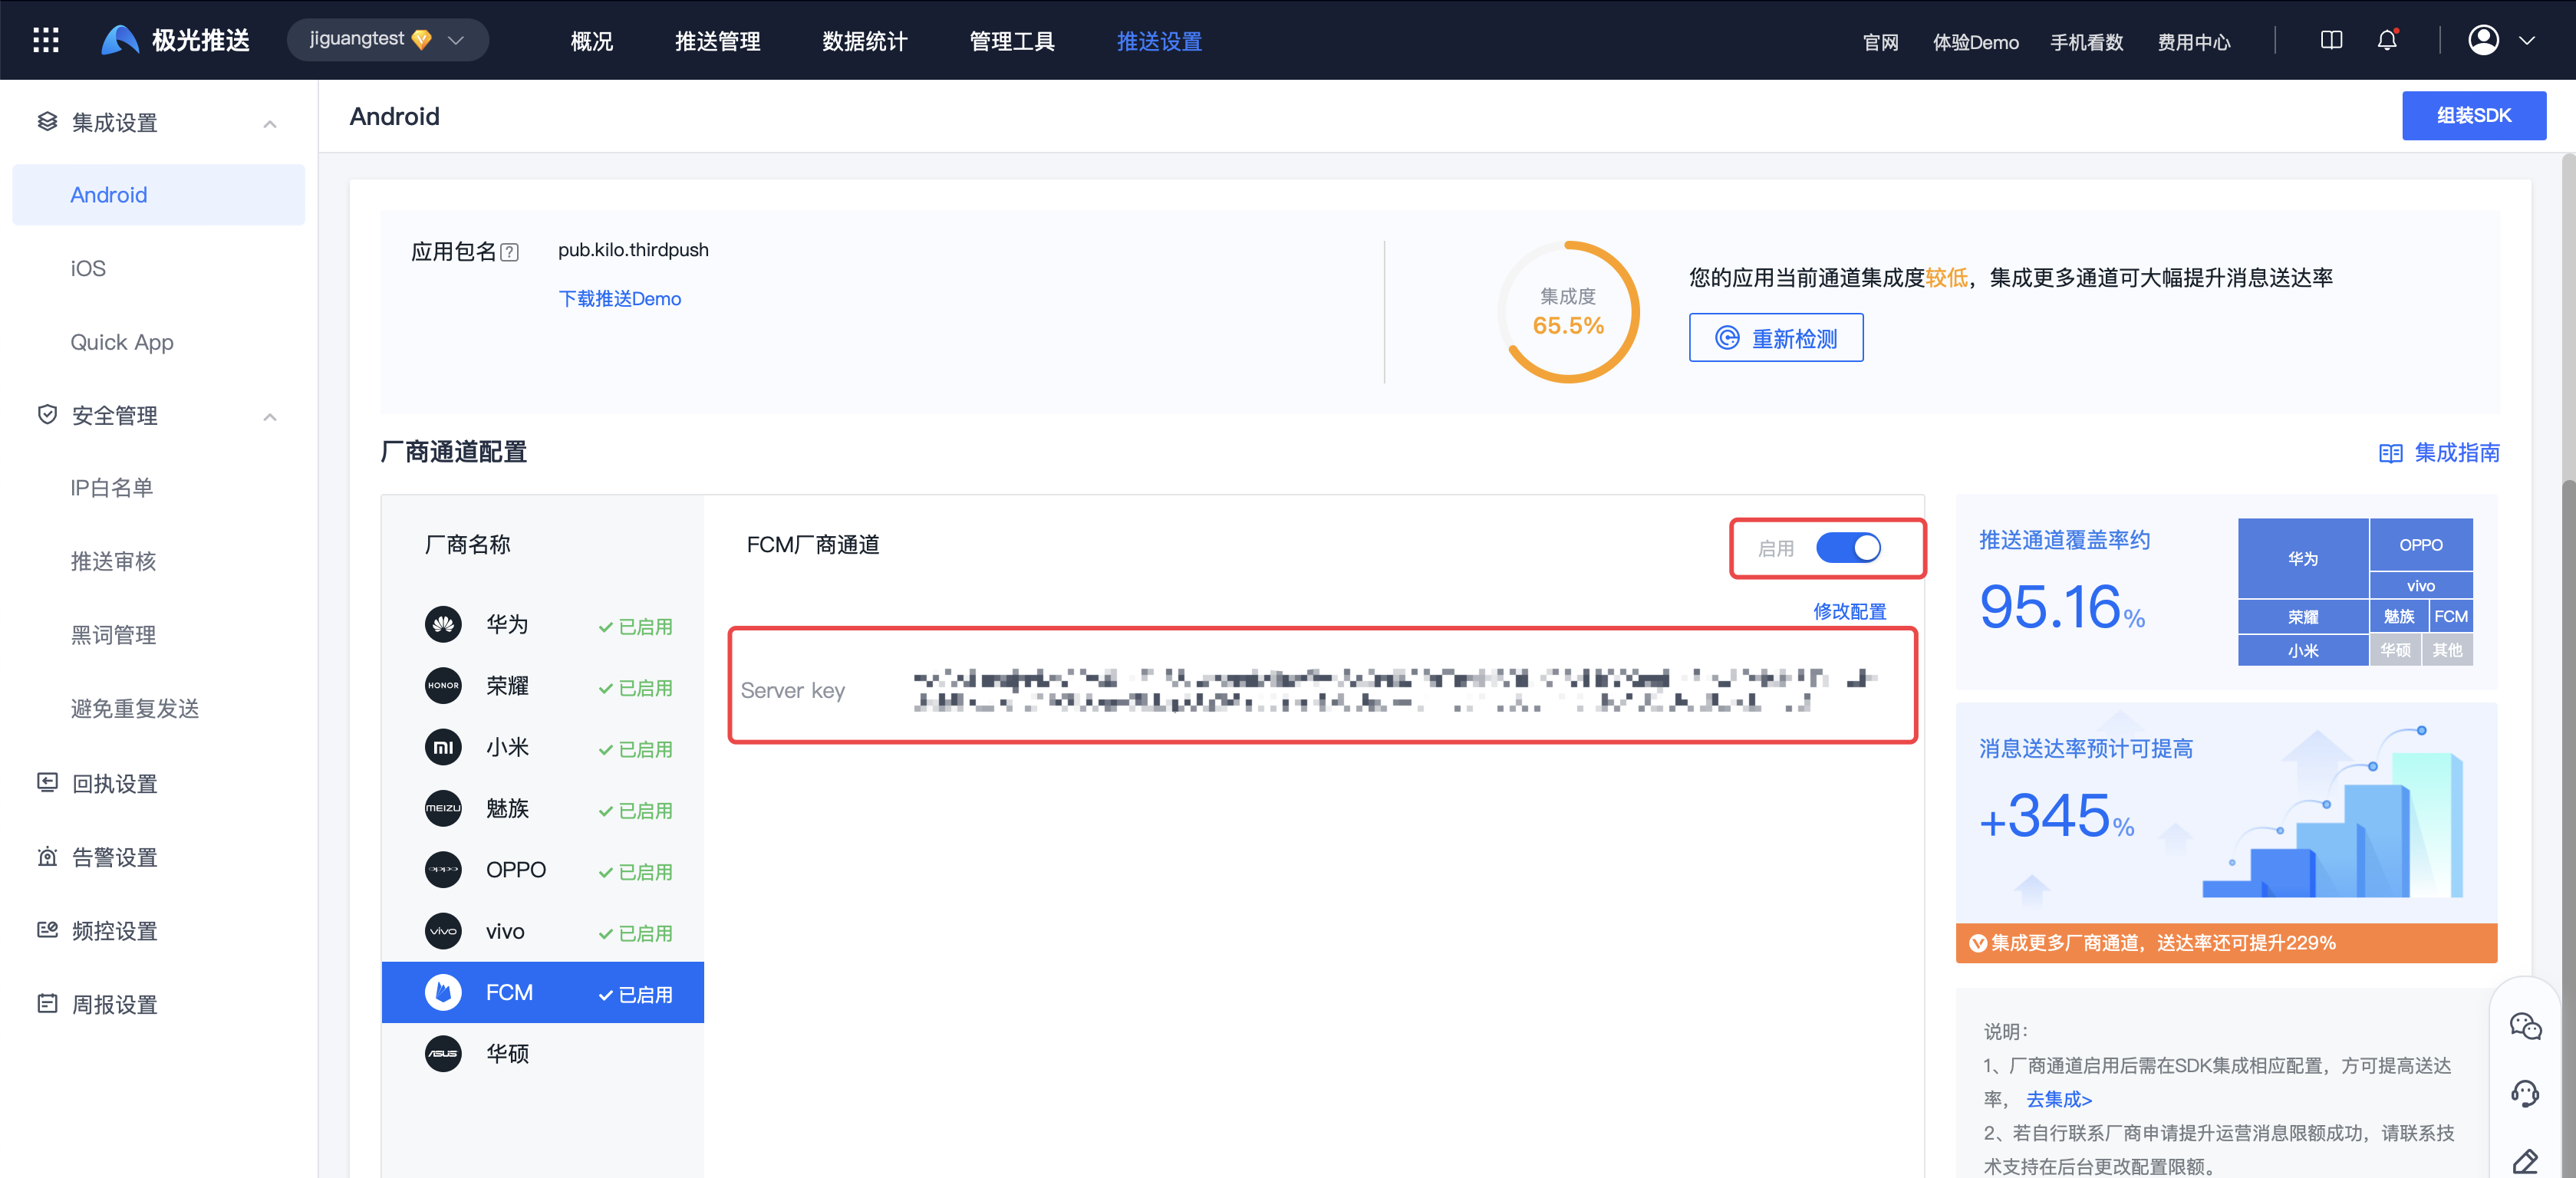
FCM Channel Integration Guide
Configuration mavenCentral support
exist Project root directory master gradle Medium configuration mavenCentral support and google-services rely.
          buildscript {
    repositories {
        mavenCentral()
    }
    dependencies {
        classpath 'com.google.gms:google-services:4.3.8'
    }
}

allprojects {
    repositories {
        mavenCentral()
        maven { url "https://maven.google.com" }
    }
}
Add to FCM plug-in
in application module of build.gradle Add at the bottom of the file apply plugin line of code to enable gradle Plugin:
apply plugin: 'com.google.gms.google-services'
Configuration dependencies
- Method 1 (online dependency): in application module of gradle middle dependencies Add the following code to the node:
          dependencies {
    //厂商版本和 JPush SDK 版本保持一致
    implementation 'cn.jiguang.sdk.plugin:fcm:5.x.x' //5.9.0版本开始会自动拉取FCM依赖包
    //implementation 'com.google.firebase:firebase-messaging:23.0.5'//5.9.0版本,不再需要配置,会自动拉取依赖包
}
If you need to use a specific version FCM sdk, you can use the following command to no longer use the automatic pull matchingFCM sdk
implementation ('cn.jiguang.sdk.plugin:fcm:5.x.x') { exclude group: 'cn.jiguang.sdk.plugin', module: 'fcm_th_push' //不再使用自动拉取匹配的fcm sdk } implementation 'com.google.firebase:firebase-messaging:23.0.5' //使用指定的 fcm sdk 版本implementation ('cn.jiguang.sdk.plugin:fcm:5.x.x') { exclude group: 'cn.jiguang.sdk.plugin', module: 'fcm_th_push' //不再使用自动拉取匹配的fcm sdk } implementation 'com.google.firebase:firebase-messaging:23.0.5' //使用指定的 fcm sdk 版本This code block is shown in the floating windowMethod 2 (local dependency): Download local package integration
Local package download address:FCMLocal dependency package
Configuration google-services.jsondocument
refer to Manufacturer Channel Parameter Application Guide get google-services.json file and configure it to app directory.
Configuration FCM notification icon
exist AndroidManifest.xml Add the following configuration to set FCM notification icon.
          <meta-data android:name="com.google.firebase.messaging.default_notification_icon"
     android:resource="@drawable/您要配置的通知图标" />
Integrated result judgment
If the integration is successful, the log will display as follows:
          D/JIGUANG-JPush: [FCMPushHelper] fcm token is success dj793yH_RO6FqNyKImQJYV:APA91bExj3PSVv50pwtl83LXVeB_HKOCSkyB6qCE12TIwIRl-RKiqCfXjvCshcqVrqn_8htlNBa8_A_8ixq7YIxfrloxig2BryZPCkunyx_z2drz0L-C2K8R7J8Yrojs61WCsF-BZj8h
D/JIGUANG-JPush: [ActionHelper] doAction:third_action
D/JIGUANG-JPush: [ThirdPushManager] doAction,action:action_register_token,bundle:Bundle[{third_key_action=action_register_token, token=dj793yH_RO6FqNyKImQJYV:APA91bExj3PSVv50pwtl83LXVeB_HKOCSkyB6qCE12TIwIRl-RKiqCfXjvCshcqVrqn_8htlNBa8_A_8ixq7YIxfrloxig2BryZPCkunyx_z2drz0L-C2K8R7J8Yrojs61WCsF-BZj8h, platform=8}],enable:true
I/JIGUANG-JPush: [ThirdPushManager] uploadRegID regid:dj793yH_RO6FqNyKImQJYV:APA91bExj3PSVv50pwtl83LXVeB_HKOCSkyB6qCE12TIwIRl-RKiqCfXjvCshcqVrqn_8htlNBa8_A_8ixq7YIxfrloxig2BryZPCkunyx_z2drz0L-C2K8R7J8Yrojs61WCsF-BZj8h
FCM Channel test method
- Test preconditions
- The mobile phone system has GooglePlay service and the version is not lower than17.3.4。
- Testing requires connecting to overseas nodesVPN, the mobile network can access Google normally.
- If you use a domestic mobile phone for testing, you can only retreat to the background for testing and cannot close the background. Domestic manufacturers have made adjustments to the system, and closing the background will kill the process.
- delete pushservice Multi-process configuration.

- Enter【JiguangConsole]-[Message Push]-[Push Settings]-[Integration Settings] page, fill in the parameters:App Secret, and click Enable.
- If testing in the country, the country code needs to be set after initialization.
          public class ExampleApplication extends Application {
    @Override
    public void onCreate() {
        super.onCreate();
        JPushInterface.setDebugMode(true);

      // 调整点一:调用启用推送业务功能代码前增加setAuth调用
      boolean isPrivacyReady; // app根据是否已弹窗获取隐私授权来赋值
      if(!isPrivacyReady){
        // JCore 5.0.4之前版本需要显式设置false
        if (JCoreInterface.getJCoreSDKVersionInt() < 504) { // 5.0.4版本号对应504
          JCollectionAuth.setAuth(context, false);
        }
        // 所有版本在未授权时都不应初始化SDK
        return;
      }
      JPushInterface.init();
      JCoreInterface.testCountryCode("us");

      // 调整点二:App用户同意了隐私政策授权,并且开发者确定要开启推送服务后调用
      // JCore 5.0.4+会自动处理授权状态,可不需要显式设置true
      JCollectionAuth.setAuth(context, true);
    }
}
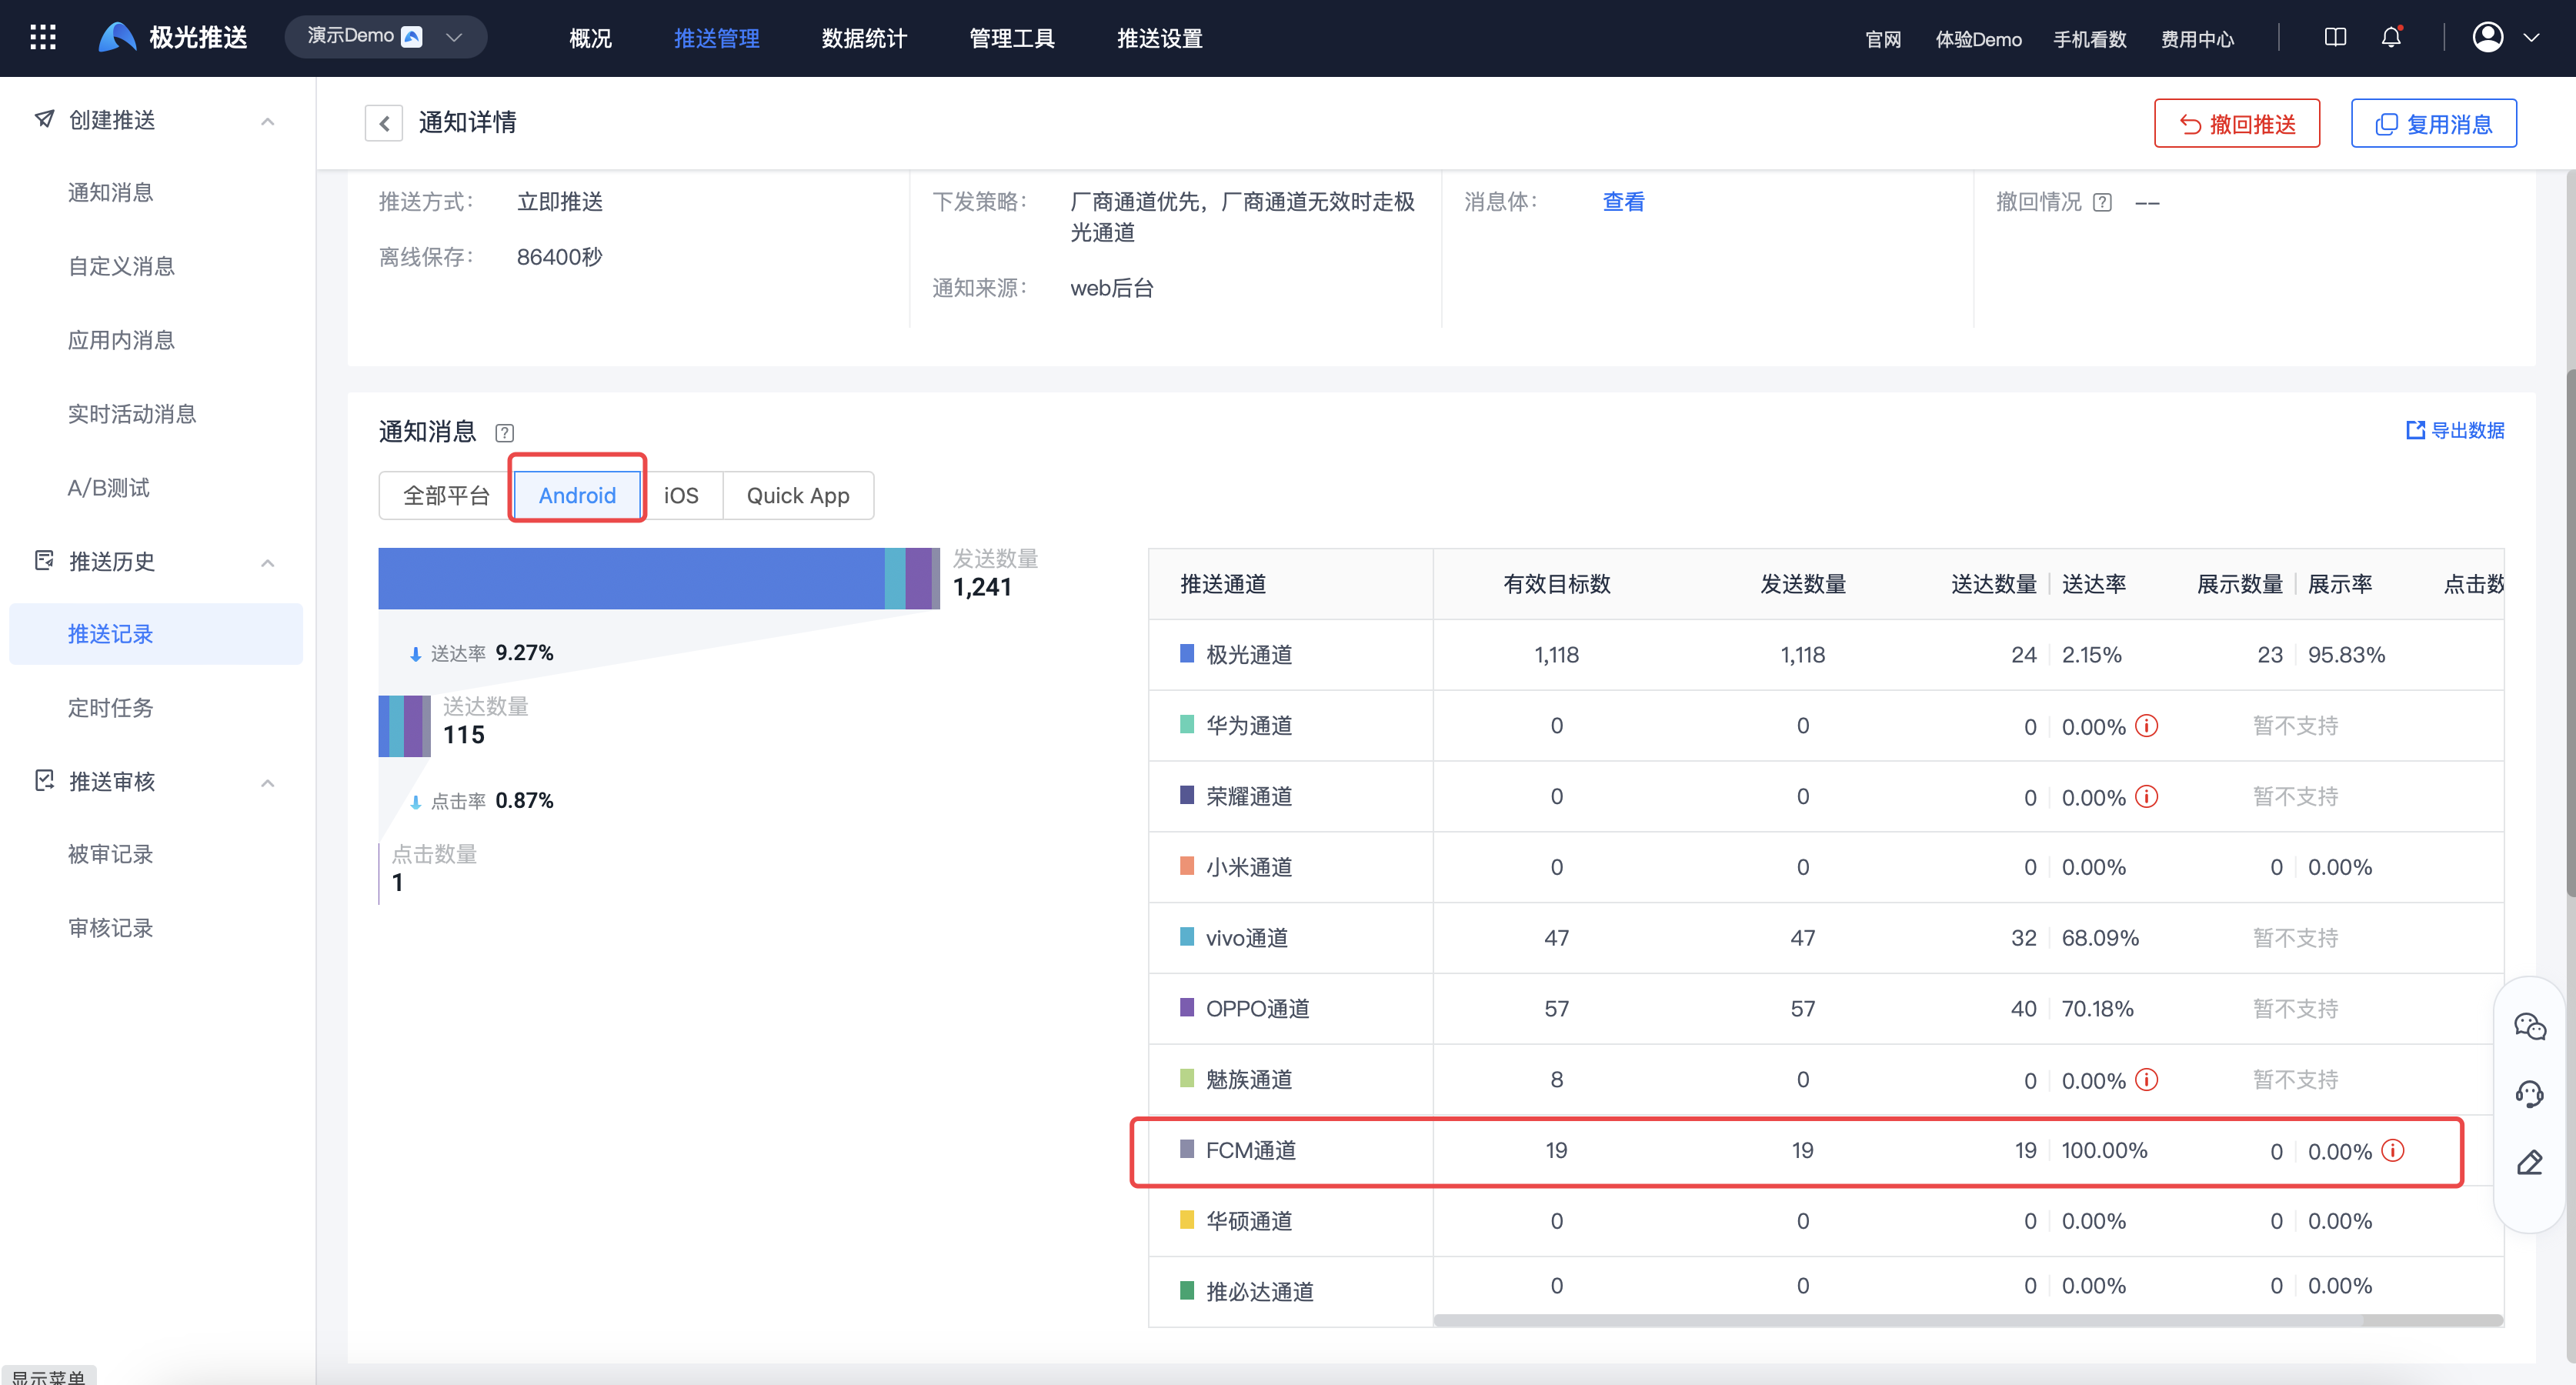
- inJiguangThe records pushed in the background are FCM The channel is stillJiguangaisle.
ASUS manufacturer channel
Function description
Before integrating the vendor channel, please make sure it is correctly integrated.Jiguang JPush Serve.
ASUS system channel functions have been deeply embedded inJiguangexistingJPush SDK。
- If automatic integration is used, developers do not need additional integration work, as long as they are using Android JPush SDK v3.5.6 and above versions are automatically supported.
- If using manual integration, you need to add AsusPushMessageReceiver:
<receiver android:name="cn.jpush.android.asus.AsusPushMessageReceiver"></receiver>
on ASUS devices JPush channel and ASUS channel coexist.
After the ASUS channel is initialized,JPush All functions already supported by the platform are supported, and both push and docking are passed.JiguangThe platform is used, and the usage method is as follows:JiguangThe integration steps are enough, and developers do not need to connect to other platforms.
How to open ASUS channel
Enter【JiguangConsole]-[Message Push]-[Push Settings]-[Integration Settings] page, click "Enable".
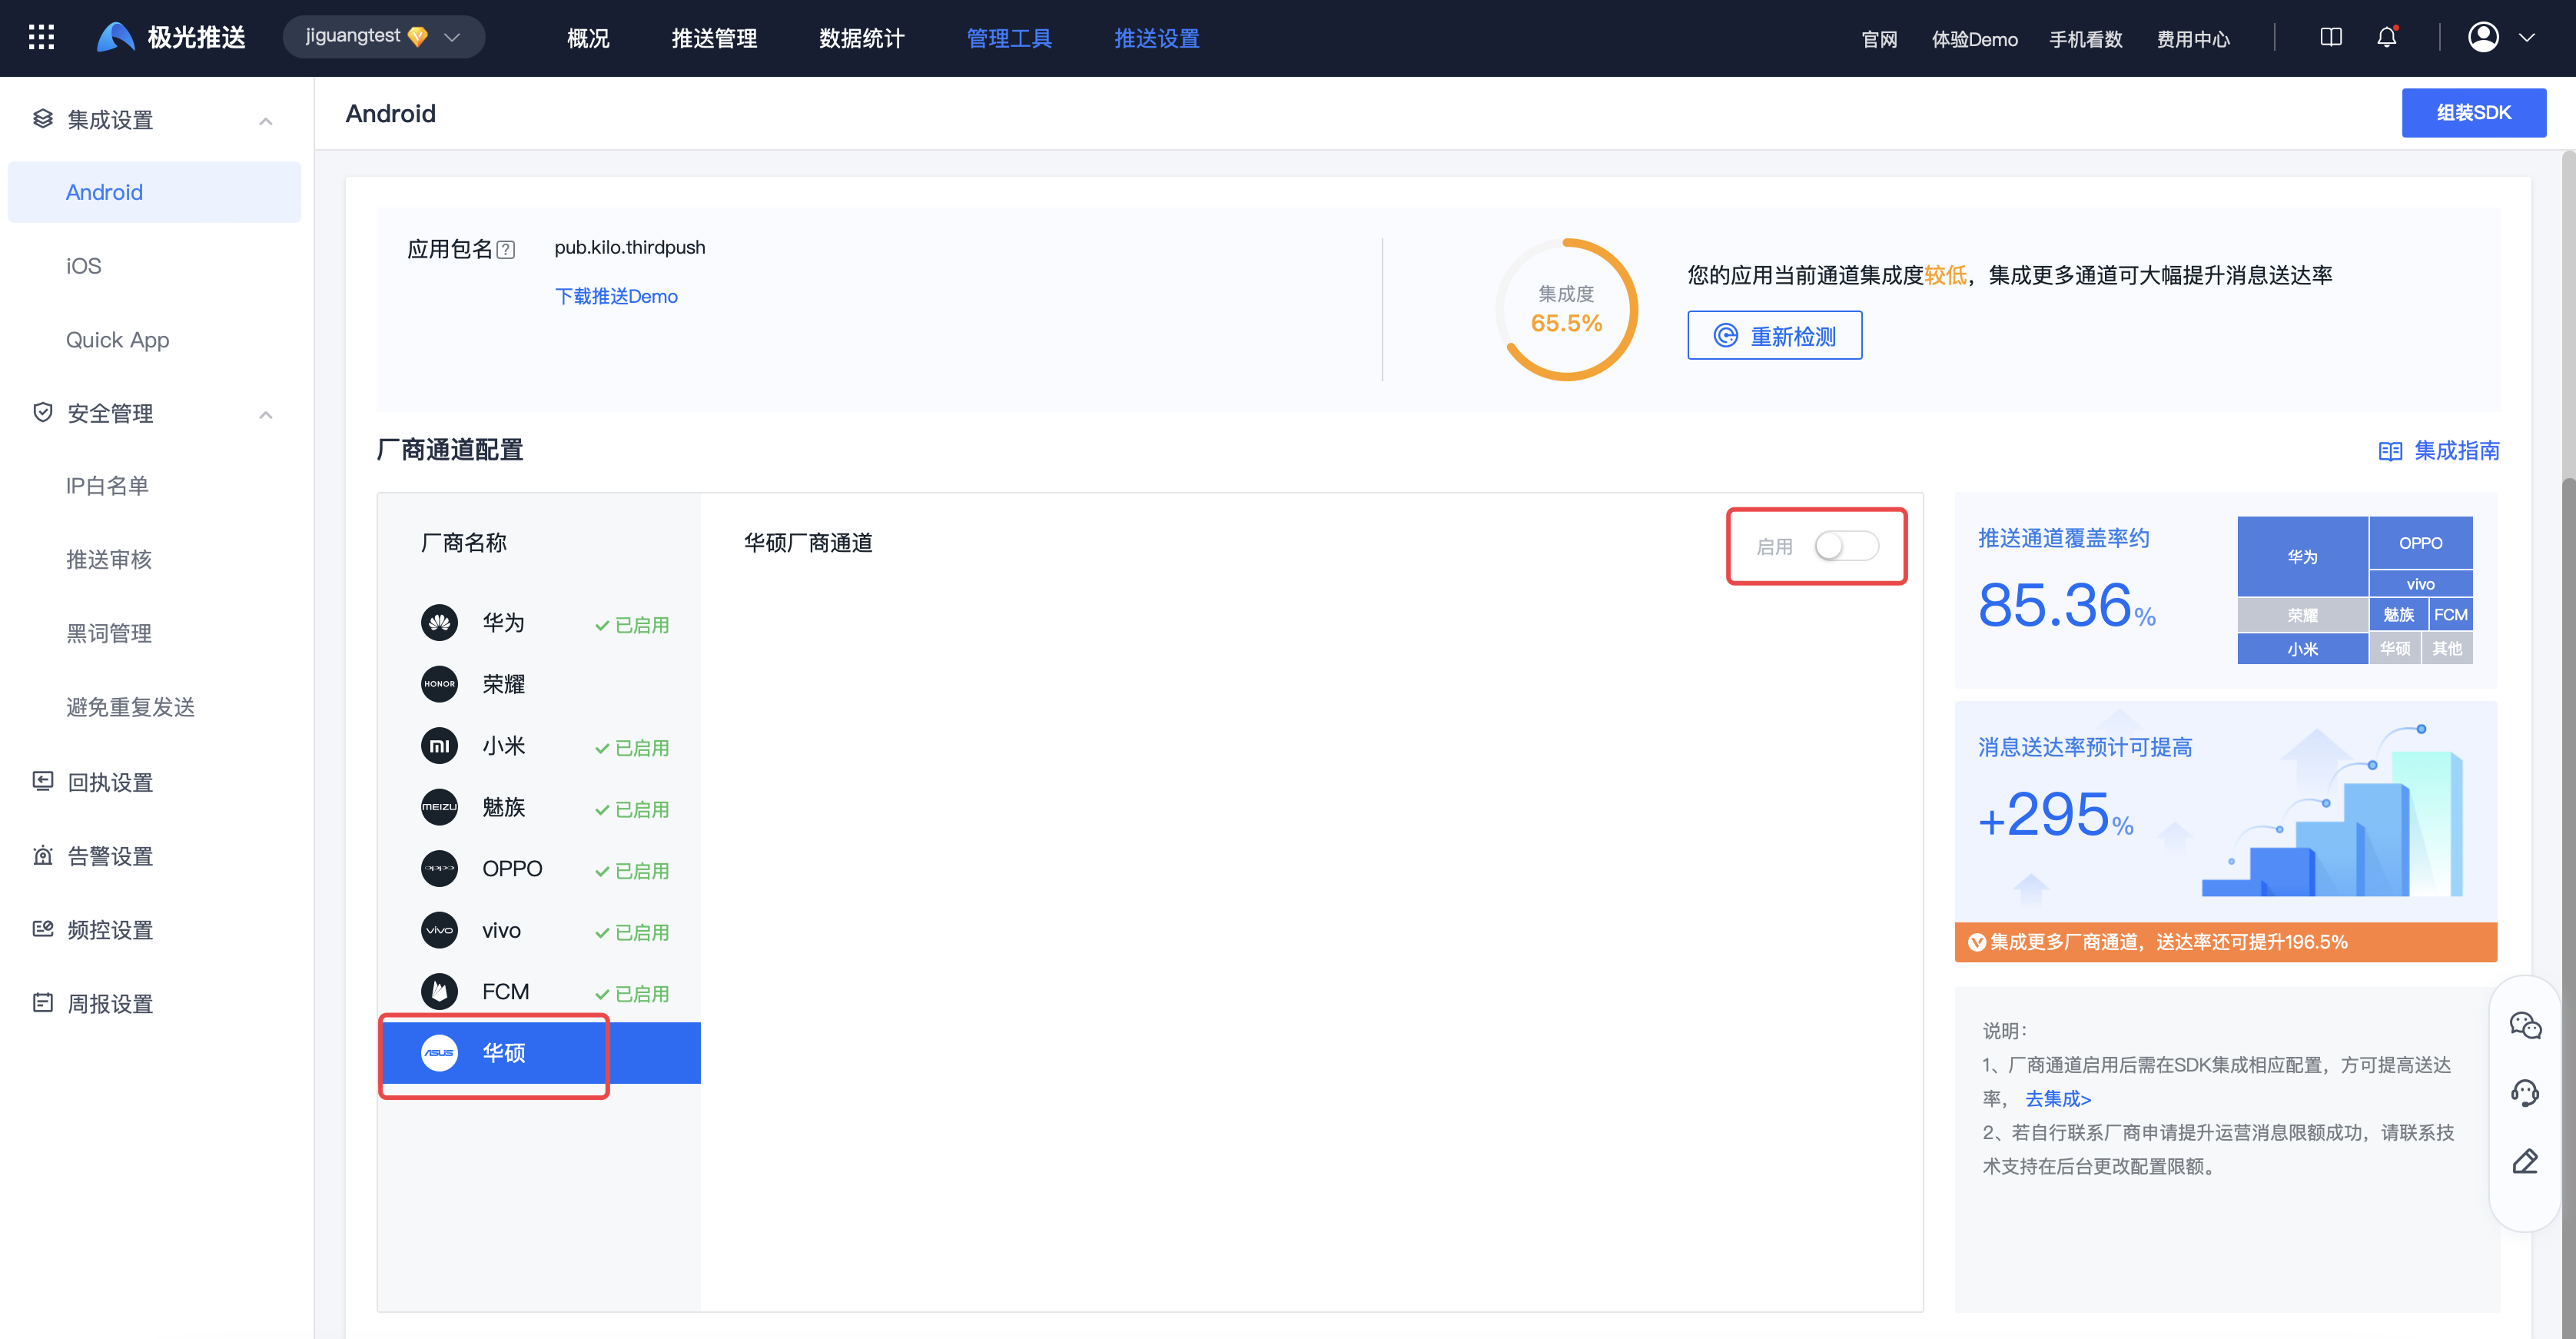
Note: JiguangAccording to the differences between ASUS system versions, the current solution is to support the use of ASUS service system, and notify the ASUS channel; for unsupported models or systems, still go through the ASUS channel.Jiguangaisle.
ASUS supported models and system instructions
| Mobile phone model | Android version | System version |
|---|---|---|
| ROG2 | Android 9 | 16.0640.1910.8 |
| ROG3 | android 10 | 17.0823.2007.23 |
| ROG5 | android 11 | 18.0810.2011.30 |
| ROG5s | android 11 | 18.1220.2105.29 |
| ROG6 | android 12 | 32.2810.2209.195 |
| ROG6Tianji Edition | android 12 | 31.0840.0840.42 |
Honor Channel Integration Guide
Usage restrictions
- Equipment requirements: Honor equipment Magic UI 4.0+, devices that do not meet the system version requirements will be registered with the Huawei channel.
Add to Honor SDK to the project
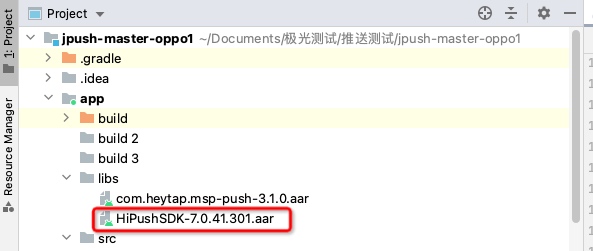
- exist third-push Found in the directory honor Directory, from libs copy in aar Packaged to the project libs directory.
- aar Package description:
- HiPushSdk-vxxx.aar: honor Push package
Configuration mavenCentral support
exist Project root directory master gradle Medium configuration mavenCentral support. (New project Supported by default configuration)
          buildscript {
    repositories {
      ...
      mavenCentral()
      maven { url 'https://developer.hihonor.com/repo' }//v5.9.0 开始需要添加
      ...
    }
}

allprojets {
    repositories {
        ...
        mavenCentral()
        maven { url 'https://developer.hihonor.com/repo' }//v5.9.0 开始需要添加
        ...
    }
}
Add to aar (5.9.0version starting, this step is no longer required)
JPush Android SDK v5.9.0 To start, please ignore this step. There is no need to introduce the Honor manufacturer’s code separately. aar 。 JPush Android SDK v4.7.0 To start, you need to introduce Honor manufacturers aar 。
- download JiguangOfficial website SDK 。
- Bundle
jpush-android-xxx-release/third-push/honor/libsdown aar Copy files to applicationmodule/libsDown.
Configuration parameters and dependencies
in project module of build.gradle Add the following code:
            defaultConfig {
        ...
        manifestPlaceholders = [
               ...
               HONOR_APPID : "您的应用对应的Honor的APP ID", // Honor平台注册的APP ID
               ...
        ]
        ...
    }
  dependencies {
        ...
        //厂商版本和 JPush SDK 版本保持一致
        implementation 'cn.jiguang.sdk.plugin:honor:5.x.x'
        //引入 libs 中的 aar,如果项目中有此依赖不需要重复引用
        implementation fileTree(include: ['*.jar','*.aar'], dir: 'libs')
        ...
  }
Note 1:JiguangIntegrated glory channel in JPush Android SDK 4.7.0 Added, corresponding to the glory of testing SDK The version is:HiPushSdk-v6.0.4.101-release.aar、HiPushSdkCommon-v6.0.4.101-release.aar。
Note 2:JPush Android SDK 4.8.1 Upgrade glory SDK version, the corresponding version is:HiPushSdk-6.0.4.200.aar、HiPushSdkCommon-6.0.4.200.aar。
Note 3:JiguangIntegrated glory channel in JPush Android SDK 4.8.3 Added, corresponding to the glory of testing SDK The version is:HiPushSdk-v7.0.1.103.aar(note glory SDK Only keep:HiPushSdk, the original HiPushSdkCommon need to be deleted).
Note 4: glory Push SDK official documentation。
Configure signing certificate
exist build.gradle Configure the signature corresponding to the fingerprint certificate added in the Honor backend.
- Glory service must require app Signature is required for successful registration.
- Can be used in the terminal keytool -list -v -keystore <签名文件的绝对路径> Obtain the corresponding fingerprint certificate.
- If you do not have a signature file or key password, you can also use the terminal keytool -list -printcert -jarfile < Apk 文件的绝对路径> Obtain the corresponding fingerprint certificate.
Integrated result judgment
If the integration is successful, the log will display as follows:
[HonorPushHelper] get honor token:s18069ps301291893q1ssro2o40s1630-n262n542r9669q62o83s390306179rro-775875632-654-6105326555582-PA-0052993947080949113-5
Configuration code obfuscation
If used proguard, in order to prevent false positives warning As a result, the compilation cannot be successful. You need to add the following content to the configuration file:
-ignorewarnings
-keepattributes *Annotation*
-keepattributes Exceptions
-keepattributes InnerClasses
-keepattributes Signature
-keepattributes SourceFile,LineNumberTable
-keep class com.hihonor.push.**{*;}
Honor channel test method
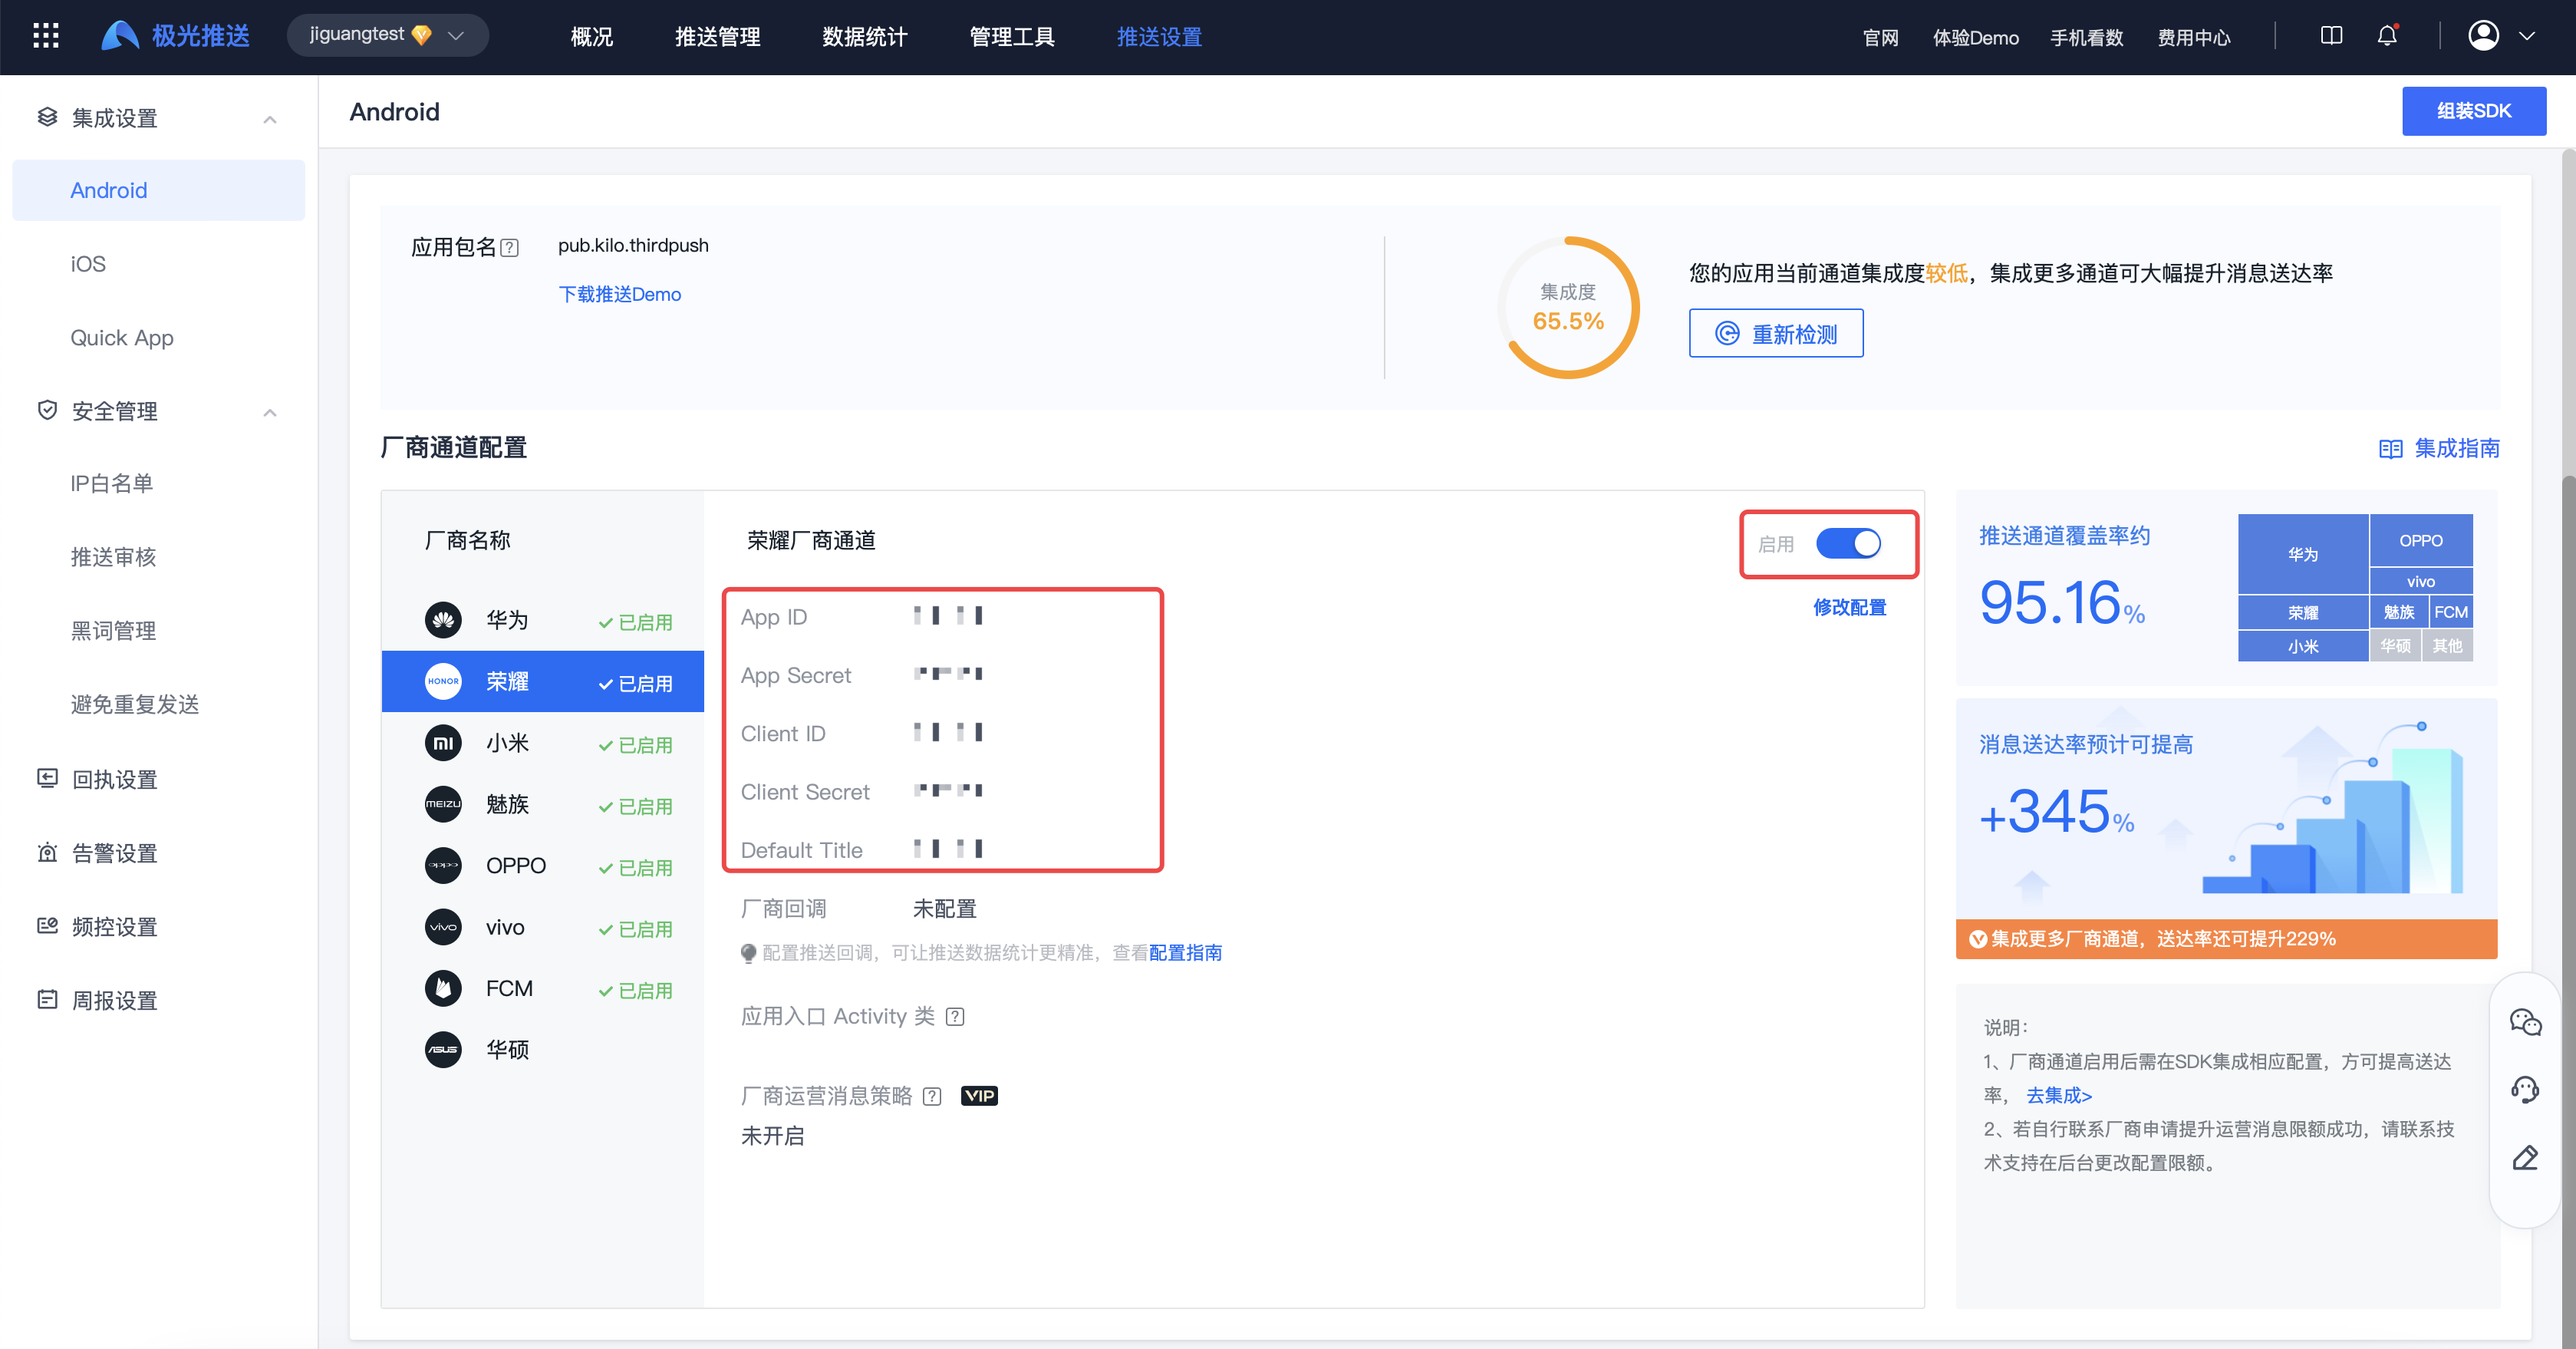
- Enter【JiguangConsole]-[Message Push]-[Push Settings]-[Integration Settings] page, fill in the parameters:App ID、Client ID、Client Secrect、App Secret, and click Enable.
- kill App Push after the process. If the push can be received, it means that the vendor channel integration is successful.

