
HarmonyOS Quick access
This article aims to guide users to quickly integrate push services. Please refer to the detailed integration steps. SDK Integration Guide and Manufacturer parameter application guide。
SDK For download details, see Resource download。
Add project configuration
Configurationhar
entry under module oh-package.json5 Configuration
Description: Association jpush-hmos-x.x.x-release.har, for example, you copy har arrive entry/hars/ directory, then in entry under module oh-package.json5 File addition
          "dependencies": {
    "jg_harmony_har": "./hars/jpush-hmos-x.x.x-release.har" //这里的路径是你存放jpush-hmos-x.x.x-release.har的位置
}
client_id Configuration
entry under module module.json5 File configuration.
illustrate:
Configure in local project client_id, exist entry under module module.json5 File addition
          "module": {
    "metadata": [
        {
            "name": "client_id",
            "value": "你的id"
        }
    ]
}
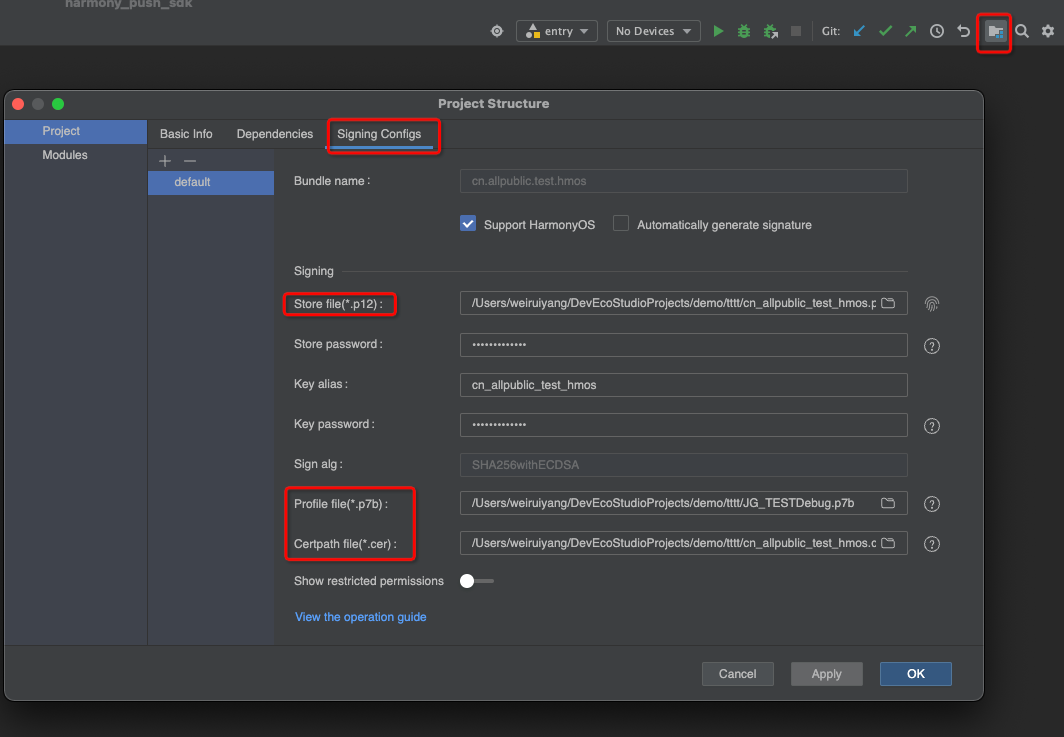
Sign configuration
Sign in the local project configuration, as shown in the figure
Package name configuration
exist AppScope under engineering app.json5 File addition
          {
  "app": {
    "bundleName": "你的包名",
  }
}
appKey Configuration
appKey Code configuration is required and needs to be in AbilityStage Configure within, need to be in init configured before.
          export default class MyAbilityStage extends AbilityStage {
  onCreate() {
    JPushInterface.setAppKey("你的appKey") //在init之前调用
  }
}
Notification jump page configuration
entry under module module.json5 File configuration.
                {
      ...
        "exported": true,
        "skills": [
          {
            "actions": [""], //actions一定要配置,没有可以配置空字符串
            "uris": [
              {
                "scheme": "你的scheme",
                "host": "你的host",
                "port": "你的port",
                "path": "你的path"
              }
            ]
          }
        ]
      }
Apply to turn on the notification switch
Apply on the home page
          export default class EntryAbility extends UIAbility {
  onCreate(want: Want, launchParam: AbilityConstant.LaunchParam): void {
    notificationManager.requestEnableNotification().then(() => {
      hilog.info(0x0000, TAG, '%{public}s', `requestEnableNotification success`);
    }).catch((err: Base.BusinessError) => {
      hilog.error(0x0000, TAG, '%{public}s', `requestEnableNotification failed, code is ${err.code}, message is ${err.message}`);
    });
  }
}
Initialize push service
- exist init Need to set up before appKey
- exist init Before setting up the receive callback information class
          export default class MyAbilityStage extends AbilityStage {
  onCreate() {
    JPushInterface.setCallBackMsg(继承CallBackMsg的实体类)//接收回调信息//在init之前调用
    JPushInterface.setAppKey("你的appKey")//在init之前调用
    JPushInterface.init(this.context.getApplicationContext())
  }
}
Configure permissions (optional)
Optional, in order to push more accurately, call it after the application is completed.initInitialization interface
Configuration file permission statement
Profile permission statement, in entry under module src/main/module.json5 File addition
          {
  "module": {
    "requestPermissions": [
      {
        "name": "ohos.permission.APP_TRACKING_CONSENT",
        "reason": "$string:reason",
        "usedScene": {
          "abilities": [
            "EntryAbility" //一般要用首页
          ],
          "when": "always"
        }
      }
    ]
  }
}
Apply for authorization from user
Apply for authorization from the user on the homepage EntryAbility Apply in the application and then initialize it, such as:
          const permissions: Array<Permissions> = ['ohos.permission.APP_TRACKING_CONSENT'];
export default class EntryAbility extends UIAbility {
  onCreate(want: Want, launchParam: AbilityConstant.LaunchParam): void {
    let context:Context = this.context;
    let atManager:abilityAccessCtrl.AtManager = abilityAccessCtrl.createAtManager();
    atManager.requestPermissionsFromUser(context, permissions).then((data: PermissionRequestResult) => {
      // 授权成功 //然后初始化
      JPushInterface.init(this.context.getApplicationContext())
    }).catch((err: BusinessError) => {
      //然后初始化
      JPushInterface.init(this.context.getApplicationContext())
    })
}
- Get the log registrationId, and inJiguangconsole Create push Experience push service.
- After the push is completed, you can Push history View detailed data such as push status, push channel, delivery rate, etc.

