
Android SDK Integration Guide
Usage tips
This article is JPush Android SDK Standard integration guide document. for guidance SDK By default, readers are already familiar with the usage of IDE(Eclipse or Android Studio), as well as having certain Android Basic programming knowledge.
This guide matches JPush Android SDK The version is:3.0.0 and later versions.
- Completed in three minutes Demo experience (Android): If you want to quickly test and feelJPushFor the effect, please refer to this article to run through it in a few minutes. Demo。
- JPush Documentation website Up, there isJPushAll related guides,API, tutorials and all other documents. Updated versions, including those of this document, will be posted to this website in a timely manner.
- If you see this document but haven't downloaded it yet Android SDK, please visit Assemble SDK Serve and download.
Product function description
JPush(JPush) is an end-to-end push service that enables server-side messages to be pushed to end-user mobile phones in a timely manner, allowing developers to actively maintain connections with users, thereby increasing user activity and application retention.JPushClient support Android,iOS Two platforms.
Book Android SDK Convenient for developers based on JPush to quickly Android App Add push function.
Main functions
- Maintain a long connection with the server so that messages can be pushed to the client instantly
- Receive notifications and custom messages, and send them to developers App convey relevant information
Main features
- The client maintains a connection that takes up less resources and consumes less power.
- SDK Rich interface, customizable notification bar prompt style
- The server has large capacity and is stable
SDK supported Android System version
- at present SDK Only supports Android 2.3 or above version of mobile phone system;
- Rich media information flow and in-app messaging functions require Android 3.0 or above version of the system.
mavenCentral Automatic integration method (recommended)
use mavenCentral Automatically integrated developers, no need to add them to the project jar and so,mavenCentral Dependencies will be automatically completed; in AndroidManifest.xml No need to add anything to JPush SDK related configuration,mavenCentral will be imported automatically.
If you need to process the received message, use 3.0.7 Version supports new interfaces for aliases and tags,AndroidManifest Custom broadcast receivers in still need to be manually configured by developers, refer to SDK in compressed package AndroidManifest.xml Sample files.
Modify component properties
If developers need to modify component properties, they can do so locally AndroidManifest Define a component with the same name and configure the desired properties, then use xmlns:tools to control local component coverage mavenCentral components on. Example:
          <manifest xmlns:android="http://schemas.android.com/apk/res/android"
    package="com.android.tests.flavorlib.app"
    xmlns:tools="http://schemas.android.com/tools">

    <application
        android:icon="@drawable/icon"
        android:name="com.example.jpushdemo.ExampleApplication"
        android:label="@string/app_name" >

  </application>

</manifest>
Configuration mavenCentral support
confirm android studio of Project root directory master gradle configured in mavenCentral support. (New project Supported by default configuration)
          buildscript {
    repositories {
        mavenCentral()
    }
    ......
}

allprojects {
    repositories {
        mavenCentral()
    }
}
Configure dependencies and substitution variables
exist module of gradle Add dependencies and AndroidManifest replacement variable.
          android {
    ......
    defaultConfig {
    applicationId "com.xxx.xxx" //JPush 上注册的包名.
    ......

    ndk {
        //选择要添加的对应 cpu 类型的 .so 库。
        abiFilters 'armeabi', 'armeabi-v7a', 'arm64-v8a'
        // 还可以添加 'x86', 'x86_64', 'mips', 'mips64'
    }

    manifestPlaceholders = [
        JPUSH_PKGNAME : applicationId,
        JPUSH_APPKEY : "你的 Appkey ", //JPush 上注册的包名对应的 Appkey.
        JPUSH_CHANNEL : "developer-default", //暂时填写默认值即可.
    ]
    ......
}
......
}

dependencies {
......

implementation 'cn.jiguang.sdk:jpush:5.8.0'        // 必选,此处以JPush 5.8.0 版本为例,注意:5.0.0 版本开始可以自动拉取 JCore 包,无需另外配置
implementation 'cn.jiguang.sdk:joperate:2.0.2'     // 可选,集成极光分析SDK后,即可支持行为触发推送消息、推送转化率统计,用户行为分析和用户标签等功能

}
JiguanganalyzeSDKmore features andAPISee detailsJiguanganalyzeSDKIntegration Guide
If you need to use a specific version JCore, you can use the following command to no longer automatically pull the latest versionjcore
implementation ('cn.jiguang.sdk:jpush:5.8.0'){ exclude group: 'cn.jiguang.sdk', module: 'jcore' //不再使用自动拉取的最新版 JCore } implementation 'cn.jiguang.sdk:jcore:5.x.x' //使用指定的 JCore 版本implementation ('cn.jiguang.sdk:jpush:5.8.0'){ exclude group: 'cn.jiguang.sdk', module: 'jcore' //不再使用自动拉取的最新版 JCore } implementation 'cn.jiguang.sdk:jcore:5.x.x' //使用指定的 JCore 版本This code block is shown in the floating windowwhen used JPush ≥ 5.0.0 and JCore < 4.2.0When, you need to add the following configuration in the manifest file:
          <provider tools:node="remove"
            android:exported="false"
            android:authorities="${applicationId}.jiguang.InitProvider"
            android:name="cn.jpush.android.service.InitProvider"></provider>
- If used JPush < 5.0.0 version, configuration is required JCore rely:
          implementation 'cn.jiguang.sdk:jpush:4.x.x'
implementation 'cn.jiguang.sdk:jcore:4.x.x'
Google Play Version
If you wish to use Google Play version, you need to select it when automatically integrating Google Play Version correspondence SDK
- 5.0.0 Version can be automatically pulled at the beginning JCore Package, no additional configuration is required, the configuration is as follows:
          dependencies {
......

implementation 'cn.jiguang.sdk:jpush-google:5.8.0'  // 此处以JPush 5.8.0 Google Play 版本为例,

}
- If you want to eliminate JPush automatically dependent JCore, you can use the following methods:
implementation ('cn.jiguang.sdk:jpush-google:5.8.0'){
       exclude group: 'cn.jiguang.sdk', module: 'jcore-google'//会自动把 JCore 剔除
}
- NOTE: When usingJPush 5.0.0 and above, the user removedJPushautomatically dependentJCoreversion, and use your own dependentJCoreother versions asJCoreversion< 4.2.0When, you need to add the following configuration in the manifest file:
          <provider tools:node="remove"
            android:exported="false"
            android:authorities="${applicationId}.jiguang.InitProvider"
            android:name="cn.jpush.android.service.InitProvider"></provider>
- If using JPush 5.0.0 and below versions, configuration is required JCore rely:
          implementation 'cn.jiguang.sdk:jpush-google:4.x.x'
implementation 'cn.jiguang.sdk:jcore-google:4.x.x'
Configuration Service
If you use JCore yes 2.0.0 and above versions require additional Androidmanifest Configure one in Service, to obtain more stable support on more mobile phone platforms, examples are as follows. (JCore1.x Version is not required)
           <!-- Since JCore2.0.0 Required SDK核心功能-->
 <!-- 可配置android:process参数将Service放在其他进程中;android:enabled属性不能是false -->
 <!-- 这个是自定义Service,要继承极光JCommonService,可以在更多手机平台上使得推送通道保持的更稳定 -->
 <service android:name="xx.xx.XService"
         android:enabled="true"
         android:exported="false"
         android:process=":pushcore">
         <intent-filter>
             <action android:name="cn.jiguang.user.service.action" />
         </intent-filter>
 </service>
Configuration Receiver
from JPush3.0.7 To start, you need to configure inheritance JPushMessageReceiver broadcast, it turns out that if it is equipped with MyReceiver It can now be deprecated. Examples are as follows.
           <!-- Required since 3.0.7 -->
 <!-- 新的 tag/alias 接口结果返回需要开发者配置一个自定的广播 -->
 <!-- 3.3.0开始所有事件将通过该类回调 -->
 <!-- 该广播需要继承 JPush 提供的 JPushMessageReceiver 类, 并如下新增一个 Intent-Filter -->
 <receiver
       android:name="自定义 Receiver"
       android:enabled="true"
       android:exported="false" >
       <intent-filter>
            <!-- 从 JPush v5.4.0 版本开始,请特别注意 RECEIVER_MESSAGE 写法, 如配置错误则无法找到回调类 -->
            <action android:name="cn.jpush.android.intent.RECEIVER_MESSAGE" />
            <category android:name="您应用的包名" />
       </intent-filter>
 </receiver>
Note:SDKCallback method description
- SDKVersion:3.0.7<= x < 5.2.0 and 5.4.0and above usereceiver Way
- SDKVersion:5.2.0<= x <=5.3.1 useservice Way
Note: If adding the above abiFilter After configuration android Studio The following prompt appears:
NDK integration is deprecated in the current plugin. Consider trying the new experimental plugin
then in Project root directory gradle.properties Add to the file:
android.useDeprecatedNdk=true
Note: Use NDK r17 time, maybe Android Studio The following prompt will appear:
          A problem occurred starting process ‘command
‘/Users/xxx/Library/Android/sdk/ndk-bundle/toolchains/mips64el-linux-android-4.9/prebuilt
/darwin-x86_64/bin/mips64el-linux-android-strip”

系统找不到指定的文件
This is because NDK r17 No longer supported later mips platform, on build.gradle Add the following configuration to solve the problem
          android {

    defaultConfig {
        .....
    }

    packagingOptions {
        doNotStrip '*/mips/*.so'
        doNotStrip '*/mips64/*.so'
    }
}
If not res/drawable-xxxx/jpush_notification_icon This resource uses the app icon for notifications by default icon,exist 5.0 The above system uses the application icon as statusbar icon May display abnormally, user can define without shadow and gradient color icon Replace this file without changing the file name.
Configuration and code description
Required permission description
| Permissions | use |
|---|---|
| You Package.permission.JPUSH_MESSAGE | Officially defined permissions that allow applications to receive JPush Broadcast message sent by internal code. |
| INTERNET | Allows the application to access the network. |
| ACCESS_NETWORK_STATE | Allows the application to obtain network information status, such as whether the current network connection is valid. |
integrated JPush Android SDK confusion
Please download 4.x and above versions proguard.jar, and replace your Android SDK "tools\proguard\lib\proguard.jar"
Please add the following configuration to the obfuscation file of the project:
              -dontoptimize
    -dontpreverify

    -dontwarn cn.jpush.**
    -keep class cn.jpush.** { *; }
    -keep class * extends cn.jpush.android.service.JPushMessageReceiver { *; }

    -dontwarn cn.jiguang.**
    -keep class cn.jiguang.** { *; }
- 2.0.5 ~ 2.1.7 The version has been introduced gson and protobuf, add configuration to eliminate confusion. (2.1.8 Version does not need to be configured)
                  #==================gson && protobuf==========================
        -dontwarn com.google.**
        -keep class com.google.gson.** {*;}
        -keep class com.google.protobuf.** {*;}
About resource confusion
Jiguang SDK Resources cannot be confused. If there is resource confusion, you need to add the following whitelist:
          andResGuard {
   ...
    whiteList = [
        "R.xml.jpush*",
        "R.drawable.jpush*",
        "R.layout.jpush*",
        "R.layout.push*",
        "R.string.jg*",
        "R.style.MyDialogStyle",
        "R.style.JPushTheme"
    ]
    ...
}
add code
JPush SDK provided API Interfaces are mainly concentrated on cn.jpush.android.api.JPushInterface In the category.
Base API
- init initialization SDK and enable push service API
Special reminder:
1. consider APP For online compliance, developers must beAPPThe user agrees to the privacy policy and the developer identifies asAppAfter the user starts to provide push services, call this interface to enable the push business function for use.JiguangServe.
2. About APP Privacy policy suggestions and instructions, please refer to JPushSDKCompliance Guidelines。
public static void init(Context context, JPushConfig config);
- setDebugMode Set debug mode
Note: This interface needs to be in init Call before the interface to avoid the situation where some logs are not printed. In the case of multi-process, it is recommended to use customized Application middle onCreate call in.
          // You can enable debug mode in developing state. You should close debug mode when release.
public static void setDebugMode(boolean debugEnalbed)
Add statistics code
- Reference documentation: Statistical analysis API
Call the sample code (reference example project)
init This only needs to be called once when the application starts API That’s it.
The following code customizes this application Application kind. need to be in AndoridManifest.xml configuration. Please refer to the above AndroidManifest.xml fragment, or example project.
          public class ExampleApplication extends Application {
    @Override
    public void onCreate() {
        super.onCreate();
        JPushInterface.setDebugMode(true);

      // 调整点一:调用启用推送业务功能代码前增加setAuth调用
      boolean isPrivacyReady; // app根据是否已弹窗获取隐私授权来赋值
      if(!isPrivacyReady){
        // JCore 5.0.4之前版本需要显式设置false
        if (JCoreInterface.getJCoreSDKVersionInt() < 504) { // 5.0.4版本号对应504
          JCollectionAuth.setAuth(context, false);
        }
        // 所有版本在未授权时都不应初始化SDK
        return;
      }
      JPushInterface.init();


      // 调整点二:App用户同意了隐私政策授权,并且开发者确定要开启推送服务后调用
      // JCore 5.0.4+会自动处理授权状态,可不需要显式设置true
      JCollectionAuth.setAuth(context, true);

    }
}
Test confirmation
- Confirm that the required permissions have been added. If the necessary permissions are not added, the log will prompt an error.
- confirm AppKey(exist Portal generated on) has been written correctly Androidmanifest.xml 。
- Confirm that it is called when the program starts init(context)interface
- Confirm that the test phone (or simulator) has successfully connected to the network
- Client call init Soon after, if everything is normal, there should be log information indicating successful login.
- Start the application in Portal Send a custom message or notification bar prompt to the application. For details, please refer to Create push。
- Within a few seconds, the client should receive the delivered notification or definition message. If SDK If the operation is normal, the log information will be as follows:
          [JPushInterface] action:init
.......
[ConnectingHelper] Login succeed
As shown in the figure, client startup is divided into 4 steps:
- examine metadata of appKey and channel, if it does not exist, the startup fails
- initialization JPush SDK,examine JNI Wait for the validity of the library file. If the library file is invalid, the startup will fail.
- examine Androidmanifest.xml, if there is Required If the permission does not exist, the startup will fail.
- Connect to the server to log in. If there is a network problem, the login fails, or there is a problem with the first three steps and it will not start. JPush SDK
Advanced functions
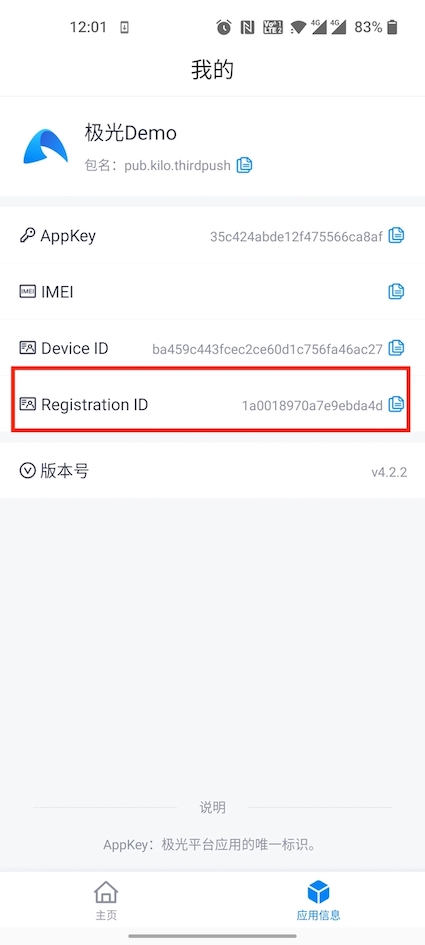
get Registration ID interaction suggestions
becauseJPushAll forms of push will eventually be converted into Registration ID push, so you need to provide it when troubleshooting customer problems Registration ID. In order to facilitate online customers to accurately provide information and reduce communication costs, we recommend that you complete SDK After integration, in App Display customer information in less commonly used UIs such as [About], [Feedback], [My] and so on. Registration ID 。
Sample code:
JPushInterface.getRegistrationID(getContext());
The effect is as shown in the figure:
Other functions
Please refer to:
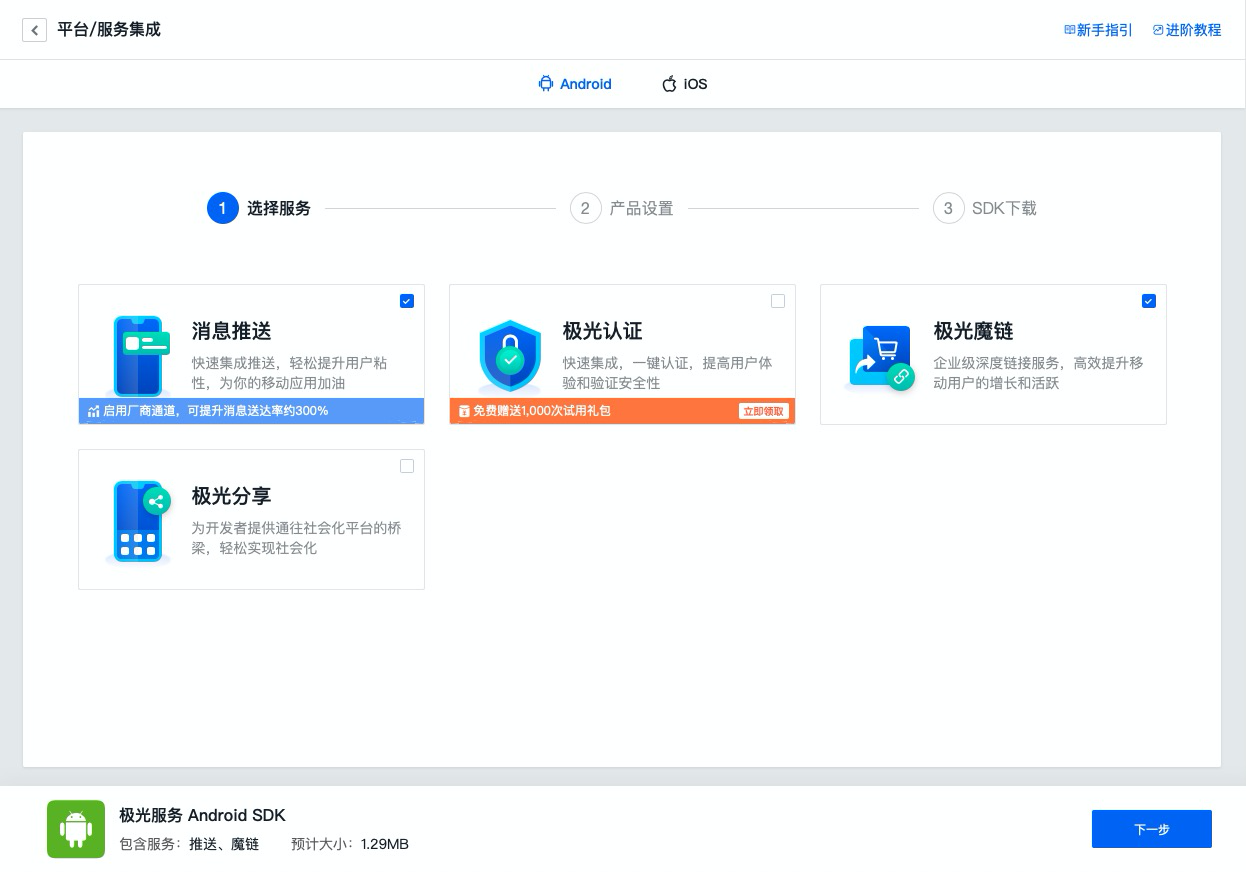
Other integration methods
Assembly service integration method
The group package service is for manual integration SDK encapsulation service, by converting SDK combined into separate jiguang module, hiding the common configuration business of manual integration, developers only need to focus on their own personalized configuration, reducing integration steps and improving developer access efficiency.
If you need to use Jpush For group package service, please check the box on the group package service interface. JPush service, and Assemble SDK。
jiguang_sdk.zip Integrated compressed package content description
jiguang
- JIGUANG SDK Combo pack
- JPush jar Packages, resource files, etc. are already dependent on the package, so there is no need to manually copy the dependencies.
jiguang-demo
- JIGUANG SDK Combo package integration demo。
- is a complete Android This project demonstrates the basic usage of package services and can be used as a reference.
- It will be automatically combined and built based on the services you selected, and the related configurations preset before package assembly will be pre-buried in demo middle
import JIGUANG SDK
Pass AS will SDK as module Import project
Import steps:AndroidStudio -> File -> New -> Import Module -> Select jiguang import
Configuration JIGUANG SDK
settings.gradle Configuration added:
include ':jiguang'
in application gradle Medium Add SDK rely
          android {
    ......
    defaultConfig {
        applicationId "com.xxx.xxx" //JPush 上注册的包名.
        ......

        manifestPlaceholders = [
            JPUSH_PKGNAME : applicationId,
            JPUSH_APPKEY : "你的 Appkey ", //JPush 上注册的包名对应的 Appkey.
            JPUSH_CHANNEL : "developer-default", //暂时填写默认值即可.
        ]
        ......
    }
    ......
}

dependencies {
    ......

    implementation project(':jiguang')
    ......
}
in application Androidmanifest Medium configuration
          <!-- Since JCore2.0.0 Required SDK核心功能-->
<!-- 可配置android:process参数将Service放在其他进程中;android:enabled属性不能是false -->
<!-- 这个是自定义Service,要继承极光JCommonService,可以在更多手机平台上使得推送通道保持的更稳定 -->
<service android:name="xx.xx.XService"
        android:enabled="true"
        android:exported="false"
        android:process=":pushcore">
        <intent-filter>
            <action android:name="cn.jiguang.user.service.action" />
        </intent-filter>
</service>

 <!-- Required since 3.0.7 -->
 <!-- 新的 tag/alias 接口结果返回需要开发者配置一个自定的广播 -->
 <!-- 3.3.0开始所有事件将通过该类回调 -->
 <!-- 该广播需要继承 JPush 提供的 JPushMessageReceiver 类, 并如下新增一个 Intent-Filter -->
 <receiver
       android:name="自定义 Receiver"
       android:enabled="true"
       android:exported="false" >
       <intent-filter>
            <action android:name="cn.jpush.android.intent.RECEIVER_MESSAGE" />
            <category android:name="您应用的包名" />
       </intent-filter>
 </receiver>
Manual integration method
Manually integrated compressed package download link:Go to download
jpush-android-3.x.x-release.zip Integrated compressed package contents
- AndroidManifest.xml
- client side embed SDK Reference configuration file
- libs/jcore-android.x.x.x.jar
- JiguangCore package for developer services.
- libs/jpush-android-3.x.y.jar
- JPush SDK development kit.
- libs/(cpu-type)/libjcore1xx.so
- Various CPU type native development kit.
- res
- integrated SDK Resource files that must be added
- example
- is a complete Android project, passed this demonstration JPush SDK The basic usage can be used as a reference.
SDK File migration
- Unzip jpush-android--3.x.x-release.zip Integrated compressed package.
- copy libs/jcore-android-x.x.x.jar to project libs/ directory.
- copy libs/jpush-android-3.x.x.jar to project libs/ directory.
- copy libs/(cpu-type)/libjcore1xy.so Store the correspondence in your project cpu type directory.
- copy res/ middle drawable-hdpi, layout, values Add the resource files in the folder to your project res/ corresponding to the directory with the same name.
Note 1: If not res/drawable-xxxx/jpush_notification_icon This resource uses the app icon for notifications by default icon,exist 5.0 The above system uses the application icon as statusbar icon May display abnormally, user can define without shadow and gradient color icon Replace this file without changing the file name.
Instructions 2: Use android studio developers, if using jniLibs folder into the so file, you only need to add all cpu Copy the folder of type into it; if you add the so file in module of libs folder, pay attention to the module of gradle Add the following configuration to the configuration:
          android {
    ......
    sourceSets {
        main {
            jniLibs.srcDirs = ['libs']
            ......
        }
        ......
    }
    ......
}
Configuration AndroidManifest.xml
according to SDK in compressed package AndroidManifest.xml Sample files to configure the application project AndroidManifest.xml 。
The main steps are:
- Copy the note as "Required" part
- Replace the section labeled "Package name of your application" with the package name of the current application
- Label the Appkey” part, replace it with Portal After creating the app on Appkey,For example:9fed5bcb7b9b87413678c407
illustrate:
If using android studio, available at AndroidManifest cited in applicationId value, in build.gradle Configuring defaultConfig Configuration under the node, such as:
          defaultConfig {
    applicationId "cn.jpush.example" //您应用的包名
......
}
exist AndroidManifest Use ${ inapplicationId} Quote gradle package name defined in
AndroidManifest Example
          <?xml version="1.0" encoding="utf-8"?>
<manifest xmlns:android="http://schemas.android.com/apk/res/android"
    package="您应用的包名"
    android:versionCode="316"
    android:versionName="3.1.6"
    >
    <uses-sdk android:minSdkVersion="9" android:targetSdkVersion="23" />

    <!-- Required -->
    <permission
        android:name="您应用的包名.permission.JPUSH_MESSAGE"
        android:protectionLevel="signature" />
    <uses-permission android:name="您应用的包名.permission.JPUSH_MESSAGE" />
    <uses-permission android:name="android.permission.INTERNET" />
    <uses-permission android:name="android.permission.ACCESS_NETWORK_STATE" />
    <!-- 适配Android13,弹出通知必须权限-->
     <uses-permission android:name="android.permission.POST_NOTIFICATIONS"/>

    <!-- Optional. Required for location feature -->
    <!-- 为了提高sdk识别唯一用户的能力,保证消息推送的精准送达,建议集成以下权限(可选)-->
    <uses-permission android:name="android.permission.READ_PHONE_STATE" />
    <uses-permission android:name="android.permission.QUERY_ALL_PACKAGES" />
    <uses-permission android:name="android.permission.GET_TASKS" />
    <uses-permission android:name="android.permission.ACCESS_WIFI_STATE" />

   <!-- 如您需要接入地理围栏业务,建议集成以下权限(可选)-->
    <uses-permission android:name="android.permission.ACCESS_COARSE_LOCATION" />
    <uses-permission android:name="android.permission.ACCESS_FINE_LOCATION" />
    <uses-permission android:name="android.permission.ACCESS_BACKGROUND_LOCATION" />

    <!-- 如您需要对应设备通知相关的能力,建议集成以下权限(可选)-->
    <uses-permission android:name="com.huawei.android.launcher.permission.CHANGE_BADGE" /><!-- 华为角标 -->
    <uses-permission android:name="com.vivo.notification.permission.BADGE_ICON" /><!-- VIVO角标权限 -->
    <uses-permission android:name="com.hihonor.android.launcher.permission.CHANGE_BADGE" /><!--honor 角标-->
    <uses-permission android:name="android.permission.VIBRATE" /><!--振动器权限,JPUSH支持通知开启振动功能,小米推送必须-->

    <!-- 扩展备用权限(可选)-->
    <permission android:name="${applicationId}.permission.JOPERATE_MESSAGE" android:protectionLevel="signature"/>
    <uses-permission android:name="${applicationId}.permission.JOPERATE_MESSAGE" />


    <application
        android:icon="@drawable/ic_launcher"
        android:label="@string/app_name"
        android:name="Your Application Name">

        <!-- Required SDK 核心功能-->
        <!-- 可配置 android:process 参数将 PushService 放在其他进程中 -->
        <service
            android:name="cn.jpush.android.service.PushService"
            android:enabled="true"
            android:exported="false" >
            <intent-filter>
                <action android:name="cn.jpush.android.intent.REGISTER" />
                <action android:name="cn.jpush.android.intent.REPORT" />
                <action android:name="cn.jpush.android.intent.PushService" />
                <action android:name="cn.jpush.android.intent.PUSH_TIME" />
            </intent-filter>
        </service>


 <!-- since 3.0.9 Required SDK 核心功能-->
        <provider
            android:authorities="您应用的包名.DataProvider"
            android:name="cn.jpush.android.service.DataProvider"
            android:exported="true"
            android:process=":pushcore"
        />

        <!-- Required SDK 核心功能-->
        <receiver
            android:name="cn.jpush.android.service.PushReceiver"
            android:exported="false"
            android:enabled="true" >
          <intent-filter>
                <action android:name="cn.jpush.android.intent.NOTIFICATION_RECEIVED_PROXY" />
                <category android:name="您应用的包名"/>
            </intent-filter>
        </receiver>

        <!-- Required SDK 核心功能-->
        <activity
            android:name="cn.jpush.android.ui.PushActivity"
            android:configChanges="orientation|keyboardHidden"
            android:theme="@android:style/Theme.NoTitleBar"
            android:exported="true" >
            <intent-filter>
                <action android:name="cn.jpush.android.ui.PushActivity" />
                <category android:name="android.intent.category.DEFAULT" />
                <category android:name="您应用的包名" />
            </intent-filter>
        </activity>
        <!-- SDK 核心功能-->
        <activity
            android:name="cn.jpush.android.ui.PopWinActivity"
            android:configChanges="orientation|keyboardHidden"
            android:exported="true"
            android:theme="@style/JPushDialogStyle">
            <intent-filter>
                <category android:name="android.intent.category.DEFAULT" />
                <action android:name="cn.jpush.android.ui.PopWinActivity" />
                <category android:name="您应用的包名" />
            </intent-filter>
        </activity>


        <!-- Since JCore2.0.0 Required SDK核心功能-->
     <!-- 可配置android:process参数将Service放在其他进程中;android:enabled属性不能是false -->
        <!-- 这个是自定义Service,要继承极光JCommonService,可以在更多手机平台上使得推送通道保持的更稳定 -->
         <service android:name="xx.xx.XService"
                 android:enabled="true"
                 android:exported="false"
                 android:process=":pushcore">
                 <intent-filter>
                     <action android:name="cn.jiguang.user.service.action" />
                 </intent-filter>
         </service>

        <!-- Required SDK 核心功能-->
        <receiver android:name="cn.jpush.android.service.AlarmReceiver" />

        <!-- 新的 tag/alias 接口结果返回需要开发者配置一个自定义的Service -->
        <!-- 该广播需要继承 JPush 提供的 JPushMessageReceiver 类, 并如下新增一个 Intent-Filter -->
        <receiver
            android:name="自定义 Receiver"
            android:enabled="true"
            android:exported="false" >
            <intent-filter>
                <action android:name="cn.jpush.android.intent.RECEIVER_MESSAGE" />
                <category android:name="您应用的包名" />
            </intent-filter>
        </receiver>


        <!--Required SDK核心功能 since 3.3.0,主要用来统一各大推送厂商跳转逻辑,透明窗体也是为了通知跳转时候,保持UI效果一致。-->
        <activity
            android:name="cn.jpush.android.service.JNotifyActivity"
            android:exported="true"
            android:taskAffinity=""
            android:theme="@style/JPushTheme">
            <intent-filter>
                <action android:name="cn.jpush.android.intent.JNotifyActivity" />
                <category android:name="android.intent.category.DEFAULT" /><!--Required SDK核心功能 since 4.2.2-->
                <category android:name="您应用的包名" />
            </intent-filter>
        </activity>
        <!-- since 4.6.0 Required SDK核心功能,各大推送厂商跳转 备份Activity。防止JNotifyActivity 被封后,通知不能跳转。 -->
        <activity
            android:name="cn.android.service.JTransitActivity"
            android:exported="true"
            android:taskAffinity=""
            android:theme="@style/JPushTheme" >
            <intent-filter>
                <action android:name="cn.android.service.JTransitActivity" />
                <category android:name="android.intent.category.DEFAULT"/>
                <category android:name="${applicationId}" />
            </intent-filter>
        </activity>
        <!-- since 5.0.0 Required SDK核心功能 -->
        <provider
            android:name="cn.jpush.android.service.InitProvider"
            android:authorities="${applicationId}.jiguang.InitProvider"
            android:exported="false"
            android:readPermission="${applicationId}.permission.JPUSH_MESSAGE"
            android:writePermission="${applicationId}.permission.JPUSH_MESSAGE" />
        <!-- Required. For publish channel feature -->
        <!-- JPUSH_CHANNEL 是为了方便开发者统计 APK 分发渠道。-->
        <!-- 例如: -->
        <!-- 发到 Google Play 的 APK 可以设置为 google-play; -->
        <!-- 发到其他市场的 APK 可以设置为 xxx-market。 -->
        <meta-data android:name="JPUSH_CHANNEL" android:value="developer-default"/>
        <!-- Required. AppKey copied from Portal -->
        <meta-data android:name="JPUSH_APPKEY" android:value="您应用的 Appkey"/>
    </application>
</manifest>
Technical support
When something goes wrong:
- Please read carefully Android FAQ Document to see if anything is missing.
- you can arriveJiguangCommunity search for similar questions
- for us support Send email support@jiguang.cn
In order to solve the problem more quickly, please provide the following information when asking for help:
- The product you need to consult is JPush, whether used simultaneouslyJiguangOther products
- what are you calling API, the parameters passed, the complete error message, and the time point when the exception occurred.
- If you cannot receive the message, provide the application's Appkey, news Message ID, of the device registration ID information
- in the case of SDK Please provide corresponding questions SDK Version and complete log records, log information please use TXT File upload
- The abnormal device is Android, list specific models and systems

